
Related Manuals for PASI Polares 32


Summary of Contents for PASI Polares 32
- Page 1 PASI User manual Polares 32 P.A.S.I srl – via Galliari 5/E – 10125 TORINO – Italy Tel. +39 011 650.70.33 – Fax +39 011 658.646 - E-mail sales@pasisrl.it www.pasisrl.it...
- Page 2 Errore. Per applicare Heading 1 al testo da visualizzare in questo punto, utilizzare la scheda Home. POLARES 32...
-
Page 3: Table Of Contents
What is the difference with conventional DC electrical tomography? ......5 Why is POLARES32 an innovative instrument? ............6 What are the main strengths of POLARES 32? ............6 POLARES32 main features ..................8 Automatic adjustment of current and voltage output values ........8 Mode of use ...................... - Page 4 Insights ........................45 Meaning of Sigma value ..................45 Format of the files used ....................45 Output GPD format ....................46 Input and output BPD format .................. 46 Output TXT format ....................46 Appendixes ......................48 Technical specifications ....................48 POLARES 32...
- Page 5 GPD file format ......................49 General structure ..................... 49 File header ....................... 50 Electrodes table ....................... 54 Measurements table ....................55...
-
Page 7: Important Notice
Important notice All rights to this manual are owned solely by P.A.S.I. srl. All rights reserved. Copying this manual (without the written permission of the owner) for printing, copying, recording or by any other means, translating all or part of the manual into any other language, including all programming languages, using any electrical, mechanical, magnetic, optical, manual or other methods is prohibited. -
Page 8: Warranty Information And Safety Notes
Correct and safe operation can only be guaranteed if the instrument is properly transported, stored and treated. - To avoid damage, use only original accessories or those approved by PASI srl. - The case containing the instrument is only waterproof when closed. Once the... -
Page 9: Contents
1. Introduction The Polares 32 instrument is a device made and assembled by P.A.S.I. srl, a leading Italian company in the production of instruments for geology and geophysics. This guide lists the technical specifications and explains how to use the device. -
Page 10: Electrical Imaging System For Tomography Polares 32
2. Electrical imaging system for tomography Polares 32 A brief introduction POLARES 32 is a lightweight, easy-to-carry and fast AC electrical imaging system for tomography. It is designed to accurately measure AC currents and voltages in order to provide the user with apparent resistivity and phase values in the frequency domain. -
Page 11: Why Is Polares32 An Innovative Instrument
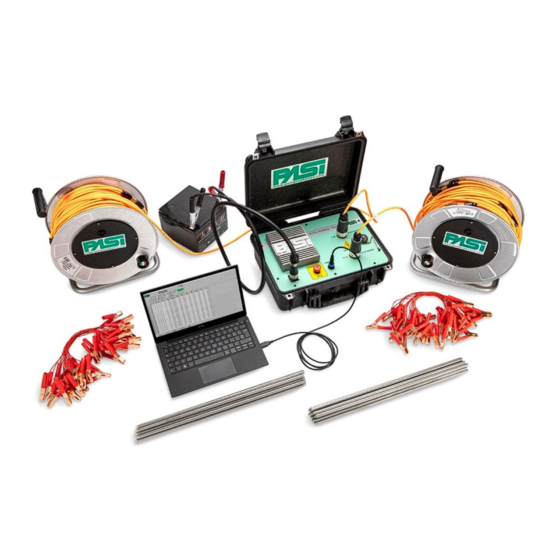
What are the main strengths of POLARES 32? - COMPLEX RESISTIVITY ACQUISITION: being designed as an AC system, POLARES32 involves both the conduction and polarisation properties of the material under investigation. - Page 12 EM coupling along the wires between the transmission and measurement circuits. - MODULARITY: POLARES32 contains, integrated in a robust Peli case, the transmission and measuring system, all the necessary guards and also 2xMPX (Multiplexer) with 16 electrodes each (for the first 32 electrodes). Additional external POLARES 32...
-
Page 13: Polares32 Main Features
MPXs (16 el. each) can be connected externally to POLARES32 to increase the number of electrodes following the first 32 (thus implementing the number of electrodes to 48, 64, 80, 96, etc.). POLARES32 main features • Transmitter and receiver in one unit; power supply via external battery of any type (lead, lithium, etc.) from 8.5 to 15V •... - Page 14 Accuracy: standard 0.15% max 1% from -20 °C to 70 °C Chargeability accuracy (measurement): 0.1% Power supply: external (8.5V = to 15V =) lead-acid or lithium battery, internal 30 A fuse, reverse polarity protection, power cable supplied, battery to be sourced locally by customer. POLARES 32...
-
Page 15: Mode Of Use
It should be remembered that the instrument uses potentially lethal electrical voltages and currents; this means that the POLARES 32 instrument must be used by specially trained personnel who have the necessary knowledge of the theoretical principles and methods of measuring electrical resistivity in the soil, whether by quadripole or multi-electrode tomographic methods. -
Page 16: Test Plug To Check Operation Of Mpx And Mpx Extension Cable
We would like to remind you here of the importance of the test plug which you found in the holder inside the lid of the POLARES 32 case. Although it can also be performed on field it is advisable to perform this procedure before going to the building site. - Page 17 2: I , 1/ IGURE NTERNAL S TEST A AND 3: E 2, 3, ... IGURE XTERNAL S TEST...
-
Page 18: Hardware And Logic Electrodes
POLARES 32 would be: 16–15–14–13–12–11–10–9–8-7–6–5–4-3-2-1 while on the right would be:... - Page 19 4: C IGURE ONFIGURATION WITH ELECTRODES Acquiring this concept, thanks to the software functions described later in the manual, it will be possible to define an arbitrary position for each electrode (logic electrode) independently of their hardware position. After planning the stringing procedure (purpose of the measurement, type of stringing, logistics, etc.), the field is prepared for the measurement by first clearing a strip (in the case of linear measurements) or an area (in the case of 3D measurements) so that the electrodes (stakes) and the measuring cable are clearly visible.
- Page 20 Home. 5: E IGURE LECTRODE CONNECTION Next, connect the cables to the MPXs (remember that the first 2 MPXs are internal to the Polares 32) using the cable outputs on each MPX (“TO ELECTRODES” connector). 6: P IGURE OLARES PANEL The first 16 stakes will be connected to the POLARES connector identified as “1-16...
- Page 21 7: P IGURE OLARES CONNECTIONS 8: P IGURE OLARES COMPLETE SYSTEM WITH ELECTRODES If a stringing with more than 32 electrodes is expected, one or more yellow MPX extensions should be used (Figs.9 and 10). In the case of 5m cable spacing, these extensions are 85m each;...
- Page 22 Errore. Per applicare Heading 1 al testo da visualizzare in questo punto, utilizzare la scheda Home. supplied for each multi-electrode cable, joined together with an adapter (included in the supply). 9: MPX IGURE EXTENSION 10: C IGURE ONFIGURATION WITH ELECTRODES OR MORE POLARES 32...
- Page 23 11: S MPX) IGURE YSTEM COMPLETE WITH ELECTRODES WITH EXTERNAL...
-
Page 24: Getting Started
Errore. Per applicare Heading 1 al testo da visualizzare in questo punto, utilizzare la scheda Home. 4. Getting started This chapter lists the sequences of steps in the Polares 32 control programme to perform the most common operations. See Chapter 5 for a description and explanation of all the commands. -
Page 25: Moving On To The Measurement Session
The system will prompt the operator to choose the directory and file name in BPD (Binary Pasi Data) format in which the measurement session and all related values, as well as the measurements taken, will be saved. After this operation, the session file will be saved and available for the operator to view and execute, without the need to open the corresponding template. -
Page 26: Displaying And Continuing A Measurement Session
From the window, the measurement session file of interest must be selected and pressing the “OK” button will proceed to display the session. This mode of opening session files can be used for any type of session, whether no measurements have been taken, completed or partially completed. POLARES 32... -
Page 27: Description Of The Polares 32 Programme
PC and has been correctly recognised by the programme (display of an image of the Polares system) connected image displayed). 12: H IGURE OMEPAGE OF THE OLARES PROGRAMME WITH THE INSTRUMENT NOT CONNECTED Figure 4.1 shows the main window with the Polares 32 system not connected to the PC. - Page 28 Errore. Per applicare Heading 1 al testo da visualizzare in questo punto, utilizzare la scheda Home. Figure 4.2 shows the homepage as it appears when the Polares 32 system is connected to the PC via the USB cable and is correctly powered. The table shows the information relating to the Mpx (multiplexer) associated with the system: in the case of the image, there are the two internal Mpx 1/A and 1/B, each with 16 electrodes, and no external Mpx.
-
Page 29: Templates
Mpx or one connected externally to the system. • Template Management: allows the deletion of session templates which are no longer of interest, the export of templates for use on another Polares 32 system or the import of templates from another Polares 32 system. •... -
Page 30: Templates Display
XXX you will find the title of the page that can be reached (Session parameters, Electrodes, Measurements); • “>> XXX”: allows you to reach the next page of the four pages listed above, instead of XXX you will find the title of the page that can be reached (Electrodes, Measurements, Electrical parameters); POLARES 32... -
Page 31: Session Parameters
• “Go to Measurements Session”: allows you to save the parameters of the template displayed within a session GPD file and to move to the measurement session display windows (see section 4.3). The function is described in section 4.2.7; • “Save Template”: allows changes made to a template to be saved so that the configuration of interest can be easily recalled. -
Page 32: Electrodes
Custom files tomography, this mode of input of the electrodes involved in each measurement will be described in section 4.2.9. ◦ • “Number of levels”: is the parameter that measurement methods use to calculate electrode positions. The number next to the indication “Real number of levels” indicates POLARES 32... -
Page 33: Electrodes Configuration
whether the number of levels actually applied, as a result of the measuring method and the number of electrodes used, is lower than the number of levels configured by the operator. The parameter can range from 1 to 10. • “Max n factor”: is the parameter that the Wenner-Schlumberger and Dipole-dipole methods use to calculate the position of the electrodes. -
Page 34: Measurements Configuration
K with the position of the 4 electrodes used. This table is automatically created by the system on the basis of the input data from the Session parameters window, and cannot be modified by the operator. POLARES 32... - Page 35 16: M IGURE EASUREMENTS TABLE FOR A TEMPLATE The table shows a measurement per line and consists of the following columns: • measurement identification number; • “A”: identification of the logical electrode that will play role A in the measurement, cannot be changed by the operator; •...
-
Page 36: Electrical Parameters
“Max. attempts”: defines the maximum number of cycles to be performed for a measurement; when this number of cycles is reached the measurement will still be terminated, even if the Max. sigma value has not been reached. • “Frequency”: value used for performing the measurement. POLARES 32... -
Page 37: Moving On To Measurement Sessions
Polares 32 programme. If a template name already exists, the operator will be asked whether he/she wants to overwrite the template or not. -
Page 38: Format Of The Measurement Input File
An example of starting a file with measurements on 4 electrodes is shown: n,m,b,a 1,2,3,4 2,3,4,5 3,4,5,6 Below is an example of starting a file with pole-dipole measurements: C1, C2, P2, P1 1, 0, 3, 2 1, 0, 4,3 2,0, 13,15 POLARES 32... -
Page 39: Measurement Sessions
Opening a measurement session previously saved on the PC is performed from the homepage of the Polares 32 programme by pressing the “Measurement sessions” button. A window will open allowing the user to navigate through the directories on your PC's disk. -
Page 40: Editing The Parameters
Testing the electrodes The electrode test function is located within the electrode parameter display window and allows the user to check the correct functioning of the electrodes and their connections. POLARES 32... -
Page 41: Performing And Deleting The Measurements
18: T IGURE ESTING THE ELECTRODES To perform the test, simply select the electrodes to test in the Test column and then press the “Test Electrodes” button. The system will proceed with testing one electrode at a time, displaying the result in the “Test Result” column. Performing and deleting the measurements The execution of measurements for a session must be controlled from the Measurements window for the session of interest. - Page 42 ◦ a numerical value that identifies the type of error found during the measurement; an incorrect measurement is highlighted in red. POLARES 32...
- Page 43 • R: value of the resistance calculated. • Rho: resistivity value calculated from measurements of resistance and geometric constant K. • Sigma: mean square deviation value calculated on the repetitions of the measurement reported as a percentage of the measurement value. •...
-
Page 44: Pseudo-Section
The measurement session file is automatically saved in proprietary GPD format by the Polares 32 programme, therefore no explicit saving of data to file by the operator is necessary; however the explicit saving functionality is provided to the operator for the reasons listed below. -
Page 45: Template Management
◦ Log file (txt), proprietary text format for obtaining the log of measurements performed in the event of a malfunction of the Polares 32 system. Template management Template management on the PC can be done by pressing the “Manage Template” button from the homepage as the templates are not directly accessible on the PC disk to the operator. -
Page 46: Delete Template
PC and recognised before opening the navigation and directory selection window. The template is saved as a text file in GPD format. The file can be copied onto removable storage medium or sent by e-mail to be imported as a template on another Polares 32 system using the import function. -
Page 47: Multiplexer Test
The System screen is used to obtain information about system versions, the update status of the installed software (only if the PC has an Internet connection) and to configure certain parameters of the Polares 32 programme. The configurations that can be implemented are as follows. - Page 48 FIRST PAGE By pressing the “Preferences” button it is possible to reach the page for the configuration of further parameters related to the GUI of the Polares 32 system, listed below. • Linear measurement unit: the operator can choose whether to display measurements in metres or in yards.
-
Page 49: Software Upgrades
Pasi: the new software version will be installed together with all the necessary drivers. In the System window (accessible from the homepage), if the PC is connected to the Internet, you can check the update status of the Polares 32 programme, see section 4.6. -
Page 50: Insights
Format of the files used The Polares 32 system makes three different proprietary file formats available to the operator. POLARES 32... -
Page 51: Output Gpd Format
The GPD (Geophysics Pasi Data) format is used to export the measurement sessions made by the Polares 32 system to third party systems. This format is used for exporting data at the end of the execution of the measurement session previously automatically saved in BPD format by the system. - Page 52 Errore. Per applicare Heading 1 al testo da visualizzare in questo punto, utilizzare la scheda Home. abnormal situations occur. Under normal system operating conditions, this format is not normally used. POLARES 32...
-
Page 53: Appendixes
6. Appendixes Technical specifications External data port (only connection) Connectivity Optional connectivity Ethernet, Wi-Fi, Bluetooth, RS232, RS485, USB client, GPS, etc. (via external PC) USB GPS receiver for georeferencing measurements to be connected to an external PC DSP (Digital Signal Processing) ATMEL Cortex M4 120 Mips Converter A/D 24 bit... -
Page 54: Gpd File Format
Home. GPD file format The GPD (Geophysics Pasi Data) format is the proprietary format that is used by the PASI Polares 32 system for storing and exporting electrode geometry data and measured electrical data related to a measurement session and stored in files. The features of the... -
Page 55: File Header
• a line at the beginning of the file containing the string “*** Do not manually edit the GPD file ***”; • a header with information about the whole measurement session; • an “Electrodes” table showing the identification and position of the electrodes used to take the session measurements;... - Page 56 If not populated, the value must be “TBD”. • “Electrodes_distance [m]”: distance between two contingent electrodes in a tomography session. If the parameter is not applicable, it will be set to “NA”. POLARES 32...
- Page 57 • “Levels_number”: maximum number of levels to be achieved in one tomography session. If the parameter is not applicable, it will be set to “NA”. • “n”: maximum value of parameter n to be applied in a tomography session. If the parameter is not applicable, it will be set to “NA”.
- Page 58 Method TOM - Wenner Alfa Electrodes_sequence AMNB Standard_electrodes_position Standard Measures_number Measures_done 0 Measurements_unit Longitude_O Latitude_O Altitude_O Azimut_X TBD Electrodes_distance [m] 5.0 Levels_number 2 Electrodes_number Topological_Information Linear X Note Spare_1 NA Spare_2 NA Spare_3 NA Lap_number Sigma_max Frequency Max_retry POLARES 32...
-
Page 59: Electrodes Table
Max_phase Multiple_acquisition false Multiple_interval Multiple_number Electrodes table The structure of the electrodes table is as follows. • A title line containing the string “Logical - Physical electrodes mapping”. • A line indicating for each column of the table which data is reported, it contains the string: “Logical_id Mux_id Electrodes_id X_position... -
Page 60: Measurements Table
“A”, “B”, “M”, “N”: the fields show the logical identifier of the four electrodes which, in the given measurement, assume each of the roles. The identifier “0” is used to indicate that no electrode is associated with the measurement in that role. Values are strings of integer numbers. POLARES 32... - Page 61 • “R=dV/I[Ohm]”: value of the resistance measured. It is indicated as decimal positive number. • “Rho[Ohm/m]”: resistivity value calculated from measurements of resistance and geometric constant K. It is indicated as decimal positive number. • “Sigma[%]”: mean square deviation value calculated on the repetitions of the measurement reported as a percentage of the measurement value.
- Page 62 0.59 28.29 2020-12-22 09:18 0.0 0.00 31.20 56.24 1.218 617.2 0.005 0.61 28.29 2020-12-22 09:18 0.0 0.00 31.20 150.05 3.170 602.8 0.015 0.66 28.29 2020-12-22 09:18 0.0 0.00 31.20 191.57 4.401 654.8 0.069 0.63 28.29 2020-12-22 09:18 0.0 0.00 31.20 POLARES 32...
Need help?
Do you have a question about the Polares 32 and is the answer not in the manual?
Questions and answers