
Related Manuals for Invacare Matrx MX1


Summary of Contents for Invacare Matrx MX1
- Page 1 Invacare® Matrx® Model IMX1 Back Cushion User Manual This manual MUST be given to the user of the product. BEFORE using this product, read this manual and save for future reference.
- Page 2 © 2011 Motion Concepts. All rights reserved. Republication, duplication or modification in whole or in part is prohibited without prior written permission from Motion Concepts. Trademarks are identified by ™ and ®. All trademarks are owned by or licensed to Motion Concepts or its subsidiaries unless otherwise noted. Invacare® Matrx® MX1 Part No. 1171914...
-
Page 3: Table Of Contents
Installing the Band Clamps................17 Overview .....................4 Installing the Back....................17 Important Information ................4 Adjusting the Back Height ................19 Invacare Matrx MX1 ................4 Adjusting the Back Angle and Back Depth..........20 After Installation ....................20 Outer Cover..................5 QUICK RELEASE DUAL MOUNT Limited Warranty - North America ............5 Installation Overview..................21... -
Page 4: General
The Invacare Matrx MX1 back includes a movable foam lumbar pad that can be installed/inserted behind the existing foam cushion to provide additional positioning capability. Refer to Options on page 28 for instructions on how to insert and adjust your lumbar support. -
Page 5: Outer Cover
This warranty gives you specific legal rights and you may also have other legal rights which vary from state to state. Invacare/Motion Concepts warrants this product to be free from defects in materials and workmanship for two years of use by original purchaser. This warranty does not apply to punctures, tears or burns, nor to the removable cushion cover. -
Page 6: Safety
DO NOT install the Invacare Matrx MX1 assembly onto back canes with an outside diameter greater than 1-inch or less than 3/4-inch. Otherwise, injury or damage may occur. The mounting position of the Invacare Matrx MX1 is directly related to the chair's stability. Use extreme caution when using a new seating position. -
Page 7: Operating Information
IMX11616-RM IMX11609-CF IMX11612-CF IMX11616-CF 17 in (43 cm) IMX11709-RM IMX11712-RM IMX11716-RM IMX11709-CF IMX11712-CF IMX11716-CF 18 in (46 cm) IMX11809-RM IMX11812-RM IMX11816-RM IMX11809-CF IMX11812-CF IMX11816-CF 14 in (36 cm) - 18 in (46 cm) IMX1* Part No. 1171914 Invacare® Matrx® MX1... -
Page 8: Mono Mount
Included Items • Back Shell with Foam and Cover • Rigidizer Bracket • Tracking Plate • Band Clamp Assemblies Tools Required • Tape measure/ruler • 4mm hex key (provided) Invacare® Matrx® MX1 Part No. 1171914... -
Page 9: Installing The Mounting Hardware
The compression bar hardware must be loosened to ensure the rigidizer bracket rests flush against the rigidizer bar D. The rigidizer bar is shown in the illustration for reference only. Part No. 1171914 Invacare® Matrx® MX1... - Page 10 The pins should slide into position with little effort. If the pins are difficult to insert, verify that the band clamp is properly centered and fully seated inside the slots of the rigidizer bracket. STANDARD INSTALLATION Invacare® Matrx® MX1 Part No. 1171914...
-
Page 11: Installing The Tracking Plate On The Back Shell
Install the back shell. Do not fully tighten the compression bar at this time. 12. Install the tracking plate. Refer to Installing the Tracking Plate on the Back Shell on page 11. Part No. 1171914 Invacare® Matrx® MX1... -
Page 12: Installing The Back Shell Onto The Mounting Hardware
Adjust the back angle. Refer to Adjusting the Back Angle. Adjust the back height. Refer to Adjusting the Back Height on page 12. 2 & 6 TOP VIEW Invacare® Matrx® MX1 Part No. 1171914... -
Page 13: Adjusting The Back Angle
Verify that all mounting hardware is properly tightened and the back is held firmly in place on the rigidizer bar. Part No. 1171914 Invacare® Matrx® MX1... -
Page 14: Removing The Mono Mount Hardware
Adjusting this screw may prevent the compression bar from tightening properly onto the back cane. Use a hex key H to push out the locking pins I from the rigidizer bracket. Separate the rigidizer bracket from the band clamp. Invacare® Matrx® MX1 Part No. 1171914... -
Page 15: Fixed Dual Mount
Before beginning the installation process, please fully read through the instructions to understand the steps and adjustments involved. If you have any questions or concerns during the installation process, please contact our customer service department. Part No. 1171914 Invacare® Matrx® MX1... -
Page 16: Installing The Angle Adjustable Brackets Onto The Back Shell
20. Repeat STEPS 2-5 for the other bracket. Repeat STEPS 1-3 for the opposite side. After any adjustment, re-tighten the three screws to secure the clamp body to the angle adjustable bracket. Invacare® Matrx® MX1 Part No. 1171914... -
Page 17: Installing The Band Clamps
Align and insert the tabs A on the band clamp B with the slots C Ensure both locking pins are fully inserted. in the clamp body D. Ensure the band clamp is fully inserted into the clamp body. Part No. 1171914 Invacare® Matrx® MX1... - Page 18 DO NOT adjust the center screw in the clamp body. The center screw F is designed only to hold the compression bar in place during installation. Adjusting this screw may prevent the compression bar from tightening properly onto the back cane. Invacare® Matrx® MX1 Part No. 1171914...
-
Page 19: Adjusting The Back Height
Tighten the compression bar hardware to secure the clamp bodies C in place. When re-tightening the compression bar hardware, alternate back and forth between the screws until the compression bar is fully secured. Part No. 1171914 Invacare® Matrx® MX1... -
Page 20: Adjusting The Back Angle And Back Depth
Ensure that the back is securely attached to the wheelchair. achieve the desired back angle and back depth. Angle and depth adjustments must be made equally on both sides. Tighten the screws on both clamp bodies to secure the back into position. Invacare® Matrx® MX1 Part No. 1171914... -
Page 21: Quick Release Dual Mount
Before beginning the installation process, please fully read through the instructions to understand the steps and adjustments involved. If you have any questions or concerns during the installation process, please contact our customer service department. Part No. 1171914 Invacare® Matrx® MX1... -
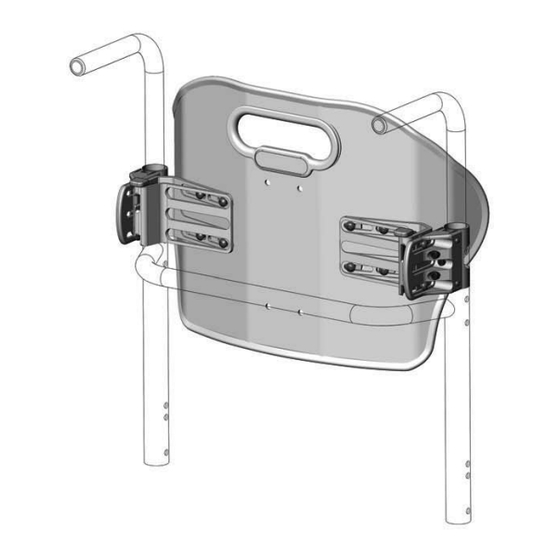
Page 22: Installing The Adjustable Mounting Brackets Onto The Back Shell
Loosely attach the adjustable mounting bracket to the back shell using the two backing plates, four hex screws and four washers. Do not tighten the hex screws at this time. Repeat STEPS 2-5 for the other bracket. Invacare® Matrx® MX1 Part No. 1171914... -
Page 23: Installing The Band Clamps
Carefully slide the two components together. bracket. Ensure that the clamp is fully inserted inside the slots on the clamp Ensure the pins are fully seated into the clamp body. body. Repeat STEPS 1-2 for the opposite side. Part No. 1171914 Invacare® Matrx® MX1... -
Page 24: Securing The Clamp Body Assembly To The Back Cane
Repeat STEPS 1-3 for the opposite clamp body assembly. The clamp bodies must be at the same height on each side of the back cane. Otherwise the back may not install correctly or at all. Invacare® Matrx® MX1 Part No. 1171914... -
Page 25: Installing The Back
Lift the lever F on the adjustable mounting bracket to unlock it. Insert the upper and lower pins G into the notches H in the adjustable mounting bracket. Part No. 1171914 Invacare® Matrx® MX1... -
Page 26: Adjusting The Back Height
Tighten the compression bar hardware to secure the clamp bodies E in place. When re-tightening the compression bar hardware, alternate back and forth between the screws until the compression bar is fully secured. DETAIL A DETAIL B Invacare® Matrx® MX1 Part No. 1171914... -
Page 27: Adjusting The Back Angle And Back Depth
Angle and depth adjustments must be made equally on Lift the back cushion up and forward to disengage it from the both sides. mounting pins. Tighten the screws on both clamp bodies to secure the back into position. Detail A Detail B Part No. 1171914 Invacare® Matrx® MX1... -
Page 28: Options
The position of the lumbar insert can be adjusted inside the Invacare Matrx MX1 cover, or it may be removed if no lumbar support is desired To access the lumbar support, open the hook and loop fastening strips on the outer cover A at the bottom rear of the back shell. -
Page 29: Installing The Optional Privacy Flap
It may be necessary to install the the double sided hook strip F onto the privacy flap to secure it to the seat. Part No. 1171914 Invacare® Matrx® MX1... -
Page 30: Maintenance
DO NOT use the product. Install the cover onto the back shell. Otherwise injury may occur. 10. Install the lumbar support. Refer to Installing/Adjusting the Lumbar Support on page 28. Invacare® Matrx® MX1 Part No. 1171914...
Need help?
Do you have a question about the Matrx MX1 and is the answer not in the manual?
Questions and answers