Samsung SyncMaster 152T User Manual
Samsung syncmaster 152t: user guide
Hide thumbs
Also See for SyncMaster 152T:
- User manual (70 pages) ,
- Manual del usuario (70 pages) ,
- User manual (69 pages)

Related Manuals for Samsung SyncMaster 152T


Summary of Contents for Samsung SyncMaster 152T
- Page 1 SyncMaster 152T/172T/192T http://www.samsung-monitor.com http://www.samsungusa.com/monitor BN68-00150M-00...
-
Page 2: Table Of Contents
Safety Instructions Unpacking Your Monitor Setting up Your Monitor Connecting Your Monitor Self-Test Feature Check Warning Messages Environment Useful Tips Adjusting Your Monitor User Controls Menu Brightness Contrast Image Lock Fine Coarse H-Position V-Position Reset Geometry Reset Color Reset Color Temperature... -
Page 3: Safety Instructions
15. Do not remove cover(or back). No user serviceable parts inside. 16. If your monitor does not operate normally - in particular, if there are any unusual sounds or smells coming from it - unplug it immediately and contact an authorized dealer or service. -
Page 4: Unpacking Your Monitor
Unpacking Your Monitor Monitor and Stand Please make sure the following items are included with your monitor. If any items are missing, contact your dealer. 152T/172T Auto Exit Menu Source DC-Adapter VESA Mounting Bracket For Multimedia model (Option) Multimedia Speaker Stand... -
Page 5: Setting Up Your Monitor
Connecting Your Monitor Rear of Monitor 1. Connect the DC Adapter for your monitor to the power port on the back of the monitor. Plug the power cord for the monitor into a nearby outlet. 2-1. Using the D-sub (Analogue) connector on the video card. - Page 6 Setting up Your Monitor Connecting Your Monitor Setup-For Multimedia model 1. PC sound connection terminal (Input) 2. Headphone connection terminal (Output) 3. Volume 4. To listen in privacy, connect headphones here. 5. Connect a sound cable from the input source (sound card, computer, CD-ROM drive).
-
Page 7: Self-Test Feature Check
4. Turn off your monitor and reconnect the video cable; then turn on both your computer and the monitor. If your monitor screen remains blank after using the previous procedure, check your video controller... -
Page 8: Warning Messages
Environment The location and the position of the monitor may influence the quality and other features of the monitor. 1. If there are any woofer speakers near the monitor, unplug and relocate the woofer to another room. -
Page 9: Adjusting Your Monitor
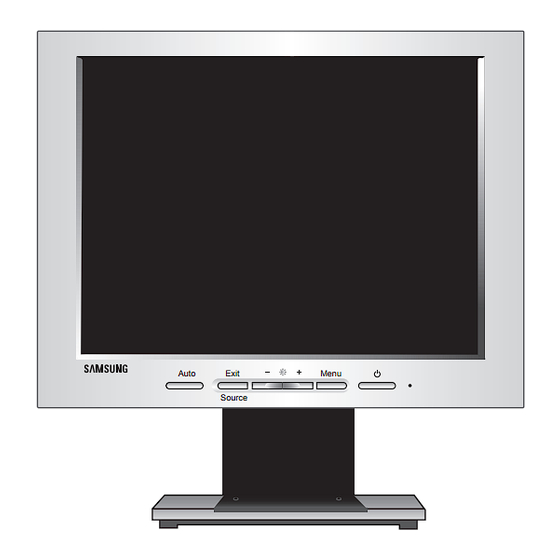
Adjusting Your Monitor User Controls 1. Auto button: Use this button to auto adjustment direct access. 2. Exit button: Use this button to Exit the active menu or the OSD. Source button: When push the 'Source' button, then Selects the Video signal while the OSD is off. -
Page 10: Brightness
Adjusting Your Monitor Brightness Contrast Adjust the Brightness. 1. Push the Menu ( ) button. 2. Push the Menu ( ) button to open the Brightness adjustment screen. 3. Use the + button to increase the brightness or - button to decrease the brightness. -
Page 11: Image Lock
Adjusting Your Monitor Image Lock Fine Image Lock is used to fine tune and get the best image by removing noises that creates unstable images with jitters and shimmers. If satisfactory results are not obtained using the Fine adjustment, use the Coarse adjustment and then use Fine again. -
Page 12: H-Position
Adjusting Your Monitor H-Position V-Position Follow these instructions to change the horizontal position of the monitor's entire display. 1. Push the Menu ( ) button. 2. Push the - button or + button until the H-Position screen is displayed. 3. Push the Menu ( ) button to open the H-Position adjustment screen. -
Page 13: Reset
) button twice to open the Geometry Reset adjustment screen. 4. Push the + button to select Yes. If you don't want to reset the monitor, use the - button to select No. Note: Not Available This function doesn't work in Digital input. -
Page 14: Halftone
Adjusting Your Monitor Color Temperature (192T) Halftone Language Color temperature is a measure of the "warmth"of the image colors. 1. Push the Menu ( ) button. 2. Push the - button or + button until the Color Temperature screen is displayed. -
Page 15: Menu Position
Adjusting Your Monitor Menu Position H-Position You can change the horizontal position where the OSD menu appears on your monitor. 1. Push the Menu ( ) button. 2. Push the - button or + button until the H-Menu Position screen is displayed. -
Page 16: Menu Display Time
-- analog or digital input signal.) Note If you select the Digital mode, you must connect your monitor to the graphic card with a digital port using the DVI cable. 1. Push the Menu ( ) button. -
Page 17: Auto Adjustment
Or push (+) button when OSD screen is not on to access Brightness control directly. Auto adjustment allows the monitor to self-adjust to the incoming video signal. The values of fine, coarse and position are adjusted automatically. 1. Push the Auto button. -
Page 18: Powersaver
This monitor has a built-in power management system called PowerSaver. This system saves energy by switching your monitor into a low-power mode when it has not been used for a certain amount of time. The monitor automatically returns to normal operation when you move the computer's mouse or press a key on the keyboard. -
Page 19: Troubleshooting
Check the signal cable connection. (Connected using the DVI cable) If you still see an (error) message on the screen when the monitor is connected properly, check to see if the monitor status is set to analogue. Press Source button to have the monitor double-check the input signal source. - Page 20 Set the colors properly at the Control Panel, Display, Settings. Set the video card by referring to the video card manual. Install the monitor driver according to the Driver Installation Instructions. Install the monitor driver according to the Driver Installation Instructions.
-
Page 21: Specifications
For example, the no. of TFT LCD pixels that is contained in this product are 2,359,296. Plug and Play Capability This monitor can be installed on any Plug & Play compatible system. Interaction of the monitor and computer systems will provide the best operating conditions and monitor settings. In most cases, monitor installation will proceed automatically, unless the user wishes to select alternate settings. - Page 22 For example, the no. of TFT LCD pixels that is contained in this product are 3,932,160. Plug and Play Capability This monitor can be installed on any Plug & Play compatible system. Interaction of the monitor and computer systems will provide the best operating conditions and monitor settings. In most cases, monitor installation will proceed automatically, unless the user wishes to select alternate settings.
- Page 23 For example, the no. of TFT LCD pixels that is contained in this product are 3,932,160. Plug and Play Capability This monitor can be installed on any Plug & Play compatible system. Interaction of the monitor and computer systems will provide the best operating conditions and monitor settings. In most cases, monitor installation will proceed automatically, unless the user wishes to select alternate settings.
-
Page 24: Display Modes
Refer to the video card manual and adjust the screen as follows. Horizontal Display Mode Frequency (kHz) MAC. 640 x 480 35.000 MAC. 832 x 624 49.726 SyncMaster 152T/172T/192T IBM. 640 x 350 31.469 IBM. 640 x 480 31.469 IBM. 720 x 400 31.469 VESA. 640 x 480 37.500... - Page 25 MEMO...
- Page 26 152_172_192T-vet.qxd 8/25/2003 Höôù n g Daã n An Toaø n Maø n Hình Vi Tính Caø i Ñaë t Maø n Hình Keá t Noá i Maø n Hình Kieå m Tra Chöù c Naê n g Töï Kieå m Thoâ...
-
Page 27: Höôù N G Daã N An Toaø N
152_172_192T-vet.qxd 8/25/2003 Khoâ n g neâ n söû duï n g phích caé m bò hoû n g hoaë c loû n g. Khoâ n g neâ n ruù t phích caé m ra baè n g caù c h keù o daâ y ñieä n cuõ n g nhö khoâ n g neâ n chaï m vaø o phích caé m baè n g tay öôù t . Chæ... -
Page 28: Maø N Hình Vi Tính
152_172_192T-vet.qxd 8/25/2003 Maø n Hình vaø Chaâ n Ñeá Kieå m tra vaä t tö döôù i ñaâ y coù ñöôï c keø m theo maø n hình hay khoâ n g. Neá u khoâ n g ñuû , lieâ n laï c vôù i ngöôø i baù n ñeå yeâ u caà u nhaä n ñuû . 152T/172T Auto Exit... -
Page 29: Caø I Ñaë T Maø N Hình
152_172_192T-vet.qxd 8/25/2003 Keá t Noá i Maø n Hình Maë t sau maø n hình 1. Gaé n boä bieá n ñieä n moä t chieà u cho maø n hình cuû a baï n vaø o coå n g ñieä n nguoà n ôû maë t sau maø n hình. Caé... - Page 30 152_172_192T-vet.qxd 8/25/2003 9:54 PM Page 5 Caø i Ñaë t Maø n Hình Ketá Noiá Manø Hình Caø i ñaë t daø n h cho kieå u maù y Multimedia 1. Khe caé m aâ m thanh PC (Ñaà u vaø o - Input) 2.
-
Page 31: Kieå M Tra Chöù C Naê N G Töï Kieå M
152_172_192T-vet.qxd 8/25/2003 Kieå m tra chöù c naê n g töï kieå m : Maù y tính cuû a baï n coù chöù c naê n g töï kieå m tra, baï n coù theå kieå m tra chöù c naê n g naø y baè n g caù c h: 1. -
Page 32: Thoâ N G Ñieä P Caû N H Baù O
152_172_192T-vet.qxd 8/25/2003 Thoâ n g ñieä p caû n h baù o Neá u tín hieä u vaø o khoâ n g töông thích, moä t thoâ n g ñieä p seõ xuaá t hieä n treâ n maø n hình hoaë c maø n hình seõ ñen maë... -
Page 33: Caù C Phím Ñieà U Chænh
152_172_192T-vet.qxd 8/25/2003 Caù c Phím Ñieà u Chænh 1. Nuù t Auto: Duø n g phím naø y ñeå truy caä p tröï c tieá p cheá ñoä ñieà u chænh töï ñoä n g. 2. Nuù t Exit: Duø n g thoaù t khoû i caù c muï c chænh hay maø n hình hieå n thò. Nuù... -
Page 34: Ñoä Saù N G (Brightness)
152_172_192T-vet.qxd 8/25/2003 Ñoä Saù n g (Brightness) Ñoä Töông Phaû n (Contrast) 9:54 PM Page 9 Söû Duï n g Maø n Hình Duø n g hieä u chænh ñoä saù n g cuû a maø n hình hieå n thò. 1. -
Page 35: Khoù A Hình Aû N H (Image Lock)
152_172_192T-vet.qxd 8/25/2003 Khoù a hình aû n h (Image Lock) 9:54 PM Page 10 Söû Duï n g Maø n Hình Tinh chænh (Fine) Chöù c naê n g Image Lock duø n g ñeå tinh chænh hình aû n h ñeå ñaï t chaá... -
Page 36: Vò Trí Ngang (H-Position)
152_172_192T-vet.qxd 8/25/2003 Vò trí ngang (H-Position) Vò trí doï c (V-Position) 9:54 PM Page 11 Söû Duï n g Maø n Hình Haõ y thöï c hieä n theo nhöõ n g höôù n g daã n naø y ñeå thay ñoå i vò trí ngang cuû... -
Page 37: Caø I Ñaë T Laï I Thoâ N G (Reset)
152_172_192T-vet.qxd 8/25/2003 Caø i ñaë t laï i thoâ n g (Reset) Ñoä noù n g maø u (Color Temperature) 9:54 PM Page 12 Söû Duï n g Maø n Hình Caø i ñaë t laï i thoâ n g soá hình hoï c (Geometry Reset) Caù... -
Page 38: Ñoä Trung Gian Maø U (Halftone)
152_172_192T-vet.qxd 8/25/2003 Ñoä noù n g maø u (Color Temperature) Ñoä trung gian maø u (Halftone) Ngoâ n Ngöõ (Language) 9:54 PM Page 13 Söû Duï n g Maø n Hình (192T) Nhieä t ñoä maø u laø moä t chöù c naê n g ño ñoä "aá m " cuû a maø u saé c hình aû... -
Page 39: Vò Trí Muï C Luï C (Menu Position)
152_172_192T-vet.qxd 8/25/2003 Vò trí Muï c luï c (Menu Position) 9:54 PM Page 14 Söû Duï n g Maø n Hình Vò trí ngang (H-Position) Baï n coù theå thay ñoå i vò trí ngang cuû a nôi xuaá t hieä n muï c luï c OSD treâ... -
Page 40: Thôø I Gian Hieå N Thò Muï C Luï C (Menu Display Time)
152_172_192T-vet.qxd 8/25/2003 Thôø i gian hieå n thò muï c luï c (Menu Display Time) Cheá ñoä hieå n thò (Display Mode) Source Select (192T) 9:54 PM Page 15 Söû Duï n g Maø n Hình Muï ï c luï c seõ töï ñoä n g taé t neá u khoâ n g thöï c hieä n ñieà u chænh naø o trong moä... -
Page 41: Ñieà U Chænh Töï Ñoä N G (Auto Adjustment)
152_172_192T-vet.qxd 8/25/2003 Ñieà u chænh töï ñoä n g (Auto Adjustment) Khoù a /Môû Khoù a (OSD Lock/Unlock) MagicBright (192T) Ghi chuù Maë c duø caù c giaù trò ñaõ ñöôï c caù c kyõ sö choï n löï a caå n thaä n , nhöng caù c giaù trò ñöôï... -
Page 42: Tieá T Kieä M Naê N G Löôï N G
152_172_192T-vet.qxd 8/25/2003 Tieá t Kieä m Naê n g Löôï n g Maø n hình Vi tính ñöôï c xaâ y döï n g heä thoá n g quaû n lyù naê n g löôï n g goï i laø möù c naê n g löôï n g thaá p . Cheá ñoä naø y seõ... -
Page 43: Giaû I Quyeá T Söï Coá
152_172_192T-vet.qxd 8/25/2003 Tröôù c khi goï i ñieä n ñeá n dòch vuï hoã trôï , haõ y ñoï c laï i thoâ n g tin trong phaà n naø y ñeå xem baï n coù theå töï khaé c phuï... -
Page 44: Screen Display
ñoå i card hình aû n h. Baï n seõ thaá y moä t thoâ n g baù o nhö sau: “Unrecognized monitor, Plug & Play (VESA DDC) monitor found”. 9:54 PM Page 19 Giaû i Quyeá t Söï Coá... -
Page 45: Ñaë C Tính Kyõ Thuaä T
Kieå u daù n g vaø ñaë c tính kyõ thuaä t coù theå thay ñoå i maø khoâ n g caà n phaû i baù o tröôù c . 9:54 PM Page 20 Ñaë c Tính Kyõ Thuaä t SyncMaster 152T 15,0 inch theo ñöôø n g cheù o 304,1(ngang) x 228,1 (doï c ) 0,297 (ngang) x 0,297 (doï c ) a-si TFT maø... - Page 46 152_172_192T-vet.qxd 8/25/2003 Ñaë c Tính Chung Kieå u Maù y Maø n hình LCD Kích thöôù c Vuø n g hieå n thò Kích thöôù c ñieå m aû n h Loaï i Goù c nhìn Hieå n Thò Ngang Doï...
- Page 47 152_172_192T-vet.qxd 8/25/2003 Ñaë c Tính Chung Kieå u Maù y Maø n hình LCD Kích thöôù c Vuø n g hieå n thò Kích thöôù c ñieå m aû n h Loaï i Goù c nhìn Hieå n Thò Ngang Doï...
-
Page 48: Cheá Ñoä Hieå N Thò
Taà n soá cuû a söï laë p laï i naø y ñöôï c goï i laø taà n soá queù t doï c . Ñôn vò : Hz. 9:54 PM Page 23 Cheá Ñoä Hieå n Thò Taà n soá queù t Xung clock doï c (Hz) SyncMaster 172T/192T 35,000 66,667 49,726 74,551 SyncMaster 152T/172T/192T 31,469 70,086 31,469 59,940 31,469 70,087 37,500 75,000 37,861 72,809 35,156... - Page 49 152_172_192T-vet.qxd 8/25/2003 9:54 PM Page 24 MEMO...
Need help?
Do you have a question about the SyncMaster 152T and is the answer not in the manual?
Questions and answers