Sangean MMR-99DAB - DAB+, FM, Bluetooth, AUX Digital Radio Manual
- Operating instruction (20 pages)
Advertisement
- 1 Introduction
- 2 Getting started
- 3 Listening to DAB radio
- 4 Listening to FM radio
- 5 Listening to music via Bluetooth streaming
- 6 Using the Auxiliary input socket and headphones socket
- 7 Specifications
- 8 Documents / Resources
Introduction

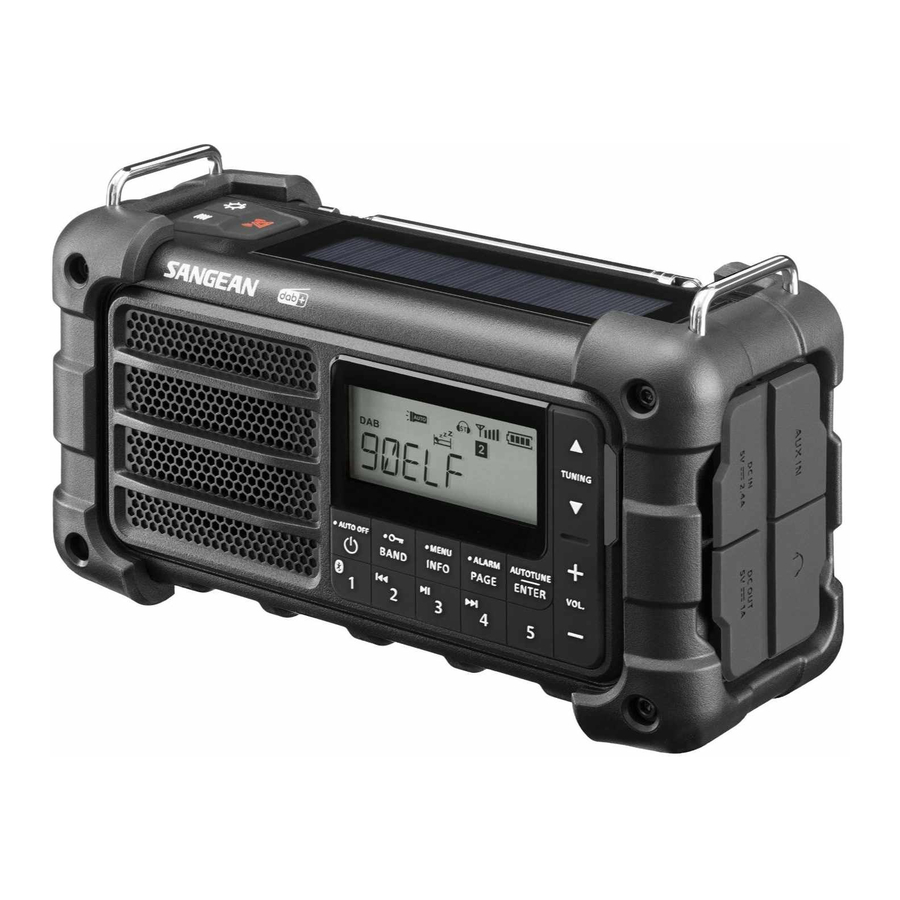
Overview of the main unit
- LED Flashlight / Emergency light button
- Emergency signal button
- Solar panel
- Illumination mode button
- Speaker
- Power / Auto off button
- Band / Lock button
- LCD display
- Info / Menu button
- Page / Alarm button
- Enter / Autotune button
- Tuning up / down button
- Bluetooth LED indicator
- Charging LED indicator
- Volume up / down button
- Preset 5 button
- Preset 4 / Next track / Fast forward button
- Preset 3 / Play / Pause button
- Preset 2 / Previous track / Rewind button
- Preset 1 / Bluetooth pairing button
- Low beam (red)
- High beam (white)
- Low beam (white)
- Hand strap
- Telescopic antenna
- Dynamo power hand crank
- DC IN socket (USB Type-C, 5V2.4A)
- DC OUT socket (USB Type-A, 5V1A)
- Auxiliary input socket
- 3.5mm headphones socket
LCD display and indicators
- FM indicator
- RDS indicator
- Emergency light indicator
- Lock indicator
- FM stereo indicator
- Signal strength indicator
- Battery indicator
- Preset indicator
- Sleep indicator
- Time and radio frequency
- Alarm indicator
- Aux indicator
- DAB indicator
Getting started
Powering the radio
The MMR-99DAB is powered by a built-in 2,600mAh Lithium-ion battery. This battery can be charged by connecting a USB power source to the radio's DC IN socket, by using the hand crank at the back of the radio or using the solar panel on top of the radio.
Before using the radio for the first time, it is recommended to fully charge the radio's builtin battery using the radio's DC-in socket and a USB power source.
Fully charging the battery using USB power takes approx. 3 hours. The battery indicator will disappear from the display when the radio's battery is fully charged. Reduced power, distortion, stuttering sounds, or an empty battery icon flashing on the radio's display are all signs that the battery needs to be recharged. The radio can play approx.10 hours when the battery is fully charged. The radio can play approx.10 hours when the battery is fully charged.
Charging the battery using the DC IN socket
Follow these steps to charge the battery using the radio's DC IN socket:
- Connect the type-C end of the supplied USB charging cable to the DC IN socket on the right side of the radio.
- Connect the other end of the USB charging cable to a USB Type-A port (for example of a PC, USB charger or powerbank).
Note:
It is recommended to use a USB power source supplying 5V / 2.4A to prevent battery failure and to make sure the radio's DC OUT socket can also be used while charging the battery.
Charging the battery using the hand crank
Follow these steps to charge the battery using the hand crank at the back of the radio:
- Before using the hand crank, make sure the telescopic antenna is retracted and placed back in its rest.
- Take the hand crank from its rest position.
- Rotate the hand crank clockwise or counterclockwise at approx. 100 rotations per minute. The Charging LED indicator next to the radio's display will light up green while the battery is being charged.
- After you have finished charging the radio using the hand crank, place the hand crank back in its rest position.
Note:
Under normal listening conditions, each minute of charging using the hand crank adds approx. 5~7 minutes of listening time.
Charging the battery using the solar panel
The radio does not need to be switched on in order for the solar panel to operate.
To recharge the radio's internal battery using solar power, position the radio in such a way that the solar panel receives direct sunlight. The more direct sunlight that shines on the solar panel, the more electricity it can generate to power the radio.
Note:
The best performance of the solar panel will be achieved when the sun is directly overhead, and the sunlight is unobstructed by clouds, foliage, curtains etc. In certain situations and poor light conditions, the solar panel may not be effective and should not be relied upon as the primary energy source for standard usage. The solar panel is designed as a supplementary energy source which under suitable light conditions is able to contribute up to 100% of the radio's energy requirements. The solar panel will charge the battery only under natural sunlight. It will not deliver a charge in artificial light.
DO NOT attempt to charge the battery by placing the solar panel directly under any kind of sun-lamp, this will cause irreversible damage to the radio and may damage the casing. (Doing so will void your warranty.)
Turning the radio on / off
After the radio has been supplied with power, press and hold the Power button to turn on the radio. The radio will automatically switch to the last used mode. To turn off the radio, simply press the Power button.
Note:
If the radio is battery powered, all buttons except the LED Flashlight / Emergency light button, Emergency signal button and Power button will be disabled when the radio is turned off. When connected to a USB power source, the alarm can still be enabled / disabled by pressing and holding the Alarm button and the radio menu can be opened by pressing and holding the Menu button.
Using the LED Flashlight
The MMR-99DAB features three built-in lights that can be used as an LED Flashlight by repeatedly pressing the LED Flashlight button to activate either of the three lights or to turn off the Flashlight feature. The LED Flashlight can always be activated, regardless of whether the radio is turned on or off. After activating one of the three lights, repeatedly press the Illumination mode button to select the illumination mode. The available illumination modes are: High brightness, Low brightness, SOS (Morse Code Distress Signal, three short flashes, three long flashes, three short flashes), and Blinking.
Using the Emergency signal feature
The MMR-99DAB also features an emergency siren and light that can be used to draw attention in case of emergency. The emergency signal can always be activated, regardless of whether the radio is turned on or off. To active the emergency signal, simply press the Emergency signal button. The red low beam light and the white high beam light will now alternately flash and an alarm sound increasing in volume will be played from the radio's speaker.
Using the Key lock feature
The key lock feature can be used to prevent unintentional operation of the radio and will disable all buttons except for the LED Flashlight and Emergency signal buttons.
In order to activate the key lock, simply press and hold the Lock button until the Lock indicator appears on the radio's display. To disable the key lock, press and hold the Lock button again until the Lock indicator disappears from the display.
Using the Sleep timer
The sleep timer allows you to automatically turn off the radio after a preset time has elapsed. It can be set from 15 to 120 minutes by pressing and holding the Power button and releasing it when the desired sleep time is shown on the display.
When the sleep timer is active, the Sleep indicator will be shown on the radio's display. To turn off the sleep timer, either press and hold the Power button until the [OFF] option appears on the display or turn off the radio and then turn it on again.
The radio menu
The radio menu can be opened when the radio is turned on or off and it can be opened from any mode. The menu consists of a number of default items and some items that are specific to the mode in which the menu is opened (if applicable).
To open the radio menu, press and hold the Menu button. Then press the Tuning up / down button to select an item or a value in the menus and press the Enter button to confirm your choice, or press the Menu button to go back one step in the menu or close the menu (if no higher level items are available).
The list below gives an overview of the default items that can be selected from the menu in all of the radio modes. In some of the radio modes, the menu also features additional items specific to the selected mode. These items will be listed in the chapter belonging to that specific mode later in this manual.
[TIME]: Select this item to go to the time submenu featuring the following items:
- [UPDATE]: Select this item to configure the source for automatically updating the time. Select [FM] to update the time when tuning into an FM station with RDS data, select [DAB] to update the time when tuning into a DAB station, or select [NONE] to disable automatic updating of the radio's time.
- [TIME SET]: Select this item to manually set the radio's time and date.
- [12 / 24 HOUR]: Select this item to select the 12 or 24 hour format.
[SW VERSION]: Select this item to view the radio's software version.
[RESET]: Select this item to reset the radio to the default settings. Please note that selecting this item and subsequently selecting [Yes] will reset the radio to its factory settings and all information stored on the radio will be deleted. This includes all settings and stored preset stations.
[LANGUAGE]: This item is not available when opening the menu from the radio's Standby mode.
Select this item to configure the language in which the radio menus are displayed.
[DCOUT]: This item is only available when the radio is not connected to a USB power source. Select this item to enable / disable the radio's DC OUT socket when using battery power (when the radio is connected to a USB power source, the DC OUT socket is always enabled and available for charging when the radio is turned off). To use the DC OUT socket to supply power to an external device when using battery power, this item must be enabled and the radio must be turned off.
[LIGHT]: Select this item to go to the light submenu featuring the following items:
- [B / L]: Select this item to configure the timeout for the radio's backlight. The available options are [30S], [20S], [10S] and [OFF].
- [EL]: Select this item to enable / disable the radio's automatic emergency light feature. This feature automatically activates the white high beam LED when the radio is disconnected from a USB power source. Repeatedly press the LED Flashlight button to turn off the flashlight.
[LOUD]: Select this item to enable / disable the radio's loudness feature.
[ALARM]: Select this item to configure the radio's alarm. After setting an alarm time, the alarm source, alarm frequency and alarm volume can also be selected. The available options for the alarm source are [DAB], [FM], and [BUZ], while the available options for the alarm frequency are [ONCE], [DAILY], [WEEKDAYS], and [WEEKENDS].
Listening to DAB radio
Tuning into DAB stations
To tune into DAB radio stations, follow these steps:
- Turn on the radio by pressing and holding the Power button.
- Select the DAB radio mode by repeatedly pressing the Band button.
- If this is the first time the DAB radio mode is being used, the radio will automatically perform a full scan in order to find all available DAB radio stations. During the scanning process, as new stations are detected the station counter will increase and the stations will be added to the list which is stored in the radio.
- When the full scan has completed, the radio will automatically tune into the first DAB station in the station list and play the station.
- Use the Tuning up / down button to browse through the station list and press the Enter button to tune into the selected station.
Note:
Before selecting the DAB radio mode and tuning into stations, make sure the telescopic antenna at the back of the radio has been fully extended and positioned upright.
The DAB radio menu
In the DAB radio mode, the radio's menu features five additional items specific to this mode:
[FULL SCAN]: Select this option to perform a full scan and store all DAB radio stations that were found in the station list.
[MANUAL]: Select this option to manually tune into a DAB channel / frequency.
[DRC]: Dynamic Range Control (also known as DRC) can make quieter sounds easier to hear when your radio is used in a noisy environment by reducing the dynamic range of the audio signal. Select this item to configure the DRC level, the available options are:
- [0]: DRC is switched off. Broadcast DRC will be ignored. This is the default setting.
- [1 / 2]: DRC level is set to 1 / 2 that sent by broadcaster.
- [1]: DRC is set as sent by broadcaster.
[ORDER]: Select this item to configure the order of the station list. Select [NAME] to order stations by name, select [ENSEMBLE] to sort the station list by DAB multiplex, or select [ACTIVE] to sort the station list by active / inactive stations.
[PRUNE]: Select this item to delete all unavailable stations from the station list.
Storing preset DAB stations
The MMR-99DAB features 4 preset pages containing 5 preset stations for DAB radio (for a total of 20 presets).
To store a DAB station as a preset DAB station, follow these steps:
- Turn on the radio.
- Select the DAB radio mode by repeatedly pressing the Band button and tune into the required DAB station as previously described.
- Repeatedly press the Page button to select the desired preset page.
- Press and hold the desired Preset button (1-5) until the radio's display shows the message "SAVED". The station is now saved as a preset and the corresponding preset indicator will appear on the radio's display.
- Repeat this procedure as needed for the remaining presets. Preset stations cannot be deleted, but they can be overwritten by storing a new station on an already used preset.
Recalling preset DAB stations
To recall a preset DAB station follow these steps:
- Turn on the radio.
- Select the DAB radio mode by repeatedly pressing the Band button.
- Repeatedly press the Page button to select the desired preset page.
- Press the button of the desired preset station (1-5).
Showing DAB information on the display
When listening to a DAB radio station, repeatedly press the Info button to cycle through the following information on the radio's display:
- Text
- Program Type
- Program Name
- Time
- Date
- Frequency
- Bit rate
- Audio Codec
- Signal Strength
- DL Plus text (Some stations may provide other programme related information for the display in addition to the regular text. If none is available, a message "no info" is displayed.)
Listening to FM radio
Tuning into FM stations
To tune into FM radio stations, follow these steps:
- Turn on the radio by pressing and holding the Power button.
- Select the FM radio mode by repeatedly pressing the Band button.
- Press the Tuning up or Tuning down button and then press the Autotune button to automatically tune into an FM station with a higher or lower frequency respectively. Your radio will stop scanning when it finds a station of sufficient strength. The display will show the frequency of the signal which has been found and the Signal strength indicator will indicate the strength of the signal received. If RDS information is available, the RDS indicator will also appear on the radio's display and after a few seconds the display will show the radio station name.
- Press the Tuning up / down button to fine-tune the frequency with steps of 0.05 MHz if needed.
- Repeat the steps 3 and 4 to tune into other radio stations.
Note:
Before selecting the FM radio mode and tuning into stations, make sure the telescopic antenna at the back of the radio has been fully extended and positioned upright.
The FM radio menu
In the FM radio mode, the radio menu features two additional items specific to this mode:
[SCAN]: Select this item to configure the radio's autotune feature. Select [LOCAL] to only have the autotune feature scan for local, strong signals, or select [DISTANT] to have the autotune feature scan for distant, weaker signals as well.
[AUDIO]: Select this item to configure playback in the FM mode. Select [MONO] to force mono playback, or select [Auto] to allow stereo playback if available. Forcing mono playback can help reducing hiss from weak FM signals.
Storing preset FM stations
The MMR-99DAB features 4 preset pages containing 5 preset stations for FM radio (for a total of 20 presets).
To store an FM station as a preset FM station, follow these steps:
- Turn on the radio by pressing and holding the Power button.
- Select the FM radio mode by repeatedly pressing the Band button and tune into the required FM station as previously described.
- Repeatedly press the Page button to select the desired preset page.
- Press and hold the desired Preset button (1-5) until the radio's display shows the message "SAVED". The station is now saved as a preset and the corresponding preset indicator will appear on the radio's display.
- Repeat this procedure as needed for the remaining presets. Preset stations cannot be deleted, but they can be overwritten by storing a new station on an already used preset.
Recalling preset FM stations
To recall a preset FM station follow these steps:
- Turn on the radio by pressing and holding the Power button.
- Select the FM radio mode by repeatedly pressing the Band button.
- Repeatedly press the Page button to select the desired preset page.
- Press the button of the desired preset station (1-5).
Showing FM information on the display
When listening to a FM radio station that is also broadcasting RDS information (the RDS indicator is shown on the radio's display), repeatedly press the Info button to cycle through the following information on the radio's display:
- Station name
- Text message
- Program type
- Frequency
- Reception type (stereo / mono)
- Current time
- Current date
If no RDS information is available, the radio will be unable to display the station name, text message and program type.
Listening to music via Bluetooth streaming
In order to stream Bluetooth music to your radio, you need to pair your Bluetooth device with your MMR-99DAB. Pairing creates a 'bond' so two devices can recognize each other.
Pairing your Bluetooth device for the first time
- Turn on the radio by pressing and holding the Power button.
- Repeatedly press the Band button to select the Bluetooth mode. The radio's display will show the message "PAIRING" and the Bluetooth LED indicator will blink blue to indicate that the radio is available for Bluetooth pairing.
- Activate Bluetooth on your Bluetooth device (refer to the manual of the Bluetooth device if you are unsure about how to active Bluetooth).
- Go to the Bluetooth list on your Bluetooth device and select the device named "MMR99 DAB".
Note:
On some Bluetooth devices with Bluetooth version 2.1 or earlier, you might be requested to enter a pass code. If this is the case, enter the pass code "0000". - After the devices have paired and connected, a confirmation tone will be played on the radio and the radio's display will show the name of the connected Bluetooth device. You can now play music on your Bluetooth device and stream the music through the radio's speaker.
Notes:
- If 2 Bluetooth devices are pairing for the first time, both must search for your radio, it will show its availability on both devices. However, if one device links with this unit first, then the other Bluetooth device won't find it on the list.
- If you take your Bluetooth device out of range, the connection between your device and the radio will be temporarily disconnected. Your radio will automatically reconnect if the Bluetooth device is brought back into range. Be aware that during the period of disconnection, no other Bluetooth device can pair or link with your radio.
- If "MMR-99 DAB" shows up in your Bluetooth device list, but your Bluetooth device cannot connect with it, please delete the item from your list and pair the Bluetooth device with the radio again following the steps described previously.
- The effective operation range between the radio and the paired Bluetooth device is approximately 10 meters (30 feet). Any obstacle between the system and the device can reduce the operational range.
- Bluetooth connectivity performance may vary depending on the connected Bluetooth device. Please refer to the Bluetooth capabilities of your device before connecting it to your radio. Not all features may be supported, depending on the Bluetooth device used.
- With some mobile phones, making / receiving calls, text messages, e-mails or any other activities unrelated to audio streaming may mute the Bluetooth audio streaming or even temporarily disconnect from your device. Such behavior is a function of the Bluetooth device and does not indicate a problem with your MMR-99DAB.
Audio playback in the Bluetooth mode
When you have successfully connected your radio with the chosen Bluetooth device you can start to play your music using the controls on your connected Bluetooth device.
- The volume of Bluetooth playback can be controlled both on your Bluetooth device and on the radio using the Volume up / down button.
- Playback can also be controlled both using the controls on your Bluetooth device and the controls on the radio. Press the radio's Play / Pause button to start / pause playback, press the Next track or Previous track button to select the desired track, and press and hold the Next track or Previous track button to fast forward or rewind within a track (release the button when the desired point within the track is reached).
Note:
Not all player applications or devices may respond to all of these controls.
Audio playback from a previously paired Bluetooth device
The MMR-99DAB can memorize up to 8 sets of paired Bluetooth devices. Once the memory goes over 8, the earliest device with which the radio was paired will be overwritten in the radio's memory.
If your Bluetooth source device has previously paired with the MMR-99DAB previously, the radio will still remember your Bluetooth device and attempt to reconnect with the device that was last connected. If the last connected Bluetooth device is not available, the radio will try to connect to the second last Bluetooth device.
Disconnecting your Bluetooth device
Press and hold the Bluetooth pairing button to disconnect the radio from your Bluetooth device. You can also press the Band button to select any mode other than Bluetooth mode or turn off Bluetooth on your Bluetooth source device to disable the connection.
If you disconnect from the Bluetooth device in the Bluetooth mode, a confirmation tone will be played and the radio's Bluetooth LED indicator will flash blue to indicate that the radio is available again for pairing.
Using the Auxiliary input socket and headphones socket
Listening to music via the Auxiliary input socket
You can listen to the sound of an external device through your MMR-99DAB's speaker. To do this, follow these steps.
- Connect the external device (such as iPod, MP3 player or CD player) to the radio's Aux input socket using a 3.5mm audio cable (not supplied).
- Make sure both the radio and the external device are turned on.
- Repeatedly press the Band button to select the Aux in mode.
- The audio output of the external device will now be played through the speaker of your MMR-99DAB. Adjust the volume on the external device to ensure an adequate volume level and then use the radio's Volume up / down button as needed to adjust the volume to a comfortable level.
Listening to music using the headphones socket
MMR-99DAB is equipped with a Headphones socket at the right side of the radio, which can be used to connect a pair of headphones with a 3.5mm plug. To connect the headphones, simply plug the 3.5mm jack into the socket. The radio will then automatically detect that a pair of headphones has been connected and it will disable its internal speaker.
We recommend turning the volume down before connecting the headphones and raising it slowly to a suitable level after connecting the headphones to avoid loud sounds and damaging your hearing.
Note:
Excessive sound pressure from earphones and headphones can cause hearing loss. To prevent possible hearing damage, do not listen at high volume levels for long periods of time.
Specifications
| Power Supply | 2600mAh rechargeable built-in Lithium-ion battery |
| Dynamo - charging to rechargeable built-in Lithium battery. | |
| Solar panel - charging to rechargeable built-in Lithium battery. | |
| DC IN (5V / 2.4A) USB C Type Socket for Charging the MMR-99DAB. | |
| USB A Type to USB C Type Cable & Hand strap included. | |
| Frequency Coverage | |
| FM | 87.5-108 MHz |
| DAB (BAND III) | 5A-13F (174.928MHz - 239.200MHz) |
| Bluetooth | |
| Bluetooth Specification | Bluetooth® 5.0 +EDR |
| Profile Support | A2DP, AVRCP |
| Bluetooth Audio Codec | SBC, AAC |
| Transmitting Power | Power Class 2 |
| Line of Sight Range | 10meters / 30feet |
| The Frequency And Maximum Transmitted Power | 2402MHz ~ 2480MHz: 2dBm (Bluetooth EDR & LE) |
| Antenna | |
| Telescopic Antenna | FM / DAB |
| Socket | |
| DC Socket | DC IN USB Type C, 5V / 2.4A This symbol indicates DC voltage. This symbol indicates DC voltage. |
| DC OUT USB Type A, 5V / 1A | |
| Earphones Jack | 3.5mm diameter, Stereo Output, 32ohm Impedance |
| Auxiliary Socket | 3.5mm diameter, Stereo Input |
| Speaker | 2.25", 4Ohm, 5Watts |
| Output Power | 1.5Watts |
| Operating Temperature Range | 5°C to 35°C |
| ※ The barcode label on the product is defined as below: | |
 |  |
The company reserves the right to amend the specification without notice.

If at any time in the future you should need to dispose of this product please note that: Waste electrical products should not be disposed of with household waste. Please recycle where facilities exist. Check with your Local Authority or retailer for recycling advice. (Waste Electrical and Electronic Equipment Directive)

Documents / ResourcesDownload manual
Here you can download full pdf version of manual, it may contain additional safety instructions, warranty information, FCC rules, etc.
Download Sangean MMR-99DAB - DAB+, FM, Bluetooth, AUX Digital Radio Manual
Advertisement


Need help?
Do you have a question about the MMR-99DAB and is the answer not in the manual?
Questions and answers