Burkert 6516 Operating Instructions Manual
Block assemblies and modular pneumatic basic rail
Hide thumbs
Also See for 6516:
- Operating instructions manual (36 pages) ,
- Operating instructions manual (17 pages) ,
- Operating instructions manual (22 pages)
Table of Contents
Advertisement
Available languages
Available languages
Quick Links
Advertisement
Chapters
Table of Contents

Related Manuals for Burkert 6516


Summary of Contents for Burkert 6516
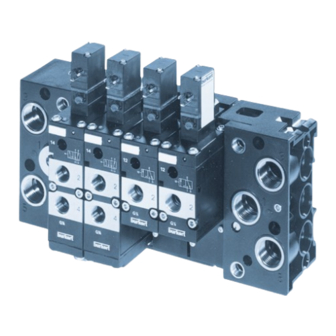
- Page 1 Operating Instructions Bedienungsanleitung Instructions de Service Type 6516 / 6517 Block Assemblies and Modular Pneumatic Basic Rail Type MP07 Mehrfachblöcke und modulare, pneumatische Grundschiene Typ MP07 Blocs multiples et Profil pneumatique modulaire Type MP07...
- Page 2 We reserve the right to make technical changes without notice. Technische Änderungen vorbehalten. Sous resérve de modification techniques. © 2000 Bürkert Werke GmbH & Co. KG Operating Instructions 0512/11_EU-ML_00803141...
- Page 3 Symbols ..................................................Safety notes ................................................Warranty conditions ............................................ TECHNICAL DESCRIPTION ........................................ Valve Construction ............................................Valve operations of the Type 6516 / 6517 ..............................Media .................................................... Electrical connections ..........................................Example of a block assembly ....................................INSTALLATION, INITIALISATION AND SERVICE ........................... General notes ..............................................
- Page 4 ONTENTS 2 - 6516 / 6517...
- Page 5 Symbols ..................................................Safety notes ................................................Warranty conditions ............................................ 6516 / 6517 - 3...
- Page 6 Operating Instructions, as well as with the application conditions and additional data given in the Type 6516 and 6517 data sheets: • When planning the application of the device, and during its operation, observe the general technical rules! •...
- Page 7 ATTENTION! The warranty covers only faultless condition of the Block Assemblies Type 6516, 6517 and Modular Pneumatic Basic Rails Type MP07. No liability will be accepted for consequent damage of any kind that max arise form failure or malfunctioning of the device.
- Page 8 ENERAL OTES 6 - 6516 / 6517...
- Page 9 ECHNICAL ESCRIPTION TECHNICAL DESCRIPTION Valve Construction ............................................Valve operations of the Type 6516 / 6517 ..............................Media .................................................... Electrical connections ..........................................Example of a block assembly ....................................6516 / 6517 - 7...
- Page 10 NOTE Plug-in connections only for the service ports 2 (B) and 4 (A). The valves require no maintenance. Valve operations of the Type 6516 / 6517 3/2 way valve: In de-energised position, Pressure Inlet 1 closed, Outlet Port 2 exhausted...
- Page 11 • to match the cable run, the instrument socket can be mounted rotated by 180° • refer to types 6106 or 8640 for other connection possibilities ATTENTION! When screwing down the instrument socket onto the coil, ensure that the flat seal is well seated! 6516 / 6517 - 9...
- Page 12 ECHNICAL ESCRIPTION 10 - 6516 / 6517...
- Page 13 Dismantling the module ........................................Other possible uses of the connecting module, - right hand - ..................Mounting the valve block ........................................Mounting single valves ........................................Measures to be taken before putting into service ..........................Faults ..................................................6516 / 6517 - 11...
- Page 14 Press the modules together until both hooks latch. Ensure that the profile gaskets are correctly seated on the base module! ATTENTION! Squashed O-rings and profile gaskets sause leackages in the block! 12 - 6516 / 6517...
- Page 15 Hang the valve block onto the upper groove of the standard rail. Latch the lower clamp into the standard rail. Firmly tighten the screws on the clamp. Dismounting Loosen the clamping screws (by about 4 revolutions). Remove the block upwards from the standard rail. 6516 / 6517 - 13...
- Page 16 Fix the module system directly to the wall using M5 screws. Electrical connection can be rotated by 180° Wall mounting Standard rail 35 x 15 DIN 50022 Standard rail 75 x 25 DIN 50023 Connecting module Figure: Mounting the valve block 14 - 6516 / 6517...
- Page 17 • used as an auxiliary pilot air connection and as the connection for pneumatic controls Service ports 2 (B) and 4 (A) M4 screws for wall mounting the single valve Figure: Mounting single valve, Manual override, Pneumatic position indicator 6516 / 6517 - 15...
- Page 18 O-rings between the modules Check for leaks and for missing seals. block: missing or damaged; Missing or incorrectly Install the missing seals and replace damaged seals. positioned profile gaskets between the valve and the baseplate. 16 - 6516 / 6517...
- Page 19 NSTALLATION NITIALISATION AND ERVICE Notes 6516 / 6517 - 17...
- Page 20 NSTALLATION NITIALISATION AND ERVICE 18 - 6516 / 6517...
-
Page 21: Table Of Contents
ALLGEMEINE HINWEISE ........................................Darstellungsmittel ........................................... Sicherheitshinweise ..........................................Garantiebestimmungen ........................................TECHNISCHE BESCHREIBUNG ....................................Ventilaufbau ..............................................Wirkungsweise der Ventile Typ 6516 / 6517 ............................Medien ..................................................Elektrischer Anschluss ........................................Beispiel eines Mehrfachblocks ....................................MONTAGE, INBETRIEBNAHME UND WARTUNG ......................... Allgemeine Hinweise ..........................................Aufbau von Mehrfachblöcken mit der modularen, pneumatischen Grundschiene Typ MP07 ........................................ - Page 22 NHALT 20 - 6516 / 6517...
-
Page 23: Allgemeine Hinweise
LLGEMEINE INWEISE ALLGEMEINE HINWEISE Darstellungsmittel ..........................................Sicherheitshinweise ..........................................Garantiebestimmungen ........................................6516 / 6517 - 21... -
Page 24: Darstellungsmittel
Sicherheitshinweise Bitte beachten Sie die Hinweise dieser Betriebsanleitung sowie die Einsatzbedingungen und zulässigen Daten gemäß den Datenblättern Typ 6516 und Typ 6517, damit das Gerät einwandfrei funktioniert und lange einsatzfähig bleibt. • Halten Sie sich bei der Einsatzplanung und dem Betrieb des Gerätes an die allgemeinen Regeln der Technik! •... -
Page 25: Garantiebestimmungen
ACHTUNG! Die Gewährleistung erstreckt sich nur auf die Fehlerfreiheit der Mehrfachblöcke Typ 6516 und Typ 6517 sowie die modulare pneumatische Grundschiene Typ MP07. Es wird keine Haftung übernommen für Folgeschäden jeglicher Art, die durch Ausfall oder Fehlfunktion des Gerätes entstehen könnten. - Page 26 LLGEMEINE INWEISE 24 - 6516 / 6517...
-
Page 27: Technische Beschreibung
ECHNISCHE ESCHREIBUNG TECHNISCHE BESCHREIBUNG Ventilaufbau ..............................................Wirkungsweise der Ventile Typ 6516 / 6517 ............................Medien ..................................................Elektrischer Anschluss ........................................Beispiel eines Mehrfachblocks ....................................6516 / 6517 - 25... -
Page 28: Wirkungsweise Der Ventile Typ 6516 / 6517
• Beliebige Einbaulage, vorzugsweise mit Magnetsystem oben HINWEIS Steckanschlüsse gelten nur für die Arbeitsanschlüsse 2 (B) und 4 (A). Die Ventile arbeiten wartungsfrei. Wirkungsweise der Ventile Typ 6516 / 6517 3/2-Wege-Ventil In Ruhestellung Druckanschluss 1 gesperrt, Ausgang 2 entlüftet. 3/2-Wege-Ventil für Vakuum, mit Steuerhilfsluft In Ruhestellung Druckanschluss 1 gesperrt, Ausgang 2 entlüftet. -
Page 29: Medien
• Die Gerätesteckdose ist zur Wahl des Kabelganges um 180° versetzt montierbar • Weitere elektrische Anschlussmöglichkeiten siehe Typ 6106 bzw. 8640 ACHTUNG! Achten Sie beim Verschrauben der Gerätesteckdose mit der Spule auf einwandfreien Sitz der Flachdichtung! 6516 / 6517 - 27... - Page 30 ECHNISCHE ESCHREIBUNG 28 - 6516 / 6517...
-
Page 31: Montage Inbetriebnahme Und Wartung
Aufbau von Mehrfachblöcken mit der modularen, pneumatischen Grundschiene Typ MP07 ........................................Demontage der Module ........................................Weitere Einsatzmöglichkeiten der Anschlussmodule, rechts ................... Befestigung des Ventilblocks ...................................... Befestigung von Einzelventilen ....................................Maßnahmen vor Inbetriebnahme ..................................Störungen ................................................6516 / 6517 - 29... - Page 32 Sie dabei auf exakten Sitz der O-Ringe! Drücken Sie die Module bis zum Einrasten beider Haken zusammen. Achten Sie auf exakten Sitz der Profildichtungen auf dem Grundmodul! ACHTUNG! Gequetschte O-Ringe und Flachdichtungen haben Undichtheit des Blocks zur Folge. 30 - 6516 / 6517...
-
Page 33: Demontage Der Module
Hängen Sie den Ventilblock mit der oberen Nut in die Normschiene ein. Rasten Sie die unteren Klemmstücke in die Normschiene ein. Ziehen Sie die Schrauben an den Klemmstücken fest. Demontage Lösen Sie die Klemmschrauben (ca. 4 Umdrehungen). Entnehmen Sie den Block nach oben von der Normschiene. 6516 / 6517 - 31... - Page 34 ONTAGE NBETRIEBNAHME UND ARTUNG Wandmontage Befestigen Sie den Ventilblock mit M5-Schrauben direkt an der Wand. Bild: Befestigung des Ventilblocks 32 - 6516 / 6517...
-
Page 35: Befestigung Von Einzelventilen
Anschluss 14 • in Standardausführung nicht belegt • dient als Steuerhilfsluftanschluss und als Anschluss für pneumatische Ansteuerungen Arbeitsanschlüsse 2 (B) und 4 (A) M4-Schrauben zur Wandmontage des Einzelventils Bild: Befestigung des Einzelventils, Handbetätigung, Pneumatische Stellungsanzeige 6516 / 6517 - 33... -
Page 36: Maßnahmen Vor Inbetriebnahme
Undichte Fehlende oder gequetschte Ermitteln Sie die Leckstelle oder fehlende Dichtungen Ventilblöcke O-Ringe zwischen den Modulen Fehlende oder falsch Setzen Sie fehlende Dichtungen ein oder erneuern Sie positionierte Flachdichtungen beschädigte Dichtungen. zwischen Ventil und Grundplatte 34 - 6516 / 6517... - Page 37 ONTAGE NBETRIEBNAHME UND ARTUNG Notizen 6516 / 6517 - 35...
- Page 38 ONTAGE NBETRIEBNAHME UND ARTUNG 36 - 6516 / 6517...
- Page 39 Consignes générales de sécurité ..................................Clauses de garantie ..........................................DESCRIPTION TECHNIQUES ......................................Construction de la vanne ......................................... Fonctionnement des vannes du type 6516 / 6517 .......................... Fluides ..................................................Raccordement électrique ........................................ Exemple d’un bloc multiple ......................................MONTAGE, MISE EN SERVICE ET ENTRETIEN ..........................
- Page 40 OMMAIRE 38 - 6516 / 6517...
-
Page 41: Remarques Generales
EMARQUES ÉNÉRALES REMARQUES GENERALES Représentation ............................................. Consignes générales de sécurité ..................................Clauses de garantie ..........................................6516 / 6517 - 39... - Page 42 Consignes générales de sécurité Observez les indications de ces instructions de service ainsi que les conditions d’utilisation et les caractéristiques admissibles selon la fiche technique du type 6516 / 6517, afin que l’appareil fonctionne parfaitement et reste longtemps en état de fonctionnement: •...
- Page 43 Les prestations de garantie ne s’étendent qu’à l’absence de défaut de la bloc multi- ples et Profils pneumatiques modulaires Type MP07. Nous déclions, par contre, toute responsabilité pour des dégâts consécutifs de toute nature susceptibles de survenir par suite de défaillance ou défaut de fonctionnement de l’appareil. 6516 / 6517 - 41...
- Page 44 EMARQUES ÉNÉRALES 42 - 6516 / 6517...
-
Page 45: Description Techniques
ESCRIPTION ECHNIQUES DESCRIPTION TECHNIQUES Construction de la vanne ......................................... Fonctionnement des vannes du type Typ 6516 / 6517 ......................Fluides ..................................................Raccordement électrique ........................................ Exemple d’un bloc multiple ......................................6516 / 6517 - 43... -
Page 46: Construction De La Vanne
Les raccords à fiche ne s’appliquent qu’aux raccords de travail 2 (B) et 4 (A). Les vannes travaillent sans entretien. Fonctionnement des vannes du type 6516 / 6517 Vanne à 3/2 voies: en position de repos, raccord de pression 1 bloqué, sortie 2 à l’air libre Vanne à... -
Page 47: Fluides
• La prise d’appareil peut être montée inversée de 180° pour le choix du passage du câble • Autres possibilités de raccordement électrique, voir type 6106, resp. 8640 ATTENTION! Veiller en vissant la prise d’appareil avec la bobine à une application parfaite du joint plat! 6516 / 6517 - 45... - Page 48 ESCRIPTION ECHNIQUES 46 - 6516 / 6517...
-
Page 49: Montage, Mise En Service Et Entretien
Autres possibilités d’ application du module de raccordement - à droite - ............Fixation du bloc de vannes ......................................Fixation des vannes seules ......................................Précautions à prendre avant la mise en service ..........................Dérangements ............................................... 6516 / 6517 - 47... - Page 50 Presser le module jusqu’à l’emboîtement des deux crochets. Veiller à la tenue exacte des joints du profil sur le module de base! ATTENTION! Les joint toriques et les joints du profil écrasés ont pour conséquence des fuites dans le bloc! 48 - 6516 / 6517...
-
Page 51: Démontage Des Modules
Emboîter la pièce de serrage inférieure dans le profil normalisé. Serrer les vis sur les pièce de serrage. Démontage Dévisser les vis de serrage (env. 4 tours). Enlever le bloc du profil normalisé, vers le haut. 6516 / 6517 - 49... - Page 52 Fixer le bloc de vannes avec 4 vis M4 directement contre la paroi. Raccordement électrique tournant de 180 ° Fixation murale Profil normalisé 35 x 15 DIN 50022 Profil normalisé 75 x 25 DIN 50023 Module de raccordement Figure: Fixation du bloc de vannes 50 - 6516 / 6517...
-
Page 53: Fixation Des Vannes Seules
Raccords de travail 2 (B) et 4 (A) Vis M4 pour la fixation murale de la vanne seule Figure: Fixation de vanne seule , Actionnement manuel , indication pneumatique de position 6516 / 6517 - 51... -
Page 54: Précautions À Prendre Avant La Mise En Service
Localiser la fuite ou les joints manquants. vannes pas écrasés entre les modules; étanches: Joints du profil absents ou Poser les joints manquants ou remplacer les joints mal positionnés entre vanne endommagés. et plaque de base. 52 - 6516 / 6517... - Page 55 ONTAGE ISE EN ERVICE ET NTRETIEN 6516 / 6517 - 53...
- Page 56 ONTAGE ISE EN ERVICE ET NTRETIEN 54 - 6516 / 6517...
- Page 58 Int. (+90 232)459 76 94, Nat. (0232)459 76 94 Fax: Int. (+33 388)57 20 08, Nat. (0388)57 20 08 E-mail: burkert@superonline.com E-mail: burkert.france@buerkert.com Burkert Contromatic Italiana S.p.A. Burkert Contromatic Limited Centro Direzionale „Colombirolo“ Brimscombe Port Business Park Via Roma, 74 Brimscombe, Stroud IT-20060 Cassina De’...
- Page 59 Addresses of BC offices/Adressliste BC Länder APAC Suzhou BURKERT CONTROMATIC AUSTRALIA PTY, LIMITED Burkert Contromatic (Shanghai), Co., Ltd. 2 Welder Road Room 5, #06-06 Seven Hills, NSW 2147 Block A, No. 5 Xinghan Street AUSTRALIA SIP Suzhou P. R. China, 215021 Phone: Int.
- Page 60 Int. (+63 2)776 43 82, Nat. (02)776 43 82 Fax: Int. (+886 2)2653 7968, Nat. (02)2653 7968 E-mail: info.rc@burkert.com E-mail: info.rp@burkert.com BURKERT CONTROMATIC SINGAPORE PTE. LTD. 51 Ubi Avenue 1, #03-14 Paya Ubi Industrial Park Singapore 408933 SINGAPORE Phone: Int. (+65)6844 2233, Nat. 6844 2233 Fax: Int.
- Page 61 Adressliste Bürkert Fluid Control Systems Deutschland Bürkert GmbH & Co. KG Christian-Bürkert-Straße 13 - 17 74653 Ingelfingen Telefon: Int. (+497940)10-111, Nat. (07940)10-111 Fax: Int. (+497940)10-448, Nat. (07940)10-448 E-mail: info@de.buerkert.com Bürkert GmbH & Co. KG Bürkert GmbH & Co. KG Paradiesstraße 206 b Holzener Straße 70 DE-12526 Berlin DE-58708 Menden...
- Page 64 The smart choice of Fluid Control Systems www.buerkert.com...
Need help?
Do you have a question about the 6516 and is the answer not in the manual?
Questions and answers