Advertisement
Quick Links
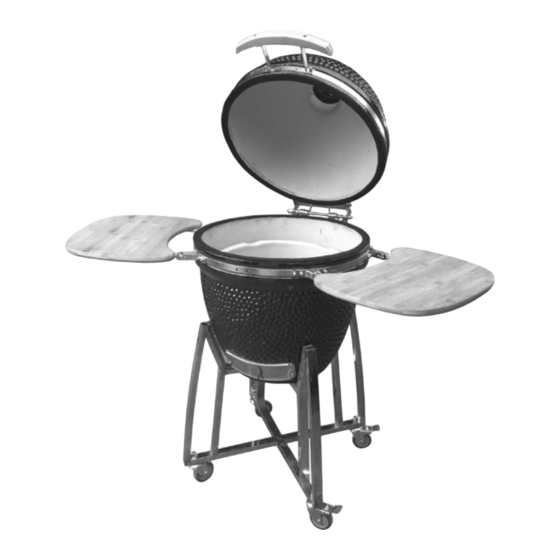
Kamado Ceramic Charcoal BBQ
Versatile design means you can barbecue, roast, bake and smoke
2-2.5cm ceramic shell with glazed exterior for maximum heat retention
524mm (20.6") stainless steel cooking grill
Cast iron top vent and stainless steel bottom damper provides heat control
Built-in temperature gauge and fireproof felt seal
Spring-loaded lid hinge with stopper
Collapsible bamboo side shelves
304 grade stainless steel stand with 4 wheels (2 lock for safety while standing)
Assembled dimensions: 1330mm W x 830mm D x 1200mm H
FOR OUTDOOR USE ONLY
DO NOT OPERATE THIS APPLIANCE BEFORE READING THE INSTRUCTION BOOKLET
DO NOT PLACE ARTICLES ON OR AGAINST THIS APPLIANCE
DO NOT STORE CHEMICALS OR FLAMMABLE MATERIALS OR SPRAY AEROSOLS NEAR THIS APPLIANCE
DO NOT OPERATE THE APPLIANCE INDOORS
DO NOT OPERATE IN AN ENCLOSED AREA. ACCESSIBLE PARTS MAY BE VERY HOT. KEEP YOUNG CHILDREN AWAY.
MINIMUM CLEARANCES FROM COMBUSTIBLE MATERIALS: 3 METRES
is a registered trademark of: Sitro Group Australia Pty Ltd - www.sitro.com.au & Aber Living, Hamilton, N.Z - www.charmate.co.nz
5127-05/19
Model No. CM155-024
Important: Retain these instructions for future use.
@CHARMATENATION
@CHARMATENATION
@CHARMATENATION
CHARMATENZ
CHARMATENZ
CHARMATENZ
CHARMATE
CHARMATE
CHARMATE
Advertisement

Related Manuals for Charmate Kamado CM155-024


Summary of Contents for Charmate Kamado CM155-024
- Page 1 DO NOT OPERATE IN AN ENCLOSED AREA. ACCESSIBLE PARTS MAY BE VERY HOT. KEEP YOUNG CHILDREN AWAY. MINIMUM CLEARANCES FROM COMBUSTIBLE MATERIALS: 3 METRES is a registered trademark of: Sitro Group Australia Pty Ltd - www.sitro.com.au & Aber Living, Hamilton, N.Z - www.charmate.co.nz Important: Retain these instructions for future use.
-
Page 2: Warnings - Caution
Care & Safe Use Guidelines • ALWAYS USE heat resistant gloves when handling WARNINGS - CAUTION! hot ceramics or cooking surfaces. • This product is intended FOR OUTDOOR USE ONLY. • Allow the unit to cool down completely before DO NOT use indoors. moving or storing. -
Page 3: Maintenance
Care & Safe Use Guidelines • Open the bottom vent and light the newpaper using • DO NOT use water or any other types of cleaning a long nosed lighter or safety matches. product to clean the inside of your Kamado. The walls are porous and will absorb any fluids used, •... - Page 4 Care & Safe Use Guidelines • It is recommended you don’t stoke or turn the coals • Close the top vent and continue to check the once they are alight. This allows the charcoals to temperature for a few more minutes. burn more uniformly and efficiently.
- Page 5 Care & Safe Use Guidelines Refueling • DO NOT use the same utensils to handle cooked and uncooked foods. • With the vents closed, the Kamado stays at a high • Ensure all meat is cooked thoroughly before eating. temperature for several hours. If you require a longer cooking time (e.g when roasting a whole joint •...
- Page 6 1 (4x) 6 (1x) Assembly Instructions For Easiest Assembly: • WARNING - DO NOT over tighten bolts; only tighten 7 (1x) 1 (4x) 6 (1x) 10 (2x) A (16x) 1 (4x) 6 (1x) with moderate pressure to avoid damaging the bolts or •...
- Page 7 Assembly Instructions Step 1 Attach the four pre-threaded castor wheels (2 & 3) to each of the four brackets (1) by pushing them through the hole. Using an adjustable spanner secure each castor wheel with 1x nut (B). Step 2 To assemble the cart insert the two cross pieces (4) into one of the four brackets (1) from both the top and bottom.
- Page 8 Assembly Instructions Step 4 Secure the brackets (1) to the cross pieces (4) by using the 16x screws (A). Make sure the cart is secure and all of the screws are tight before placing the Kamado Grill (9) into it. Step 5 To place the Kamado Grill (9) on the cart first remove all of the items that are inside of the grill to make lifting easier.
- Page 9 Assembly Instructions Step 8 When the grill is securely placed on the cart add the firebox (8), charcoal plate (7), upper ring (6) and cooking grill (5) inside of the Kamado Grill as displayed in the assembly diagram. Step 9 Press down on the castor levers (2) to lock the castor wheels to ensure the Kamado can not move when in use.
- Page 10 Assembly Instructions Step 10 To attach the handle (10) to the lid of the Kamado Grill (9) start by attaching 2x handle brackets (11) using the 2x pre-attached bolts and dome headed nuts. Attach the handle (11) to the brackets (10) using 2x bolts (C) and nuts (E). Ensure that the top vent bolt is on the left hand side when assembling it.
- Page 11 Assembly Instructions Step 12 Attach the 2x table brackets (14) to the Kamado Grill (9) using the 4x pre-attached bolts and dome headed nuts per bracket. Please note the position shown in the above diagram. Step 13 Attach the 2x table brackets (15) to the Kamado Grill (9) using the 4x pre-attached bolts and dome headed nuts per bracket. Please note the position shown in the above diagram.
Need help?
Do you have a question about the Kamado CM155-024 and is the answer not in the manual?
Questions and answers