Table of Contents
Advertisement
Quick Links
Advertisement
Table of Contents

Subscribe to Our Youtube Channel
Related Manuals for Door Knox VDP304


Summary of Contents for Door Knox VDP304
- Page 1 Instruction Manual VDP304 © 2023 System Q Ltd DoorKnox.com...
-
Page 2: Table Of Contents
VDP304 Table of Contents Part 1 Introduction 1 Key Features ........................3 Part 2 User Information Part 3 Connections and Wiring 1 Cameras ......................... 6 2 Monitors .......................... 7 3 Powering Cameras ......................7 4 Powering Monitors ......................7 5 Cable Runs ........................8... -
Page 3: Part 1 Introduction
4" size. Two door cameras and two door locks can be connected to the main monitor. *The menu structure in the VDP304 does not match the latest VDP207 and VDP210 monitors, but they can be used in conjunction with each other. -
Page 4: Part 2 User Information
VDP304 User Information · Do not expose to moisture or high humidity conditions. This product is rated for internal use only. · Take care when transporting, storing and installing the monitor · Always use and conform to current standards to install and use these. The signal cables should be kept way from high voltage equipment. -
Page 5: Part 3 Connections And Wiring
Connections and Wiring Connections and Wiring © 2023 System Q Ltd DoorKnox.com... -
Page 6: Cameras
VDP304 3.1 Cameras All of the DoorKnox cameras have connection cables terminated into the same 7 colour coordinated wires. 4 wires are used to connect to the monitor and then 2 of the 3 remaining wires are used to connect to an electronic door lock. -
Page 7: Monitors
Connections and Wiring 3.2 Monitors Every monitor is supplied with 5x 4 wire y-leads, 1x 2 wire y-lead and 1x 3 wire y- lead. The 4 wire y-leads are terminated into 4 pin plugs which are simply inserted into the sockets on the rear of the monitor. -
Page 8: Cable Runs
VDP304 3.5 Cable Runs The maximum achievable cable run is limited by the voltage drop in the chosen cable and also the quality of the video cable which can cause signal loss and interference. Resistance differs depending on the cable used and the higher the resistance the more the voltage drops hence the shorter cable run achievable. -
Page 9: Part 4 Mounting
Mounting Mounting Mark the hole positions using the mounting bracket. Drill the holes and install the wall plugs. Secure the mounting plate and then slot the monitor onto the bracket, when the monitor clicks it is secured in place. © 2023 System Q Ltd DoorKnox.com... -
Page 10: Part 5 Controls And Features
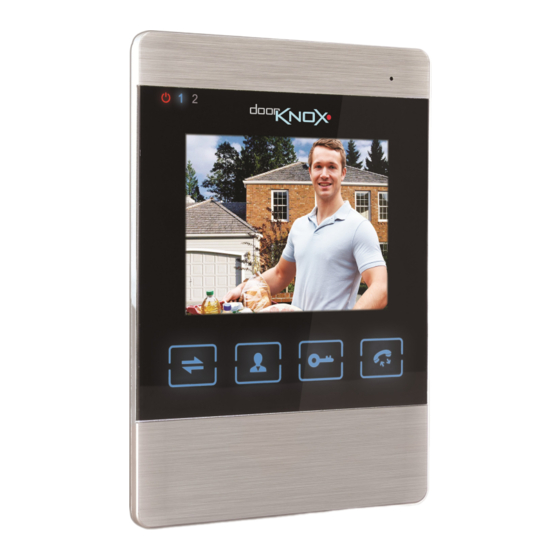
VDP304 Controls and Features 1. Power Indicator 2. Indicator shows which camera is being displayed 3. Transfer - Send call to other monitor(s) / Intercom 4. Monitoring - Switch between camera inputs 5. Unlock - Sends command to unlock 6. Talk - Answer / End call / Return 7. -
Page 11: Part 6 Menu Navigation
Menu Navigation Menu Navigation Setting button on the side of the monitor - · Press in to enter the menu. · Flick up / down to navigate the menu system · Press again to make selection Talk (Answer/ hang up) intercom button - ·... -
Page 12: Part 7 Basic Monitor Settings
VDP304 Basic Monitor Settings If only using 1 door camera and 1 monitor then skip setting monitor ID and camera switch. 7.1 Setting Monitor ID Up to 4 DoorKnox monitors can be used; 1 main monitor and up to 3 auxiliary monitors. -
Page 13: Part 8 Using The Door Entry System
Using the Door Entry System Using the Door Entry System 8.1 Visitor Calls When a visitor presses the call button on a door camera the ringtone will be played and their image will be displayed on all door monitors. To answer the call press the Talk button. -
Page 14: Intercom (Monitor To Monitor Audio)
VDP304 8.4 Intercom (Monitor to Monitor Audio) Press the Transfer button to show different monitor extension IDs Press the Up / Down to select the different monitor IDs then select using Setting to call another monitor. To answer the call press the Talk button on the receiving monitor. -
Page 15: Part 9 Monitor Menu
Monitor Menu Monitor Menu Language Language English / Italian / Lithuanian / Turkish / Dutch / Spanish / Slovakian / Czech / French / Ukrainian / Polish / Russian / Traditional Chinese / Simplified Chinese Time Clock On / off Format YY-MM-DD / DD-MM-YY / MM-DD-YY Date... - Page 16 VDP304 CAM 2 Ring Time 5 (0 - 20) Record Video Enter to view files Picture Enter to view files Return Digital Photo Digital Switch Disable / Enable Interval Time 09 (01 – 10) Media Music Enter to preview files...
-
Page 17: Part 10 Troubleshooting
Troubleshooting Troubleshooting Poor Connections - A poor lead connection may cause signal loss or interference so check that each component is firmly plugged in and any joints (soldered or otherwise) have been made well and solid with no shorts or crossed wires. Lack Of Power - May cause a lack of picture or other intermittent results. -
Page 18: Part 12 Specifications
VDP304 Specifications Screen Size 4” Video Input CVBS / AHD (2MP) Ready Screen Resolution 320 (H) x 240 (V) Camera Input 2x Door Cameras / 2x Auxiliary Cameras Door Monitor Inputs Door Monitor Outputs 1 (3 Auxiliary, 4 Total – Daisy chained) -
Page 19: Part 13 Conditions
Conditions Conditions All specifications are approximate. System Q Ltd reserves the right to change any product specifications or features without notice. Whilst every effort is made to ensure that these instructions are complete and accurate, System Q Ltd cannot be held responsible in any way for any losses, no matter how they arise, from errors or omissions in these instructions, or the performance or non-performance of the equipment that these instructions refer to.
Need help?
Do you have a question about the VDP304 and is the answer not in the manual?
Questions and answers