
Subscribe to Our Youtube Channel
Related Manuals for Door Knox VDP301


Summary of Contents for Door Knox VDP301
- Page 1 Doc XVDP400 Wireless External Door Entry Kit MODEL VDP400 WIRELESS DOOR ENTRY CAMERA WIRELESS DOOR ENTRY MODEL VDP301 MONITOR MODEL VDP404 Version 002 Email: support@doorknox.com Last Revised: 13/07/2017...
-
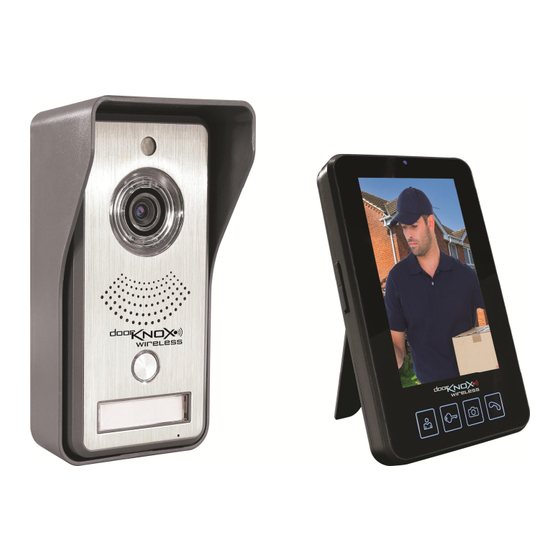
Page 2: Product Description
2.4 GHz, these units are suitable for use in most domestic and smaller commercial properties to add an extra dimension to a new or existing security system at little extra cost. Video Doorbell Unit (Part code: VDP301) Perfect for use in porches or sheltered doorways, the video doorbell unit in an attractive silver finish has a rain hood to prevent water from settling on the camera lens as well as a name plate badge so that the occupant’s surname or the house/flat number can be added. - Page 3 Video Display Screen, Part code: VDP301 Video Door Bell & Camera Unit Kit VDP400 contains: 1 x VDP301 Wirefree External Door Entry Camera 1 x VDP301 Wirefree External Door Entry Camera 1 x Camera Rain Shield 1 x Screw Pack...
-
Page 4: Safety Instruction
You can charge the battery taken from the camera unit, in the monitor, using the USB type plugtop. Monitor Standby Time: 3 days Monitor Run Time: 2 hours VDP301 Camera Unit 1. Connect the battery and fit the camera into the rain shield. Ensure battery is connected to correct polarity. -
Page 5: Magnetic Lock
Doc XVDP400 2. Wiring diagrams for magnetic lock and electric lock connections are shown below. Connect electric lock to terminals 4 and 6 or connect a magnetic lock to terminals 5 and 6. Note: When the camera is only powered by a lithium battery without any extra power supply, the camera unit electric lock cannot be released. - Page 6 Doc XVDP400 5. If the name plate is needed, take off the name plate cover, put the name plate inside and refit cover. 6. Finish wiring connection of the power supply and the electric lock according to the wiring diagram. 7.
- Page 7 Doc XVDP400 Function Keys and Operational Instructions VDP404 Monitor Icons in Standby Signal strength Mute Talking Battery Time Unlocking State Missed Call Ringtone PIR Sensor LEDs Camera Wiring Terminals Encoding Button Speaker Call button Battery Compartment Name Plate Microphone Email: support@doorknox.com Last Revised: 13/07/2017...
- Page 8 Doc XVDP400 VDP404 Door Entry Monitor Functions settings can be divided into the following parts: Language setting, Time and Date setting, Ringtone setting, Unlock time setting, Screen brightness setting etc. Press UNLOCK button to confirm and enter into the next setting page, press TALK button to save the setting for one part and then exit.
- Page 9 Doc XVDP400 VDP400 Door Entry Kit Operation 1. Setting up VDP301 camera unit Connect the battery and fit the camera into the rain shield. Ensure battery is connected to correct polarity. The camera unit can run directly from the battery or be powered using the 100 ~ 240vAC 0.8A...
- Page 10 Doc XVDP400 5. Battery Power for Monitor and Camera units Battery indicator on the Monitor unit: The battery icon in the top right hand corner of the screen represents the battery power of the monitor unit. When the battery power is low, the battery icon will become red to indicate that the battery needs charging.
- Page 11 Doc XVDP400 Power button three or four times quickly and the monitor will enter encoding mode and will display “Pairing”. 2. Obtain a paperclip and straighten out one leg and push into the Encoding hole on the back of the camera. Hold down until a “Ding” sound is heard with a blue flashing light. When a “Dong”...
-
Page 12: Technical Specifications
Working Power Consumption 2.4W Battery standby time 120 Hours Transmitting Power 18dBm Receiving sensitivity -80dBm Transmitting frequency 2403 ~ 2478MHz VDP301 Camera Power Supply 5vDC 1A Camera Pixels 300,000 IR light spectrum 940nm IR Visual distance 4.3 metres IR visual angle 90°... -
Page 13: Troubleshooting
Doc XVDP400 Troubleshooting Problem Resolution There is no response when The camera and monitor have not been paired or have lost the pairing the camera unit calls the code. Refer to section: VDP400 Door Entry Kit Operation Item 8 monitor after powering up. “Pairing the Monitor to the Camera.”...
Need help?
Do you have a question about the VDP301 and is the answer not in the manual?
Questions and answers