Digitax F1 PLUS TAXIMETER Manual
- User manual (2 pages) ,
- User manual (9 pages)
Advertisement
OPERATION
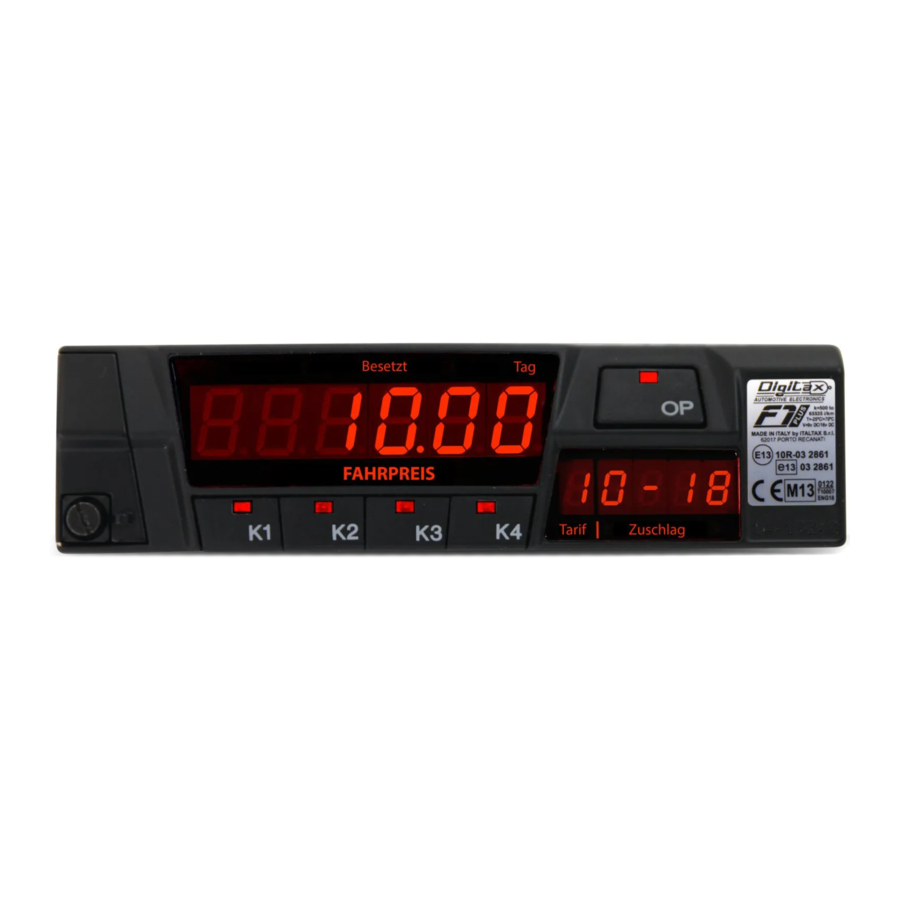
The taximeter has, in its front side, 5 keys (or buttons) called: OP, K1, K2, K3, K4.
The taximeter has three working modes called:

The taximeter's working modes are selectable by pressing the OP button in the following sequence:

In any of the above taximeter's working mode (FOR HIRE, HIRED, STOPPED), the other four buttons K1, K2, K3, K4 will exploit a different function, as below described.
- Taxi in "For Hire"
When the Taxi is parked or it moves without any passenger on board, the taxi driver selects the For Hire position by OP. The clock is displayed and the keys will have the following functions:

For Hire![]() Go back from Chrono to Clock
Go back from Chrono to Clock
For Hire![]() Shows calendar Day and Month
Shows calendar Day and Month
For Hire![]() Shows Year
Shows Year - Taxi in "Hired"
Once the taxi starts the trip, the taxi driver selects the Hired position by OP. The "Taxi" roof sign will turn off and the taximeter starts the fare calculation by distance or time.

Hired![]() Selects Rate Nr (if inabled)
Selects Rate Nr (if inabled)
Hired![]() Insert Extra Nr 1 (If enabled)
Insert Extra Nr 1 (If enabled)
Hired![]() Insert Extra Nr 2 (If enabled)
Insert Extra Nr 2 (If enabled)
Hired![]() Reset Extras
Reset Extras - Taxi in "Stopped"
At the end of the trip, the taxi driver has to select the
Stopped position by OP.
The waiting time counting is thus blocked.

Stopped![]() Insert Special Extras
Insert Special Extras
Stopped![]() Insert Extra Nr 3 (If enabled)
Insert Extra Nr 3 (If enabled)
Stopped![]() Insert Extra Nr 4 (If enabled)
Insert Extra Nr 4 (If enabled)
Stopped![]() Reset Extras
Reset Extras

 Go back from Chrono to Clock
 Shows calendar Day and Month
  Shows Year
 Selects Rate Nr (if inabled)
 Insert Extra Nr 1 (If enabled)
 Insert Extra Nr 2 (If enabled)
 Reset Extras
 Insert Special Extras
 Insert Extra Nr 3 (If enabled)
 Insert Extra Nr 4 (If enabled)
 Reset Extras
STATISTICAL MEMORY: READ / PRINT / ERASE
The taximeter has, inside, 2 blocks of memory called:
BLOCK 1 --- BLOCK 2
Each one is divided in 45 locations. Each one is enabled to record and keep the taximeter's activity.
Block 1 is the Partial Block since the activity information contained in its 45 locations can be read, printed and erased whenever desired (See specific procedure).
This "Partial Function" is very useful and may be utilized for working shift data's control and analisys.
Block 2 is the Total or Cumulative Block since the activity information contained in its 45 locations can only be read and printed.
HOW TO READ THE INFORMATION CONTAINED IN BLOCK 1 and 2
- Select the For Hire mode by pressing OP button;
- Press K1 + K2 buttons at the same time to enter "Statistical Reading";

- The secondary display will now show: at its left-side: 1 - indicating the Memory Block Nr. being read pressing K3 button now, to go to Block 2; pressing K3 button again, to go back to Block 1. at its right-side: a number between 1 and 45, indicating the Location Number.


- The main display will now show a Nr. which is the information contained in the correspondent memory location being read and now indicated at right-side of secondary display;(please see locations' list )
- Press K1 or K2 buttons if You wish to decrease or increase respectively memory location's Nr. (memory location Nr. is indicated on right side of secondary display);
- Press OP button to go back to For Hire mode and to END the Reading Procedure


PRINT-OUT
- Select the For Hire mode by pressing OP button;
- Press K1+K2 buttons at the same time to enter "Statistical Reading";

- Press K2 buttons till You reach memory location Nr.5 (memory locations Nrs. are shown at right side on secondary display);

- When You have reached memory location Nr.5, press K4 button to print out all information contained in memory locations of both memory blocks.

- Press OP button to go back to For Hire mode and to END procedure.


HOW TO ERASE INFORMATIONS CONTAINED IN MEMORY LOCATIONS OF BLOCK 1
- Select the FOR HIRE mode by pressing OP button;
- Press K1+K2 buttons at the same time to enter "Statistical Reading";

- Press K2 buttons till You reach memory location Nr.19; (memory locations Nrs. are shown at right on secondary display);

- When You have reached memory location Nr.19, press K4 button to erase all information contained in memory locations of BLOCK 1; (when pressing K4, if the printer is ON all the information would be printed before being erased);

- Press OP button to go back to FOR HIRE mode and to END procedure. FOR HIRE STOPPED HIRED Night Day


STATISTICAL MEMORY READING
Memory Location List
| ML | Block 1 | Block 2 |
| 1) | Trips total number | idem |
| 2) | Taximeter units total number | idem |
| 3) | Total Kilometers | idem |
| 4) | Total Kilometers in For Hire | idem |
| 5) | Total Kilometers in Hired | idem |
| 6) | Km in for For Hire with passenger on board idem | |
| 7) | Km in Over speed | idem |
| 8) | Collected Total (Fare+Extras+Tax) | idem |
| 9) | Collected by Credit Card Total | idem/100 |
| 10) | Fare Total Amount (excluded Extras+Tax) | idem/100 |
| 11) | Extras Total Amount | idem/100 |
| 12) | Tax Total Amount | idem/100 |
| 13) | Run time in Stopped | idem |
| 14) | Run time in Hired and Stopped | idem |
| 15) | Waiting time in Hired | idem |
| 16) | Meter on total time | idem |
| 17) | Total Tariff 1 collection | idem |
| 18) | Total Tariff 2 collection | idem |
| 19) | Total Tariff 3 collection | idem |
| 20) | Total Tariff 4 collection | idem |
| 21) | Total Tariff 5 collection | idem |
| 22) | Total Tariff 6 collection | idem |
| 23) | Total collections from 7th to 64th | idem |
| 24) | Total tariff 1 units | idem |
| 25) | Total tariff 2 units | idem |
| 26) | Total tariff 3 units | idem |
| 27) | Total tariff 4 units | idem |
| 28) | Total tariff 5 units | idem |
| 29) | Total tariff 6 units | idem |
| 30) | Total units from 7th to 64th tariff | idem |
| 31) | Total Kilometers in tariff 1 | idem |
| 32) | Total Kilometers in tariff 2 | idem |
| 33) | Total Kilometers in tariff 3 | idem |
| 34) | Total Kilometers in tariff 4 | idem |
| 35) | Total Kilometers in tariff 5 | idem |
| 36) | Total Kilometers in tariff 6 | idem |
| 37) | Total Km from 7th to 64th | idem |
| 38) | Not used | |
| 39) | Not used | |
| 40) | Not used | |
| 41) | Not used | |
| 42) | Not used | |
| 43) | Not used | |
| 44) | Not used | |
| 45) | Not used |
SET TIME AND DATE
Settings
In order to manually programme the clock, please check that you are in For Hire position (by OP) and then press K1 and K3 at the same time. The sign "Time" appears on the main display for a few seconds and then For Hire and Stopped will flash at the same time.
In the two left digits of the main display, the day is displayed, in the right ones the month. On the secondary display, in the left digit, the hours are displayed and in the right ones the minutes. Please find here below the functions of the keys in this programming menu:
PROGRAMMING START:
PRESS K1 + K3 AT THE SAME TIME
K1 Sets the day number
K2 Sets the month number
K3 Sets the hour
K4 Sets the minutes
OP By pushing it, you move to the year set up
When you select the year to change by OP, K keys have the following functions:
K1 Decreases the year of one unit
K2 Increases the year of one unit
K3 Sets the taximeter manufacturing year
PROGRAMMING END AND DATA CONFIRMATION:
PRESS OP
HOW TO CONVERT THE LOCAL CURRENCY INTO EURO AND VICE-VERSA
IN HIRED & STOPPED MODE
DEPRESS and RELEASE K1 + K2 keys to toggle from the local currency to Euro and vice-versa


Press to end the programming and to confirm data

Documents / ResourcesDownload manual
Here you can download full pdf version of manual, it may contain additional safety instructions, warranty information, FCC rules, etc.
Advertisement


Need help?
Do you have a question about the F1 PLUS TAXIMETER and is the answer not in the manual?
Questions and answers