Advertisement
Quick Links
©2023 ClearSpan™
All Rights Reserved. Reproduction
is prohibited without permission.
Revision date: 04.26.23
ClearSpan
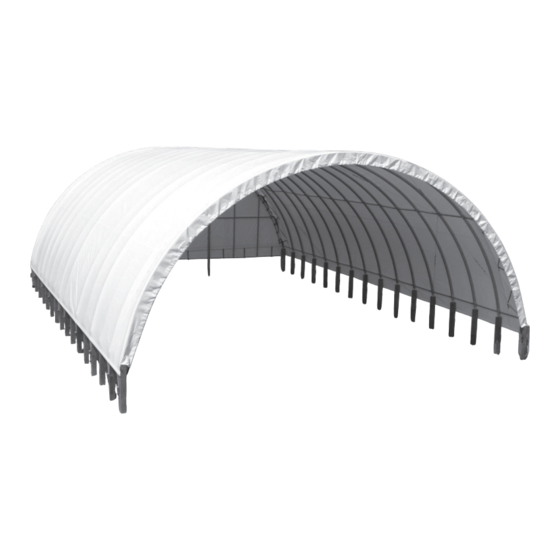
38' Wide Pony Wall Building
Photo may show a model of a different length.
CLEARSPAN
™
STK#
DIMENSIONS
PB00250R4/R5
38' W x 19' H x 40' L
PB00252R4/R5
38' W x 19' H x 60' L
PB00254R4/R5
38' W x 19' H x 80' L
PB00256R4/R5
38' W x 19' H x 100' L
POLY BUILDINGS
™
1
Advertisement

Subscribe to Our Youtube Channel
Related Manuals for ClearSpan PB00250R4


Summary of Contents for ClearSpan PB00250R4
- Page 1 ™ 38' Wide Pony Wall Building Photo may show a model of a different length. STK# DIMENSIONS ©2023 ClearSpan™ PB00250R4/R5 38' W x 19' H x 40' L All Rights Reserved. Reproduction PB00252R4/R5 38' W x 19' H x 60' L is prohibited without permission.
-
Page 2: Safety Precautions
BEGIN TO ASSEMBLE THE SHELTER. • Never erect the structure under power lines. Thank you for purchasing this ClearSpan™ shelter. When • Identify whether underground cables and pipes are properly assembled and maintained, this product will present before preparing the site or anchoring the provide years of reliable service. -
Page 3: Assembly Procedure
These words and phrases are common to most refers to the tapered end of the pipe or tube. Swaged ClearSpan™ shelters and identify the different parts of ends of a pipe can be inserted into couplers and the the shelter. (Some are used in this document. Others may straight ends of other pipes of the same diameter. -
Page 4: Required Tools
CLEARSPAN POLY BUILDINGS ™ REQUIRED TOOLS The following list identifies the main tools needed to Space below is reserved for customer notes. assemble the shelter. Additional tools and supports may be needed depending on the structure, location, and application. •... - Page 5 CLEARSPAN POLY BUILDINGS ™ The following graphics and photos will help you identify the different parts of the building. Consult the Quick Start Guide for additional details and diagrams. (Some parts are not shown.) 105350 QH1061 FA4482B Purlin Connection Bracket Tek Screw 1"...
- Page 6 CLEARSPAN POLY BUILDINGS ™ ClearSpan ™ Pony Wall Building OVERVIEW This section describes assembling your pony wall building. For details of each assembly procedure, consult the Quick Start Guide and the individual sections of these End Rafter Interior Rafter instructions. See illustration below to identify main parts of shelter.
- Page 7 CLEARSPAN POLY BUILDINGS ™ LAY OUT THE BUILDING SITE • The pony wall must support the load created by the shelter plus the additional loads imposed by the wind Review the previous Location and Site information before and other elements. Concrete, large pre-cast concrete you begin construction of the pony wall.
- Page 8 CLEARSPAN POLY BUILDINGS ™ ASSEMBLING THE RAFTERS 3. Secure each pipe joint using one ½" x 4½" bolt, a single purlin connection bracket (#105350), and nut. NOTE: Assistance is required to assemble the shelter. Install the nut against the purlin bracket as shown.
- Page 9 CLEARSPAN POLY BUILDINGS ™ 4. Assemble a rafter foot base using one (1) 3.25" pipe RAFTER ASSEMBLY (CONTINUED) fitting (#105092) and one (1) base (#105349). Connect 6. In the hole closest to the foot base, secure foot to rafter the pipe fitting and base using carriage bolt, nut, and using a ½"...
-
Page 10: Frame Assembly
CLEARSPAN POLY BUILDINGS ™ FRAME ASSEMBLY 4. With the first end rafter set and width at 38' on-center, set the first interior rafter in place. Gather the parts: Attach upper • All rafter assemblies purlin first. • Purlins: 4' spacing use purlin #105118; 5' spacing use purlin #105576 •... - Page 11 CLEARSPAN POLY BUILDINGS ™ ATTACHING RAFTER FEET TO CONCRETE Additional materials required to secure the rafter feet to the Space below is reserved for customer notes. concrete base are not included and must be purchased by customer. Materials and rafter foot shown in the following diagrams may differ from actual purchases.
-
Page 12: Cable Assembly
CLEARSPAN POLY BUILDINGS ™ CABLE ASSEMBLY Cable assemblies provide diagonal bracing for the building. Each cable assembly includes the following items: • Two (2) lengths of cable: Measure from point-to-point on the frame and cut as needed. • Turnbuckle (1) •... -
Page 13: Cable Placement
CLEARSPAN POLY BUILDINGS ™ CABLE PLACEMENT The diagram and inserts below identify the placement and proper way to attach the cable assemblies to the building. Anchor the assembled frame before you tighten the cables. Consult the Side Profile Diagram in the Quick Start section. - Page 14 CLEARSPAN POLY BUILDINGS ™ ANCHOR THE SHELTER INSTALL THE MAIN COVER RATCHETS After installing all cable assemblies, anchor the frame. Attach all ratchets on the outside of the pony wall. Once the frame is anchored properly, continue with these instructions.
- Page 15 CLEARSPAN POLY BUILDINGS ™ 4. Measure approximately 24" down from the top of the ATTACHING RATCHETS TO CONCRETE pony wall and attach as shown below. Additional materials required to secure ratchets to a concrete base are not included and must be purchased Install ratchets immediately across from each other by customer.
- Page 16 CLEARSPAN POLY BUILDINGS ™ PREPARE MAIN COVER Gather the parts: WARNING: To prevent damage to the cover and to prevent • Pipe 1.66" x 99" swaged serious personal injury, DO NOT attempt to install the main cover on windy days.
- Page 17 CLEARSPAN POLY BUILDINGS ™ ATTACH MAIN COVER 3. Once the main cover is pulled into position, center the cover on the frame (end-to-end and side-to-side). Gather the parts: WARNING: To prevent damage and injury, do not • Main cover (with conduits inserted) leave the cover unattended if it has not been properly •...
- Page 18 CLEARSPAN POLY BUILDINGS ™ INSTALL THE MAIN COVER SIDE STRAPS NOTE: For bulk strap, use the ratchet position to determine the required length and cut strap as needed. The side straps wrap around the conduit in the side pocket. 3. Feed both ends of the strap through the slot in the The ends of each strap are then fed into each side ratchet ratchet and slightly tighten the strap.
- Page 19 CLEARSPAN POLY BUILDINGS ™ INSTALL THE PVC CONDUIT FOR MAIN COVER ENDS PVC conduits are installed near the ends of the main cover to provide an additional tie-down position. Complete these Complete this section if the building is longer than 48'.
- Page 20 CLEARSPAN POLY BUILDINGS ™ INSTALL PVC CONDUIT (CONTINUED) 8. Continue weaving the strap around the end rafter and PVC conduit working up and over the rafter and down 3. Repeat the steps and continue to assemble and feed to the other end of the PVC conduit.
- Page 21 CLEARSPAN POLY BUILDINGS ™ INSTALL PVC CONDUIT (CONTINUED) TIGHTEN THE SIDE RATCHETS 12. Beginning at either end of the cover, tighten the strap. Verify that the cover is in the desired position and centered The strapping will pull against the strapping installed at on the frame.
- Page 22 If the shelter is moved, inspect all parts and connections before reassembling. • For replacement or missing parts, call 1.800.245.9881 for assistance. NOTE: With the exception of Truss Arch buildings, ClearSpan™ shelters and greenhouses do not have any tested loading criteria. Revision date: 04.26.23...
- Page 23 CLEARSPAN POLY BUILDINGS ™ 19'-0" Height QUICK START GUIDE 38' Wide Pony Wide Building 38’ on-center width 38’ - 5 1/2” outside-to-outside Ground Level F F R R O O N N T T Grid Represents 12" Squares Frame shown may differ in length from actual frame.
- Page 24 CLEARSPAN POLY BUILDINGS ™ Revision date: 04.26.23...
- Page 25 CLEARSPAN POLY BUILDINGS ™ Revision date: 04.26.23...
- Page 26 CLEARSPAN POLY BUILDINGS ™ Revision date: 04.26.23...
- Page 27 CLEARSPAN POLY BUILDINGS ™ Revision date: 04.26.23...
- Page 28 CLEARSPAN POLY BUILDINGS ™ Revision date: 04.26.23...
- Page 29 CLEARSPAN POLY BUILDINGS ™ Revision date: 04.26.23...
- Page 30 CLEARSPAN POLY BUILDINGS ™ Revision date: 04.26.23...
- Page 31 CLEARSPAN POLY BUILDINGS ™ Revision date: 04.26.23...
- Page 32 CLEARSPAN POLY BUILDINGS ™ Revision date: 04.26.23...
- Page 33 CLEARSPAN POLY BUILDINGS ™ Revision date: 04.26.23...
- Page 34 CLEARSPAN POLY BUILDINGS ™ Revision date: 04.26.23...
- Page 35 CLEARSPAN POLY BUILDINGS ™ Revision date: 04.26.23...
Need help?
Do you have a question about the PB00250R4 and is the answer not in the manual?
Questions and answers