Extron electronics RGB 109xi Setup Manual
Hide thumbs
Also See for RGB 109xi:
- User manual (17 pages) ,
- Specifications (2 pages) ,
- User manual (17 pages)
Table of Contents
Advertisement
Quick Links
The Extron
RGB 109xi is a dedicated computer-video
®
interface with a 15-pin HD connector.
C
These instructions provide a quick setup
guide for experienced installers. Installation
and service must be performed by authorized
personnel only.
Step 1 — Disconnect power
Turn off all equipment and disconnect their power sources.
Step 2 — Configure sync settings
W
Changes to internal jumpers must be performed by authorized service personnel only.
Take steps to prevent electrostatic discharge.
a. Open the interface and locate jumper blocks J20
and J40 (see the figure at right).
b. Set the sync polarity (jumper J20):
To force H and V output syncs to
negative, connect pins 1 and 2.
For output sync to follow input
sync, connect pins 2 and 3 (default
setting).
c. Set vertical sync pulse width (jumper J40).
For a narrow V output sync pulse,
connect pins 1 and 2.
For a wide V output sync pulse
(default setting), connect pins 2 and 3.
d. Replace the cover.
Step 3 — Mount the interface
The interface can be mounted on a desk, under a
desk, or through a desk. See the RGB 109xi and RGB 112xi User's Guide for details.
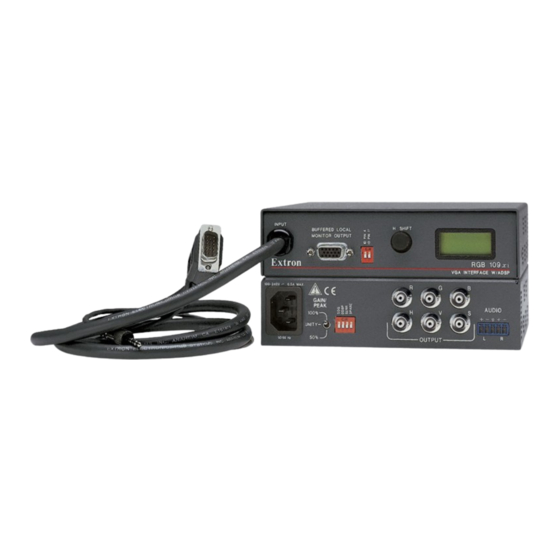
Step 4 — Connect video and audio input
The video and audio connectors are on a 4 foot (122 cm) cable (
Connect the 15-pin HD male connector to the computer video
output and the 3.5 mm tip-ring-sleeve (TRS) audio connector to the
unbalanced computer audio output. Wire the audio connector as
shown in the figure at right.
Step 5 — Connect local monitor
If required, connect a local monitor to this 15-pin HD connector (
Setup Guide — RGB 109xi
a
).
b
).
Advertisement
Table of Contents

Subscribe to Our Youtube Channel
Related Manuals for Extron electronics RGB 109xi


Summary of Contents for Extron electronics RGB 109xi
- Page 1 Setup Guide — RGB 109xi The Extron RGB 109xi is a dedicated computer-video ® interface with a 15-pin HD connector. These instructions provide a quick setup guide for experienced installers. Installation and service must be performed by authorized personnel only. Step 1 — Disconnect power Turn off all equipment and disconnect their power sources. Step 2 — Configure sync settings Changes to internal jumpers must be performed by authorized service personnel only.
- Page 2 Setup Guide — RGB 109xi (cont’d) Step 6 — Connect video output Connect a RGBHV, RGBS, or RGsB video display to the video output ( as shown in the figure at right. Step 7 — Connect audio output Connect an audio device to the five-pole, 3.5 mm captive screw connector ).
Need help?
Do you have a question about the RGB 109xi and is the answer not in the manual?
Questions and answers