Advertisement
Quick Links
Q U I C K I N S T A L L G U I D E - E N
Replacing Enphase IQ Series ACM Microinverter
Read and follow all warnings and instructions in this guide. Safety warnings are listed at the end of this guide. Use this procedure to replace an
Enphase IQ Series ACM Microinverter using the parts provided in the replacement kit. Read and understand the safety information before installing the
replacement microinverters.
The microinverter has a Class II double-insulated rating, which includes ground fault protection (GFP). To support GFP, use only PV modules equipped
with DC cables labeled PV wire or PV cable. Refer to local electrical codes and standards for grounding requirements of PV array and racking.
PREPARATION
A ) Download the Enphase Installer App and open it to log
in to your Enphase Installer Platform. With this app, you
can scan microinverter serial numbers and connect to
the IQ Gateway to track system installation progress. To
download, go to
https://enphase.com/en-gb/installers/apps
the QR code.
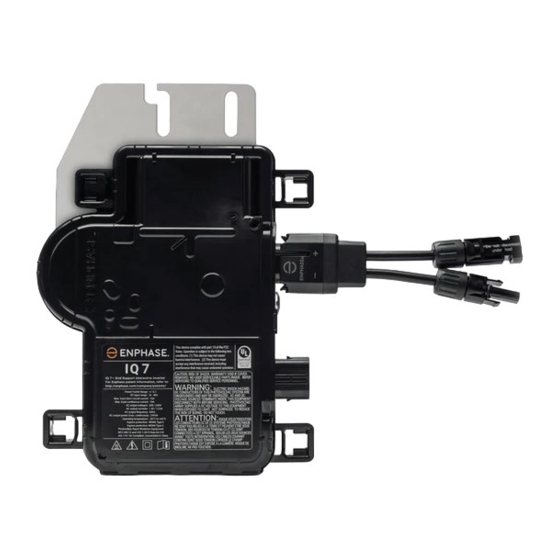
B ) Your kit includes a single Enphase microinverter:
Kit model
IQ7-60-ACM-INT-RMA
IQ7PLUS-72-ACM-INT-RMA
IQ7A-72-E-ACM-INT-RMA
IQ7A-72-M-ACM-INT-RMA
• IQ7 Microinverters are compatible only with 60-cell PV modules.
• IQ7+ and IQ7A Microinverters are compatible with 60-cell or 72-cell PV
modules.
C ) Check that you have the following equipment:
Replacement IQ Series Microinverter, included in the kit
•
IQ Disconnect Tool (Q-DISC-10)
•
Voltmeter
•
D ) Check that your AC branch circuits meet the following limits for the
maximum number of microinverters per branch when protected with
a 20 A overcurrent protection device (OCPD).
Maximum* IQ Microinverters per AC branch circuit
IQ7
IQ7+
15
12
* Limits may vary. Refer to local requirements to define the number of
microinverters per branch in your area.
E ) Protect your system with lightning and/or surge suppression devices. It
is also important to have insurance that protects against lightning and
electrical surges.
F ) Use your paper installation map to record device serial numbers and
positions in the array. You will scan this map later using the Enphase
Installer App and your mobile device. The map is essential for future
system troubleshooting.
G ) Size the AC wire gauge to account for voltage rise. Select the correct
wire size based on the distance from the beginning of the IQ Cable to
the breaker in the load center.
Best practice: Center-feed the branch circuit to minimise voltage rise
in a fully-populated branch.
or scan
Microinverter
IQ7-60-ACM-INT-NM
IQ7PLUS-72-ACM-INT-NM
IQ7A-72-E-ACM-INT-NM
IQ7A-72-M-ACM-INT-NM
IQ7A (Ph+N)
10
INSTALLATION
1
Remove the AC module
A ) De-energise AC by opening the branch circuit
breaker.
B ) Disconnect the DC and AC connectors on the
microinverter using the IQ Disconnect tool. If a
DC adapter is present, insert the disconnect tool
and remove the adapter. Save the adapter to use
on the replacement microinverter.
C ) Lift the entire AC module (panel) from the roof
per manufacturer instructions for handling and
safety. Then, place it on the ground or a suitable
work surface.
2
Install the replacement microinverter
A ) Once on the ground, place the AC module in a position that allows
you to access the microinverter.
B ) Press each of the four clips to free the microinverter from its frame.
C ) Press and snap the new replacement microinverter into place. The
Enphase label should face up when the AC module (panel) is face
down. The replacement microinverter will engage with all four clips.
Make sure the microinverter is fully seated in all four clips.
D ) Connect the AC module's AC lead to the AC connector on the
replacement microinverter.
DC
connection
AC
connection
F ) Attach the removable serial number
label from the new replacement IQ
Series Microinverter to your copy of the
installation map or note the location
for later entry into the array map in
the Enphase Installer App. You must
scan the label afterward and assign
their positions in the array using the
Enphase Array Builder.
IQ
Disconnect Tool
Clips
Clips
Affix serial
number labels
Advertisement

Related Manuals for enphase IQ Series


Summary of Contents for enphase IQ Series
- Page 1 Read and follow all warnings and instructions in this guide. Safety warnings are listed at the end of this guide. Use this procedure to replace an Enphase IQ Series ACM Microinverter using the parts provided in the replacement kit. Read and understand the safety information before installing the replacement microinverters.
- Page 2 Retire the unit and update the array Option 1: Retire and Replace A ) In the Enphase Installer Portal, look for the “Retire and Replace” feature on the “Settings” page by clicking the gear icon C ) Scroll to the self-help section and click “Install Replacement”.
- Page 3 © 2023 Enphase Energy. All rights reserved. received prior approval from the electrical utility company. Enphase, the e and CC logos, IQ, and certain other marks listed at https://enphase.com/ trademark-usage-guidelines are trademarks Enphase customer support: https://enphase.com/contact/support of Enphase Energy, Inc.
- Page 4 INSTALLATION MAP...
Need help?
Do you have a question about the IQ Series and is the answer not in the manual?
Questions and answers