Table of Contents
Advertisement
Quick Links
Advertisement
Table of Contents

Related Manuals for Aussie Traveller 41307000500080


Summary of Contents for Aussie Traveller 41307000500080
- Page 1 More information https://www.caravansplus.com.au Models: 400x450 / 700x500...
-
Page 2: Table Of Contents
More information https://www.caravansplus.com.au Table of Contents 400x450 Name of main part Notes Use of roof windows Installation Product Size Packing List Installation Precautions Installation of roof windows 700x500 Use & Installation Installation Diagram - Notes Product Size Warranty Statement... - Page 3 More information https://www.caravansplus.com.au 400x450 Manual PART NUMBER: 41304500400080...
-
Page 4: Name Of Main Part
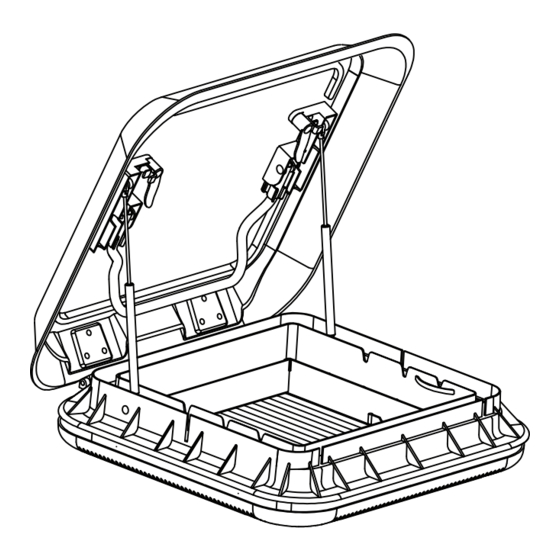
More information https://www.caravansplus.com.au Name of main part Roof window... -
Page 5: Notes
More information https://www.caravansplus.com.au Notes... -
Page 6: Use Of Roof Windows
More information https://www.caravansplus.com.au Use of Roof Windows Curtains and Lights Switch... - Page 7 More information https://www.caravansplus.com.au Use of Roof Windows Open the dome 60°...
- Page 8 More information https://www.caravansplus.com.au Use of Roof Windows...
- Page 9 More information https://www.caravansplus.com.au Use of Roof Windows...
-
Page 10: Product Size
More information https://www.caravansplus.com.au Product Size Unit mm Roof (450) (400) (526) (525) Hole Size (573) -
Page 11: Packing List
More information https://www.caravansplus.com.au Packing List Small Installation block Roof window ST3.5×30 Large Installation block cross pan head screws ST4×12 ST3.5×30 Cross large pan head screws Cross countersunk head screws Roof Windows User & Installation Manuals & Model:3J-RW-3 :3J-RW-3 lamp cover Instruction manual The package is suitable for 35mm wall thickness. -
Page 12: Installation Precautions
More information https://www.caravansplus.com.au Installation Precautions Installation precautions: 1.The power is 12V DC. 2. The roof window is only suitable for flat roofs ( maximum inclination angle 15°). 3. When installing roof window, select appropriate self-tapping screws according to the thickness of roof(see the table below). 4. -
Page 13: Installation Of Roof Windows
More information https://www.caravansplus.com.au Installation of Roof Windows Driving direction Please pay attention to the thickness of the wall before installing. This package is suitable for 35mm wall thickness. Please apply glue according to the instructions for use of the sealant. - Page 14 More information https://www.caravansplus.com.au Installation of Roof Windows Driving direction Please pay attention to the installation direction before installation (the hinge towards driving direction). 4. Use 8 ST3.5Ú22 cross pan head screws and 8 ST3.5Ú22 cross countersunk head screws from inside to fix the outer frame through 4 small installation blocks (cross pan head screws) and 4 large installation blocks (cross countersunk head screws) (Take note the position of installation blocks).
- Page 15 More information https://www.caravansplus.com.au Installation of Roof Windows 5. Fix the inner frame to the outer frame with 8 ST4Ú12 cross large pan head screws from the inside. The mounting screw torque is ≤1.5N.m. Please tear off the protective film on the top of the glass in time. After installation, please check if the light is working properly.
- Page 16 More information https://www.caravansplus.com.au 700x500 Manual PART NUMBER: 41307000500080 Model: 700x500...
-
Page 17: Installation Diagram
More information https://www.caravansplus.com.au Installation Diagram Diagram 1. Cut hole size on roof 1. Outer shell; 2. Securing clip; 3. Inner shell; 4. Lamp cover Diagram 3. Glue the outer shell Diagram 2. Reinforce roof openings and clean up the installation area... - Page 18 More information https://www.caravansplus.com.au Installation Diagram Diagram 4. Installation Direction, hinge side Diagram 5. Screw the outer shell facing to front of RV (direction of travel) Diagram 7. When installing LED Lamp covers (4), please Diagram 6. Screw the inner shell install gently to avoid breaking cover clips.
-
Page 19: Notes
More information https://www.caravansplus.com.au Notes 1. The power supply line of the roof window, which is 12V DC, red is "+", black is "-"), should be connected to the vehicle power cord. (The switch button should be close to the vehicle power cord when the inner shell is installed). 2. -
Page 20: Product Size
More information https://www.caravansplus.com.au Product Size 836.0 32.7 WALL WALL 780.0... -
Page 21: Warranty Statement
In arranging Warranty inspection, service and repair, Aussie Traveller will seek to provide the details of an approved service agent within your geographic area. Should one not be available, or if the Product is in use in travel, Aussie Traveller reserves the right to seek to arrange a repair or replacement at the next available location on the route of travel. - Page 22 8. Appropriate documentation (such as historical and maintenance records). the Warranty claim. The Product must be made available to Aussie Traveller or its authorised repair agent for inspection and testing. If such inspection and testing insurance of the Product. Exclusions This Warranty will not apply where: Traveller or an authorised repair agent;...
Need help?
Do you have a question about the 41307000500080 and is the answer not in the manual?
Questions and answers