Cuisinart Smart Stick CSB-179 - Variable Speed Hand Blender Manual
- Instruction and recipe booklet (64 pages)
Advertisement
For your safety and continued enjoyment of this product, always read the instruction book carefully before using.
IMPORTANT SAFEGUARDS
When using an electrical appliance, especially when children are present, basic safety precautions should always be taken, including the following:
- READ ALL INSTRUCTIONS.
- Unplug from outlet when not in use, before putting on or taking off parts, and before cleaning. To unplug, grasp plug and pull from electrical outlet. Never pull cord.
- To protect against electric shock, do not put the motor body, cord or electrical plug of this hand blender in water or other liquids. Only the detachable blending shaft and other certain parts of this appliance have been designed for immersion into water or other liquids. Never submerge any other portion of this unit. If hand blender falls into liquid, remove immediately. Do not reach into the liquid without unplugging the unit first.
- This appliance should not be used by children. To avoid possible accidental injury, close supervision is necessary when any appliance is used by or near children or individuals with certain disabilities.
- Avoid contact with moving parts.
- During operation, keep hands, hair and clothing, as well as spatulas and other utensils, away from attachments and any mixing container to reduce risk of injury to persons and/or damage to the appliance. A spatula may be used, but must be used only when the unit is not operating.
- Do not operate any appliance with a damaged cord or plug, or after the appliance has malfunctioned or has been dropped or damaged in any way or is not operating properly. Return the appliance to the nearest Cuisinart Repair Center for examination, repair, or mechanical or electrical adjustment.
- Remove detachable shaft from the motor body before washing the blades or shaft.
- Blades are SHARP. Handle carefully when removing, inserting or cleaning. Exercise the same care when removing or inserting the cutting blade, or reversing disc for the food processor attachment.
- When mixing liquids, especially hot liquids, use a tall container or mix small quantities at a time to reduce spillage, splattering and the possibility of injury from burning.
- To reduce the risk of injury, never place chopper/grinder attachment cutting blade on base without first putting work bowl properly in place.
- Be certain the food processor attachment cover is securely locked in place before operating appliance. Do not attempt to remove cover until blade has stopped rotating.
- Check work bowl for presence of foreign objects before using.
- The use of attachments or accessories not recommended by Cuisinart may cause fire, electric shock, or risk of injury.
- Do not use outdoors or for other than its intended use.
- Do not let any cord hang over the edge of the table or counter. Do not let cord contact hot surfaces, including stovetop.
- Make sure the appliance is off, the motor has stopped completely, and the appliance is unplugged from outlet before putting on or taking off attachments, and before cleaning.
- Maximum rating is based on the 300W chopper/grinder attachment that draws the greatest power.
- Do not operate your appliance in an appliance garage or under a wall cabinet. When storing in an appliance garage, always unplug the unit from the electrical outlet. Not doing so could create a risk of fire, especially if the appliance touches the walls of the garage or the door touches the unit as it closes.
SAVE THESE INSTRUCTIONS
FOR HOUSEHOLD USE ONLY
NOTICE
This appliance has a polarized plug (one blade is wider than the other). As a safety feature, this plug will fit in a polarized outlet only one way. If the plug does not fit fully in the outlet, reverse the plug. If it still does not fit, contact a qualified electrician. Do not attempt to defeat this safety feature.
UNPACKING INSTRUCTIONS
Place the package containing the Cuisinart® Smart Stick® Variable Speed Hand Blender on a sturdy surface. Unpack the hand blender from its box by removing the upper protective insert. Gently slide the unit from the box. Remove all support materials from the box and replace the upper insert. Save packaging for possible repacking of the unit.
NOTE: The blending blade is extremely sharp.
Before using the Cuisinart® Smart Stick® Variable Speed Hand Blender for the first time, we recommend that you wipe the motor body housing with a clean, damp cloth to remove any dirt or dust. Dry it thoroughly with a soft, absorbent cloth. Handling it carefully, wash the detachable blending shaft with fixed-mount blade and the whisk by hand. Dry thoroughly before use. Read all instructions completely for detailed operating procedures.
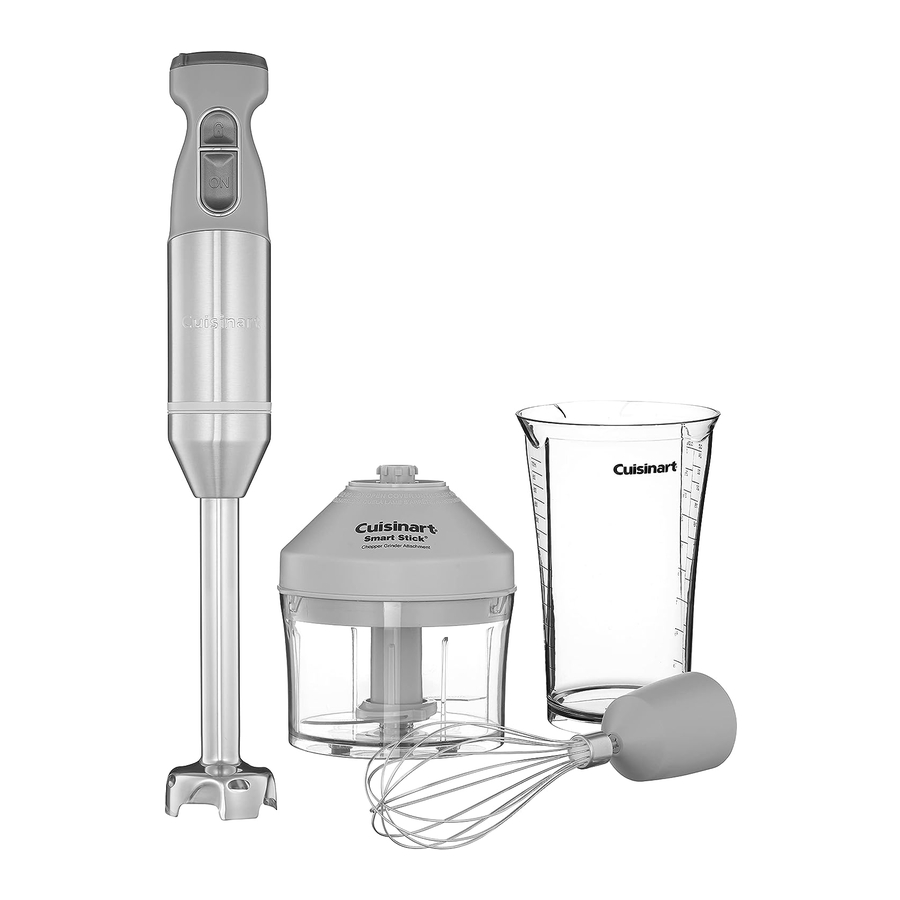
PARTS AND FEATURES

- Variable Speed Slide Control: Lets you adjust speed from low to high for the ingredients you are blending.
- Comfort Handle: The ergonomic handle allows you to maneuver the hand blender with ease.
- LOCK/UNLOCK Button: Must be pressed to unlock before power handle will operate.
- ON/OFF Button: Simply press and hold down the button to blend. Once the button is released, blending will stop.
- Pulse Feature: Repeatedly press and release the ON/OFF button to PULSE (while holding down the LOCK/UNLOCK button).
- Motor Body Housing: Powers the blender. Release button in back makes it easy to attach and detach blending shaft and whisk assembly.
- Release Button: (not shown)
- Detachable Blending Shaft
- Blade Guard: Snaps into the motor body housing. The fixed-mount stainless blade is partially covered by a stainless guard to keep splatter to a minimum.
- Stainless Steel Blade
- Whisk Attachment: Whisk attachment snaps into the gearbox which connects to the motor body housing. The whisk is great for whipping cream, egg whites and other delectable treats.
- Detachable Gear Box: Whisk attaches to it.
- Chopper/Grinder Attachment with Reversible Blade: Chop, mince and grind with the Cuisinart® chopper/grinder attachment. Chopper/grinder attaches to the motor body in place of the blending shaft or whisk attachment.
- Mixing/Measuring Cup: 3-cup (24 oz.) mixing cup is top-rack dishwasher safe. Use this container to blend drinks, shakes, salad dressings and more. Designed for easy gripping and drip-free pouring.
ASSEMBLY
BLENDING ATTACHMENT
- Align the motor body housing with the blending shaft and push the pieces together until you hear and feel them click together. It may be helpful to press the release button when assembling.

- Plug the power cord of the hand blender into an electrical outlet.

CHOPPER/GRINDER ATTACHMENT
- Connect the motor body housing to the top of the work bowl cover.
![]()
- Align the spine in the chopper/grinder cover's drive shaft with the ribbed opening on the underside of the motor body housing.

- When aligned properly, slide the two pieces together until you feel and hear a slight click.
- Place the chopping/grinding blade into center of the work bowl over metal blade shaft.
![]()
- Place the motor body housing with cover on top of the work bowl and rotate clockwise to lock into place.
![]()
- Plug the power cord of the hand blender into an electrical outlet.


WHISK ATTACHMENT
- Align the motor body housing with the assembled whisk attachment and push the pieces together until you hear and feel them click together. It may be helpful to press the release button when assembling.
NOTE: Whisk and whisk gearbox are detachable from one another.


REVERSIBLE BLADE
The Cuisinart® Smart Stick® Variable Speed Hand Blender chopper/ grinder attachment is equipped with a reversible blade. This blade is sharp on one side and blunt on the other. The blade is attached to a plastic ring that slides over the plastic blade sheath, so it can be easily turned over to select the appropriate blade. To reverse the blade, see detailed instructions. Also see Frequent Uses for Chopper/Grinder.
Assemble the parts
- Place the work bowl on a flat, dry, stable surface near an electrical outlet with the same specifications as the hand blender.
- The fully assembled two-piece metal blade assembly (A) should be attached to the bottom of the work bowl. If not, slide it onto the metal shaft (B) in the bowl.
![]()

IF METAL BLADE RING (C) HAS NOT BEEN ATTACHED TO PLASTIC SHEATH (D), OR TO SAFELY REASSEMBLE BLADE ASSEMBLY AFTER USE AND CLEANING, CAREFULLY FOLLOW THESE INSTRUCTIONS:
Assembling the Blade Ring
ALWAYS HOLD THE BLADE RING BY THE CENTRAL HUB'S HOLDING GRIPS (E). DO NOT TOUCH THE RAZOR-SHARP BLADES!
To assemble using base of bowl to turn blade:
- Turn work bowl upside down and stand the sheath (D) on the raised round nub in the center of bowl bottom.
![]()
- Place the metal blade ring (C) over the sheath, lining up the two notches in the interior of the center hub with the two ridges (F) on either side of the sheath. Let the blade ring slide to the bottom of the sheath.

- Grasp the top of the sheath firmly and turn counterclockwise to lock the blade into place on the sheath. The three rubberized nubs will guide the blade ring without you needing to touch it.
- To remove the blade from the sheath, stand the metal blade assembly on the overturned work bowl and turn the sheath clockwise to unlock the blade. Holding the central hub by the grips, carefully lift the blade ring off the sheath.


To assemble turning blade by hand:
- Carefully place the metal blade ring (C) over the sheath (D), lining up the two notches in the interior of the center hub with the two ridges (F) on either side of the sheath. Let the blade ring slide to bottom of sheath.
- Grasp the top of the sheath firmly and, holding the grips (E) on the central hub of the blade ring, turn the blade ring clockwise to lock it into place on the sheath.
- To remove the blade from the sheath, hold the sheath firmly and holding the central hub by the grips, turn the blade ring counterclockwise to unlock it and carefully lift it off the sheath.
TWO-WAY CUTTING BLADE
(See section on Frequent Uses for Chopper/Grinder, to learn which side of blade – SHARP or DULL – is best for what you are prepping.)
SHARP – Place blade ring over plastic blade sheath so the word "SHARP" is on top side of blade.

DULL – Place blade ring over plastic blade sheath so no writing is on top of blade.

OPERATION
- Press and hold the LOCK/UNLOCK button.
![]()
- Then press and hold the ON/OFF button.
![]()
- Release the LOCK/UNLOCK button while continuing to hold down the ON/OFF button.
![]()


No need to keep holding down the LOCK/UNLOCK button once the blender is operating.
BLENDING
The specially designed blade blends, mixes and purées all kinds of foods, including salad dressings, thick smoothies, powdered drink products, soups and sauces. It can also be used to emulsify mayonnaise.
This blade is designed to add minimal air to your mixture. A gentle up-and-down motion lets you achieve the most flavorful, full-bodied results. Be careful never to remove the blending shaft from the liquid while in operation.
- Connect the blending shaft to the motor body housing.
- Plug electrical cord into a wall socket.
- Immerse the blade end of blending shaft into mixture to be blended. You can blend in the mixing cup, bowl, pot, saucepan or pitcher.
- Turn the variable speed slide to the speed recommended in your recipe. NOTE: You can change the blending speed while blending.
- To turn the blender on:
See Operation, illustrations 1, 2, 3 above.- Press and hold the LOCK/UNLOCK button.
- Then press and hold the ON/OFF button.
- Release the LOCK/UNLOCK button while continuing to hold down the ON/OFF button.
NOTE: Do not continuously blend for longer than 60 seconds. Release ON/OFF button for 20–30 seconds between 60-second blending cycles.
- Unplug immediately after use.
TO PULSE
- Press and hold the LOCK/UNLOCK button.
- Then press and hold the ON/OFF button.
- Repeatedly press and release the ON/OFF button while continuing to hold down the LOCK/UNLOCK button to PULSE until ingredients reach desired consistency.
WHISKING
- Insert the whisk assembly into the motor body.
(See Assembly for Whisk Attachment.) - Plug electrical cord into a wall socket.
- Put the whisk into mixture that will be whisked.
- Turn the variable speed slide to the desired speed.
To begin whisking, follow the instructions in #5 under OPERATION BLENDING. - Unplug immediately after use.
CHOPPING/GRINDING
- Place the work bowl firmly on a flat, sturdy surface like a countertop.
- Put food in the work bowl. Be sure the food is cut into small pieces (½ to 1 inch), and the bowl is not overloaded.
- Put the work bowl cover on top of the work bowl. Be sure the cover is properly seated.
- Turn the variable speed slide to the desired speed. To begin processing, follow the instructions in #5 under OPERATION BLENDING (unplug immediately after use).
NOTE: Due to the powerful motor provided with this unit, Cuisinart recommends using one hand to support the work bowl during operation. - When you have finished processing the food, stop the unit by releasing the ON/OFF button.
- WHEN THE BLADE STOPS MOVING, unplug the unit.
- Remove the motor body with the cover from the work bowl.
- Carefully remove the chopping blade, holding it by the gripping ridges on the plastic sheath. NEVER TOUCH THE BLADE ITSELF.
- Remove food from work bowl with a kitchen tool.
NOTE: Do not operate the chopper/grinder attachment without food contents in the work bowl.
CLEANING AND MAINTENANCE
MOTOR BODY AND BLENDING SHAFT
Unplug the Smart Stick® before cleaning. Clean the motor body and blending shaft thoroughly after using. Remove the blending shaft from the motor body. Clean the motor body only with a sponge or damp cloth. Do not use abrasive cleaners that could scratch the surface. To clean the blending shaft, wash by hand in hot water, using mild detergent. Be mindful of the fixed, razor-sharp edges.
Do not put the motor body or blending shaft in the dishwasher.
CHOPPER/GRINDER ATTACHMENT
To simplify cleaning, rinse the work bowl, blade and cover immediately after use so that food won't dry on them. Do not submerge the work bowl cover in water or put in the dishwasher. Wash chopping blade and work bowl in warm, soapy water. Rinse and dry. Wipe the underside of the cover with a sponge or damp cloth to remove any food. Wash the blade carefully. Avoid leaving it in soapy water where it may disappear from sight.
You can wash the work bowl and chopping blade on the top shelf of your dishwasher. Unload the dishwasher carefully to avoid contact with the sharp blade. Wipe the motor body and top of the cover with a damp sponge or cloth. Dry it immediately. Never submerge the motor body or the cover in water or other liquids. The chopper/ grinder attachment is intended for HOUSEHOLD USE ONLY.
WHISK ATTACHMENT
To clean your whisk attachment, simply release the attachment from the motor body housing. Once the whisk is removed, detach the metal whisk from the gearbox by pulling the pieces apart. To clean the gearbox, simply wipe with a damp cloth. To clean the metal whisk, wash with warm, soapy water or put in the top shelf of the dishwasher.
Do not submerge the gearbox in water or any other liquids.
Any service, other than cleaning and normal user maintenance, should be performed by an authorized Cuisinart Service Representative.
TIPS AND HINTS
FOR HAND BLENDER
- When blending in the mixing cup, pour liquid ingredients in first, unless recipe instructs otherwise.
- When blending into mixing cup, for example, when making a fruit smoothie, cut most solid foods into ½-inch pieces for easy blending.
- Be sure that blending blade guard is fully submerged before blending ingredients.
- Do not attempt to blend fruit pits, bones or other hard materials, as these are liable to damage the blades.
- Do not fill mixing containers too full. The level of mixture will rise when blending and can overflow.
- Liquid should not come closer than 1 inch of where the shaft attaches to the motor housing.
- Using a gentle up-and-down motion is the best way to blend and incorporate ingredients uniformly.
- To whip air into a mixture, always hold the blade just under the surface.
- When using a nonstick cooking surface, be careful not to scratch the coating with the hand blender.
- To purée a soup, use the hand blender to blend the soup ingredients to the desired consistency using a gentle up-and-down motion right in the saucepan or pot.
- When blending ingredients right in a pot or pan, tilt the pan away from you to create a deeper area for blending to prevent splatter.
- Do not let hand blender stand in a hot pot on stove while not in use.
- Use the hand blender to make smooth gravies and pan sauces.
- The hand blender is perfect for frothing milk for cappuccino or lattes. Just warm milk in a small saucepan, and then pulse the hand blender gently, being sure to keep the blending blade guard fully submerged.
- Do not immerse motor body housing in water or any other liquids.
FOR WHISK ATTACHMENT
- Do not immerse whisk attachment gearbox in water or any other liquids.
- Use the whisk attachment for beating heavy cream or egg whites.
- When beating egg whites, use a very clean metal or glass bowl, never plastic. Plastic can contain hidden oils and fats that can ruin the delicate egg-white foam. To help stabilize the egg whites, add 1/8 teaspoon of cream of tartar per egg white prior to beating them. (If using a copper bowl, omit the cream of tartar.) Beat the egg whites until desired peaks form.
- When adding sugar to beaten egg whites, add it slowly when soft peaks just begin to form, and then continue beating to form desired peaks.
- Beating the egg whites too long causes them to dry out and become less stable.
- When beating heavy cream, if possible and time allows, use a chilled bowl and chill the whisk attachment. The best shaped bowl for whipping cream is one that is deep with a rounded bottom to minimize any splatter.
- The cream should come out of the refrigerator just before whipping. Whipped cream may be used at either soft or firm peaks, depending on preference. It may be flavored as desired. For best results, whip cream just before using.
- It may also be used for any task that you would normally whisk by hand, like crêpe batters or eggs for omelets.
FOR FOOD CHOPPER/GRINDER ATTACHMENT
- Do not overload work bowl. For best results, most foods should not reach more than 2∕3 of the way up the work bowl.
- Liquids in work bowl should not exceed 1½ cups. Use quantities given in the recipe section as a guide.
- For raw ingredients: Peel, core and/or remove seeds and pits. Food should be between ½ and 1 inch, depending on hardness of the food.
- The size of pieces you put in bowl should be about the same size to achieve even results.
- Do not attempt to chop fruit pits, bones or other hard materials, as these are liable to damage the blades.
- Pulse food in 1-second increments to chop. For the finest chop, process continuously. Watch ingredients closely to achieve desired consistency and scrape the work bowl as necessary.
- Do not operate chopper/grinder attachment for more than 30 seconds continuously.
- When making compound butters, remove the butter from the refrigerator and let it come to room temperature before blending the ingredients.
- Some spices may scratch the work bowl.
- Do not immerse food processor cover in water or any other liquids.
FREQUENT USES FOR CHOPPER/GRINDER
| Ingredient | Suggested Blade | Speed | Comments |
| Baby foods (always consult a pediatrician or family physician for appropriate food recommendations) | Sharp Blade | Low-High | Place small amounts of cooked foods into chopper/grinder bowl. Add small amount of appropriate liquid. Pulse to chop, then hold to blend. |
| Bread Crumbs fresh or dry (day old) | Sharp Blade | High | Pulse to chop, then process until desired consistency is reached. |
| Hard Cheese (Asiago, Locatelli, Parmesan, Romano, etc.) (Not recommended for softer cheeses unless making a dip or dressing) | Sharp Blade | High | Cut into 1/4-inch pieces. Pulse to chop, then process until desired consistency is reached. |
| Chocolate | Sharp Blade | High | Cut into 1/2-inch pieces; may chill in freezer for 3 minutes before chopping. Pulse to chop, then process, no more than 1 ounce at a time, until desired texture is reached. |
| Creamy Dressings and Dips | Sharp Blade | Low | Place ingredients in chopper/grinder bowl; do not cover or spill on stem. Use pulse action to chop, then continuous-hold action to blend to desired consistency. |
| Garlic (peeled) | Sharp Blade | High | Up to 6 cloves. Pulse to chop. |
| Ginger (fresh) | Sharp Blade | High | Peel, cut into 1/2-inch pieces. Pulse to chop 1/2 ounce at a time. |
| Hard Spices (coriander, cloves, anise, etc.) | Dull Blade | High | Pulse to chop until desired consistency. Pulse with sharp blade to get fine results. |
| Herbs (fresh) | Sharp Blade | High | 1/2 cup maximum; must be clean/dry. Pulse to chop. |
| Nuts | Dull Blade | High | Shelled; toast first for best flavor. Pulse to chop, process up to 1/3 cup at a time, until desired consistency is reached. May be processed to nut-butter stage. |
| Onion | Sharp Blade | High | Peel, cut into 1/2-inch pieces. Pulse to chop, up to 1/2 cup at a time, until desired chop is reached. |
| Vegetables (cooked) | Sharp Blade | Low-High | Cut into 1/2- to 1-inch pieces; pulse to chop, up to 1/2 cup at a time. Add cooking liquid, stock or water to process to a puree. It is not recommended for making mashed potatoes. |
| Vegetables (uncooked) | Sharp Blade | High | Peel as needed; cut into 1/2-inch pieces. Chop/process up to 1/2 cup at a time. |
| Meat (raw for grinding) | Sharp Blade | High | 6 oz. or 175g, cut into 1/2-inch pieces. Pulse until desired consistency. |
| Simple Blending | Dull Blade | Low-High | For light mixing and incorporating. |

Documents / ResourcesDownload manual
Here you can download full pdf version of manual, it may contain additional safety instructions, warranty information, FCC rules, etc.
Download Cuisinart Smart Stick CSB-179 - Variable Speed Hand Blender Manual
Advertisement


Need help?
Do you have a question about the Smart Stick CSB-179 and is the answer not in the manual?
Questions and answers