Table of Contents
Advertisement
Quick Links
Owner's Manual
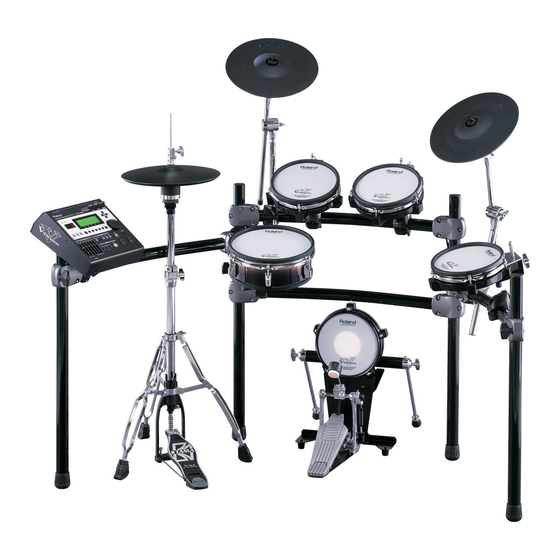
Thank you, and congratulations on your choice of the TD-12K Roland Drum System.
Before using this unit, carefully read the sections entitled: "USING THE UNIT SAFELY"
(p. 2) and "IMPORTANT NOTES" (p. 4). These sections provide important information
concerning the proper operation of the unit. Additionally, in order to feel assured that
you have gained a good grasp of every feature provided by your new unit, Owner's
manual should be read in its entirety. The manual should be saved and kept on hand as
a convenient reference.
* Kick Pedal and Hi-Hat stand are not included.
202
Copyright © 2005 ROLAND CORPORATION
All rights reserved. No part of this publication may be reproduced in any form without the
written permission of ROLAND CORPORATION.
Advertisement
Table of Contents

Related Manuals for Roland V-Drums TD-12K


Summary of Contents for Roland V-Drums TD-12K
- Page 1 Owner’s Manual Thank you, and congratulations on your choice of the TD-12K Roland Drum System. Before using this unit, carefully read the sections entitled: “USING THE UNIT SAFELY” (p. 2) and “IMPORTANT NOTES” (p. 4). These sections provide important information concerning the proper operation of the unit.
- Page 2 Roland. • When using the unit with a rack or stand recom- mended by Roland, the rack or stand must be carefully placed so it is level and sure to remain stable. If not using a rack or stand, you still need to...
- Page 3 (Add) • Assemble the drum stand and TD-12K with care to avoid danger of pinching the fingers. (Add) • Make sure to firmly tighten all hand knobs and screws after you have assembled the drum stand and attached any components. You should...
-
Page 4: Important Notes
IMPORTANT NOTES 291a In addition to the items listed under “USING THE UNIT SAFELY” on pages 2–3, please read and observe the following: Placement 354a • Do not expose the unit to direct sunlight, place it near devices that radiate heat, leave it inside an enclosed vehicle, or otherwise subject it to temperature extremes. -
Page 5: Check The Contents Of The Box
❑ CY-12R/C (V-Cymbal Ride/Crash) x 2 ❑ Tuning Key x 1 ❑ VH-11 Owner’s Manual ■ TD-12K Owner’s Manual (this manual) x 1 • The tuning key is included in the VH-11 package. • The TD-12 Owner’s Manual is included in the TD-12 package. -
Page 6: Adjusting The Head Tension
IMPORTANT NOTES KD-85 (V-Kick Trigger Pad) Frame Output Jack T-Bolt Tuning Bolt Rubber Foot Adjusting the Head Tension When adjusting, use the tuning key supplied with the VH-11. Be sure to adjust the head tension before use. In general, a tension that produces a strike response approximately the same as an acoustic drum will be appropriate. - Page 7 Assembling the KD-85 Take care not to pinch your fingers between the KD-85 pad and the stand plate. 1. Place the KD-85 pad, with the head surface facing downward, on a flat surface such as the floor. 2. Use the tuning key supplied with the VH-11 to loosen the bolts for the bracket on the back of the KD-85 pad, then open the bracket.
-
Page 8: Replacing The Head
IMPORTANT NOTES To Obtain More Stability If you are using a kick pedal with an under plate Adjust the length of the legs and the angle of the stay so that the four legs of the KD-85 and the heel of the kick pedal contact the floor evenly. -
Page 9: Attaching The Pad To A Stand
PD-105 (V-Pad) Hoop (Rim) Head Stand Fixing Screw Bracket Shell Frame Adjusting the Head Tension When adjusting, use the tuning key supplied with the VH-11. Be sure to adjust the head tension before use. In general, a tension that produces a strike response approximately the same as an acoustic drum will be appropriate. - Page 10 IMPORTANT NOTES PD-85 (V-Pad) Hoop (Rim) Stand Fixing Screw Tuning Bolt Holder Adjusting the Head Tension When adjusting, use the tuning key supplied with the VH-11. Be sure to adjust the head tension before use. In general, a tension that produces a strike response approximately the same as an acoustic drum will be appropriate.
- Page 11 Attaching the Pad to a Stand fig.PD-85-Set.e Tighten Loosen Pass the rod through the pipe that is inside the holder. When attaching the PD-85 to the mount, be sure to tighten the stand fixing screw securely. If it remains loose, the pad could fall off. Replacing the Head When the Head Should Be Replaced The head is an expendable item that eventually will wear out...
- Page 12 IMPORTANT NOTES CY-12R/C (V-Cymbal Ride/Crash) Edge Wing Nut Felt Washer Stopper Attaching the V-Cymbal to the Cymbal Mount 1. Remove the wing nut, felt, collar, and washer Bell 2. Use the tuning key supplied with the VH-11 to BOW/EDGE Output Jack 3.
- Page 13 Assemble the “TD-12K” Using the built-in connection cables of the MDS-12, connect the pads, cymbals, hi-hat, and kick trigger pad. fig.Setting1.e TD-12 Rear Panel (TRIGGER OUT) (CTRL OUT) TD-12 • The HI-HAT and RIDE cymbal use two cables each. See the TD-12 Owner’s Manual (p. 20 and p. 52).
- Page 14 * To make use of bell shot, you’ll need to connect to a trigger * Strike the bell somewhat strongly with the shoulder of the stick BOW/EDGE output. input jack on the percussion sound module that accommodates rim shots. BOW/BELL output.
-
Page 15: Specifications
* To make use of choking play techniques, you’ll need to connect to a trigger input jack on the percussion sound module that accommodates rim shots. Edge Sensor... -
Page 16: Australia/New Zealand
Information When you need repair service, call your nearest Roland Service Center or authorized Roland distributor in your country as shown below. AFRICA PHILIPPINES G.A. Yupangco & Co. Inc. 339 Gil J. Puyat Avenue EGYPT Makati, Metro Manila 1200, Al Fanny Trading Office...
Need help?
Do you have a question about the V-Drums TD-12K and is the answer not in the manual?
Questions and answers