Table of Contents
Advertisement
Quick Links
How to obtain a PDF of the owner's manual
PDF files of the owner's manual and supplementary material for this product can be obtained from the
Roland website.
• TD-15/TD-11 Owner's Manual (this document)
• Data List
(This is not included with the product; you may download it as necessary.)
Visit the following URL, choose "Owner's Manuals, " and search for the model name "TD-15" or "TD-11. "
http://www.roland.com/support/en/
* The illustration shows the TD-15.
Advertisement
Table of Contents

Related Manuals for Roland TD-11


Summary of Contents for Roland TD-11
- Page 1 * The illustration shows the TD-15. How to obtain a PDF of the owner’s manual PDF files of the owner’s manual and supplementary material for this product can be obtained from the Roland website. • TD-15/TD-11 Owner’s Manual (this document) • Data List (This is not included with the product; you may download it as necessary.) Visit the following URL, choose “Owner’s Manuals, ” and search for the model name “TD-15” or “TD-11. ” http://www.roland.com/support/en/...
-
Page 2: Using The Unit Safely
USING THE UNIT SAFELY Before using this unit, carefully read the sections entitled: “USING THE UNIT SAFELY” (p. 2) and “IMPORTANT NOTES” (p. 4). These sections provide important information concerning the proper operation of the unit. Additionally, in order to feel assured that you have gained a good grasp of every feature provided by your new unit, Owner’s manual should be read in its entirety. The manual should be saved and kept on hand as a convenient reference. WARNING WARNING WARNING Use only Roland stand MDS series that is Do not bend the power cord or place heavy Do not disassemble or modify by yourself recommended objects on it Do not open (or modify in any way) the unit or its AC adaptor. This unit should be used only with Do not excessively twist or bend... - Page 3 Place in a well ventilated location occurs wet hands The unit and the AC adaptor should Immediately turn the unit off, be located so their location or Never handle the AC adaptor or remove the AC adaptor from the position does not interfere with its plugs with wet hands when outlet, and request servicing by their proper ventilation. plugging into, or unplugging from, your retailer, the nearest Roland an outlet or this unit. Use only the specified stand (s) Service Center, or an authorized Disconnect everything before moving the unit Roland distributor, as listed on the This unit is designed to be used in “Information” page when: combination with specific stands Before moving the unit, disconnect (MDS series) manufactured by the AC adaptor and all cords • The AC adaptor, the power- Roland. If used in combination with...
-
Page 4: Important Notes
• For everyday cleaning wipe the unit with a soft, Top panel dry cloth or one that has been slightly dampened • MPEG Layer-3 audio compression technology with water. To remove stubborn dirt, use a cloth is licensed from Fraunhofer IIS Corporation and impregnated with a mild, non-abrasive detergent. THOMSON Multimedia Corporation. Afterwards, be sure to wipe the unit thoroughly • ASIO is a trademark of Steinberg Media with a soft, dry cloth. Technologies GmbH. • Never use benzine, thinners, alcohol or solvents of • Roland, SuperNATURAL, and V-Drums are either any kind, to avoid the possibility of discoloration registered trademarks or trademarks of Roland and/or deformation. Corporation in the United States and/or other countries. Repairs and Data • Company names and product names appearing • Never touch the terminals of the USB flash drives. • Please be aware that all data contained in the in this document are registered trademarks or Also, avoid getting the terminals dirty. unit’s memory may be lost when the unit is sent for trademarks of their respective owners. repairs. Important data should always be backed up to USB flash drives, or written down on paper (when possible). During repairs, due care is taken... -
Page 5: Main Features
Main Features SuperNATURAL on V-Drums Roland takes digital drums to a new height with the implementation of its exclusive SuperNATURAL concept. The best electronic drums in the world just got better. Improved dynamics and sensitivity make every nuance of playing drums feel even more natural, no matter what your musical style might be. What are SuperNATURAL Tones? Taking advantage of Behavior Modeling Technology, SuperNATURAL is Roland’s exclusive sound set that achieves a new level of realism and expression that were difficult to realize with previous sound generators. Behavior Modeling Technology Not only physical modeling of the instruments, Roland takes it a step further by modeling the instrument’s distinctive behavior that responds to how the performer plays, resulting in true-to-life, expressive sounds in realtime. Enjoy playing with the Internal songs & Song player Internal songs (p. 26) Realistic and powerful backing songs and loop phrases are built into the TD. These are perfect for practicing, or just the pure enjoyment of playing along. Song player (p. 27) You can play back audio files (WAV, MP3) directly from an inserted USB flash drive(optional). Also the Speed Control and A-B repeat functions allow you to take practicing with your favorite songs to a new level. -
Page 6: Table Of Contents
Contents USING THE UNIT SAFELY . . . . . . . . . . . . . . . . . . . . . . . . . . . . . . . 2 Performing Along with a Song . -
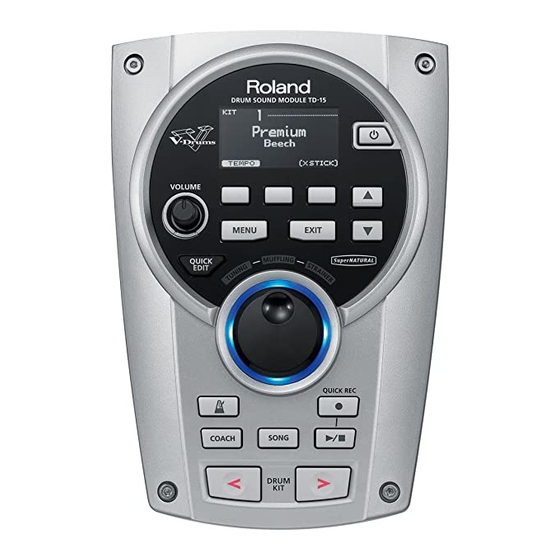
Page 7: Panel Descriptions
[SONG] button ] button Accesses the SONG screen (p. Plays/stops the song or your [DRUM KIT] buttons 27). Press this when you want to performance recorded by QUICK play songs or make song-related Switch drum kits (p. 11). REC (p. 27, p. 30). settings. * The illustration shows the TD-15. How to read this manual • T his owner’s manual applies to both the TD-15 and the TD-11. These two devices will be collectively referred to as the “TD. ” • F unctions found only on the TD-15 are indicated by the icon. • B uttons on the panel are enclosed by square brackets [ ]; for example, the [SETUP] button. • B uttons corresponding to function buttons shown in the display are referred to as (for example) the [F3] (XSTICK) button. -
Page 8: Side Panel (Connecting Your Equipment)
Panel Descriptions Side Panel (Connecting Your Equipment) DC IN jack OUTPUT jacks MIDI OUT connector (L/MONO, R) Connect the included AC adapter here. Use this when you want to trigger an external MIDI For connecting to your audio system or sound module, sampler, amp. All sounds from the TD are output etc., from the TD (p. 37). here. Place the AC adaptor so the side with the For outputting sounds in MONO, connect indicator (see illustra- the cable to the L/MONO jack. tion) faces upwards and the side with textual information faces downwards. The indicator will light when you plug the AC adaptor into an AC outlet. * The illustration shows the TD-15. [VOLUME] knob Adjusts the volume of the headphones. -
Page 9: Top Panel (Connecting Your Equipment)
Top Panel (Connecting Your Equipment) COMPUTER port MEMORY port Use a USB cable to connect the TD You can connect your USB flash drive to your computer (p. 47). MIDI data (separately sold) here, and play back and audio data can be sent via USB audio files from it (p. 27) or save TD to and from your DAW software. settings on it (p. 38). NOTE • Use USB flash drive sold by Roland. We cannot guarantee operation if other products are used. • Never insert or remove a USB flash drive while this unit is turned on. Doing so may corrupt the unit’s data or the data on the USB flash drive. • Carefully insert the USB flash drive all the way in-until it is firmly in place. Bottom Panel Sound module mounting plate attachment holes TRIGGER INPUT... -
Page 10: Getting Ready To Play
Getting Ready to Play Turning the power off Turning the Power On/Off NOTE Turning the power on Settings you’ve edited on the TD itself will be saved when you turn off the power. Be sure to turn off the power by pressing the [POWER] button. Once everything is properly connected (p. 8), be sure to follow the procedure below to turn on their power. Minimize the volume of the TD and of the If you turn on equipment in the wrong order, you risk external equipment connected to the TD . causing malfunction or equipment failure. Before turning the unit on/off, always be sure to turn Power-off the external equipment . the volume down. Even with the volume turned down, you might hear some sound when switching Hold down the [POWER] button until the screen... -
Page 11: Playing The Drums
” A “drum kit” is a set of sounds (instruments) assigned to the pads. Drum kit Instrument The DRUM KIT screen will appear. No matter what screen is in use, by pressing the [DRUM KIT] button, you will return to the DRUM KIT screen. The illustration below shows the structure of a drum kit. Selecting a drum kit from the list Drum kit 100 (50 on the TD-11) In the DRUM KIT screen, you can turn the value dial to access the KIT LIST and select a drum kit from the list. Drum kit 1 About the DRUM KIT screen Pad settings KICK SNARE TOM1 TOM2 This is the TD’s main screen; it will appear when you press... -
Page 12: Performance Techniques
Edge sensor Bell shot (CY-15R, CY-13R) Strike the bell area. Cross stick When XSTICK (p. 11) is on: Only strike the rim of the pad. Depending on the sound assigned to the rim you can play rim shots and/or cross stick sounds. * Strike the bell somewhat strongly with the shoulder of the stick. Choking a cymbal Choking (pinching) the cymbal’s edge with the hand immediately after hitting the cymbal will mute or choke the sound, just like with a real cymbal. The Choke function only works when you grasp in the area (where the edge sensor is) as shown in the figure. If you do otherwise, it will not work. * This is supported only for the snare pad. Roland logo * To play the cross stick, be sure that you only strike the rim of the pad. Place your hand on the head gently, Edge sensor otherwise this may prevent the cross stick function from working properly. -
Page 13: Using The Metronome
Playing the Drums Hi-Hat (CY-5/VH-11) Using the Metronome Practicing with the metronome is the best way to Open/Closed develop accurate timing. The hi-hat sound will change smoothly between open and closed depending on pressure applied to the hi-hat Starting the Metronome control pedal or a hi-hat stand. Foot closed and foot splash sounds are possible. Press the [ ] button . The metronome will start playing, and the button will blink in time with the tempo. MEMO You can change the way in which the metronome sounds (p. 36). Bow shot Changing the Metronome Tempo Hit the striking surface of the hi-hat. and Volume In the DRUM KIT screen (p . 11), press the [F1] (TEMPO) button . -
Page 14: Recording Your Performance (Quick Rec)
MEMO REC) button . SMF (Standard MIDI File) is a standard file The [ ] (QUICK REC) button will light, and the QUICK REC format that allows performance data to screen will appear. be exchanged between various musical applications. The recorded data is saved in the following folder of the USB flash drive. Roland TD-15 or TD-11 MEMO If you want to hear the metronome while you record, Backup press the [ ] button to turn on the metronome. Use the value dial to set the tempo. To start recording, strike a pad or press the QUICK REC KIT_01 .MID KIT_02 .MID ] button . -
Page 15: Quickly Editing An Instrument (Quick Edit)
Quickly Editing an Instrument (QUICK EDIT) The TD-15’s QUICK EDIT function lets you make quick and easy adjustments to the sound of each instrument. Before you continue, select the drum kit that contains the instrument you want to edit . In the DRUM KIT screen (p . 11), press the [QUICK EDIT] button . Each time you press the button, you’ll cycle between “Tuning, ” “Muffling, ” and “Strainer, ” and then return to the DRUM KIT screen. The pad being edited Strike the pad whose instrument you want to edit . -
Page 16: About The Menu Screens
About the MENU Screens There are eight menu screens that allow you to edit the drum kit. In the DRUM KIT screen, press the [MENU] button to access the KIT MENU screen, from which you can jump to each edit screen. INST Change instruments, or adjust the overall volume of the drum kit (p. 17). Apply an effect to the entire drum kit (p. 19). Menu Description Ambience Ambience settings Multi-effect settings Multi-FX EQ settings NAME Assign a name to the drum kit (p. 22) MIDI Change the MIDI note number of each pad (p. 22). COPY/PASTE Copy and paste drum kits or pads (p. 23). SAVE/LOAD Save a drum kit to your USB flash drive, or load a previously-saved drum kit from the USB flash drive back into the TD (p. 24). 1 KIT RESTORE This lets you return the currently selected drum kit to the factory settings (p. 25). Use the cursor buttons ( / ) SYSTEM to scroll the screen. Here you can edit settings that apply to the entire TD (p. 34). Menu Description Page Settings for display contrast and power Options p. 35 (Auto Off ) Metronome Metronome settings p. 36... -
Page 17: Creating A Drum Kit
Creating a Drum Kit Individual head and rim settings (Link) You can edit the individual sounds in each kit to customize them for your musical style. For some pads, you can assign different instruments to the head and rim (for a cymbal, to the bow and the bell). Changing the Instrument To enable this, turn Link off. In the INST screen, press the [F1] (LINK) button . On the TD, each instrumental sound, such as the kick drum or snare drum within the drum kit, is called an Each time you press the button, LINK will turn on/off. “instrument (INST). ” In the DRUM KIT screen (p . 11), press the [MENU] Value Description button . -
Page 18: Instrument Edit
Creating a Drum Kit Instrument Edit Parameter Value Description The openness of the hi-hat can NORMAL be changed by In the DRUM KIT screen (p . 11), press the [MENU] NORMAL, the pedal. Fixed HH button . FIXED1–4 The openness of The KIT MENU screen will appear. FIXED the hi-hat will be fixed. Press the [F1] (INST) button . Adjusts the brightness of the The INST screen will appear. -
Page 19: Using The Effects (Fx)
Creating a Drum Kit Using the Effects (FX) How each effect works AMBIENCE This produces an ambience (room reverberation) that’s ideal for drum sounds. You can adjust the room ambience (the type and size of the room) and the reverb (reverberation). MULTI-FX This is a powerful multi-effect that can be used to transform your sound. You can use it to distort the sound, or give it depth and spaciousness. This is a four-band (low, two mid bands, high) equalizer. Use it to adjust the tonal character. Basic procedure The edit screen for the selected effect will appear. Use the cursor buttons ( / In the DRUM KIT screen (p . 11), press the [MENU] ) to select a parameter. Use the value dial to button . edit the value. - Page 20 Level 0–100 Overall amount of ambience Ambience Send 0–100 Amount sent from each pad to the ambience 0–100 Amount sent from the multi-effect to the ambience MFX to Ambi Send [F2] (MULTI-FX) Type of multi-effect Type 10 types For details on multi-effect’s parameters, download “Data List” (PDF file) from “TD-15” in the “Owner’s Manuals” list on the Roland website (http://www.roland.com/support/en/). [F3] (EQ) High Freq 1 kHz–8 kHz Frequency of the high region High Gain -12 dB–+12 dB Amount of boost/cut for the high region Low Freq 20 Hz–1 kHz Frequency of the low region Low Gain -12 dB–+12 dB Amount of boost/cut for the low region Mid1 Freq 20 Hz–8 kHz...
-
Page 21: Adjusting The Amount Of Ambience For Each
Creating a Drum Kit Use the value dial to specify the amount of Adjusting the Amount of ambience (send level) . Ambience for Each Pad (SEND) Value 0–100 You can adjust the amount of ambience (the send level) for each pad. Press the [EXIT] button several times to return to the DRUM KIT screen . Access the AMBIENCE screen as described in steps 1–3 of the basic procedure (p . -
Page 22: Naming A Drum Kit
Creating a Drum Kit Naming a Drum Kit Changing the MIDI Note Number of Each Pad You can assign a name of up to 12 characters to each drum kit. You can also assign a sub title of up to 14 characters Here’s how to change the MIDI note number that is below the kit to indicate the musical style or the date on transmitted and received by each pad. which you created the kit. MEMO In the DRUM KIT screen (p . 11), press the [MENU] The settings in this screen will be ignored if the button . SYSTEM menu setting “Std MIDI Setup Lock” is “ON” (p. 37). The KIT MENU screen will appear. -
Page 23: Copying And Pasting A Drum Kit Or Pad
Creating a Drum Kit Press the [F1] (SEL) button to specify whether Copying and Pasting a Drum you want to copy a drum kit or a pad . Kit or Pad When copying a drum kit Drum kit name You can copy the settings of a drum kit or pad, and paste them to another kit or pad. NOTE When you execute the paste operation, the contents of the paste-destination will be erased. Use this operation with caution. When copying a pad The contents that are copied Pad name For a drum kit... -
Page 24: Saving A Drum Kit To A Usb Flash Drive
Creating a Drum Kit Press the [F3] (PASTE) button . Saving a Drum Kit to a USB If you’re pasting a pad, the paste operation will occur at this point. Flash Drive If you’re pasting a drum kit, a confirmation screen will appear. Here’s how you can save a drum kit to your USB flash drive. Saving a Drum Kit Connect your USB flash drive (p . 9) . * If you decide to cancel, press [F1] (CANCEL). Make sure that the drum kit you want to save is selected . -
Page 25: Loading A Drum Kit From A Usb Flash Drive Into The Td
Creating a Drum Kit Restoring a Drum Kit to the Loading a Drum Kit from a USB Flash Drive into the TD Factory Settings Here’s how the currently selected drum kit can be Connect your USB flash drive (p . 9) . restored to its factory-set state. Make sure that the loading-destination drum kit An accidentally-overwritten drum kit can also be is selected . -
Page 26: Performing Along With A Song
Performing Along with a Song Audio files that can be played by the TD The TD contains built-in-songs and phrases covering a variety of styles selected for enhancing your practice time. You can play the drums while listening to one of You can play back audio files of the following formats these songs. from a USB flash drive. If a USB flash drive is connected, you can play the drums while listening to one of your favorite songs from the USB flash drive. Sampling rate 44.1 kHz Bit rates 64 kbps–320 kbps Song structure Sampling rate 44.1 kHz A song contains MP3 or WAV audio tracks and drum tracks (MIDI data) containing a drum performance. Bit depth 8, 16, 24-bit For some internal songs there is a guide drum part on its drum track, which you can mute in order to play along with the song. When transferring files from your You can also use the QUICK REC function to record your computer to a USB flash drive performance with the songs. -
Page 27: Selecting A Song
Performing Along with a Song Selecting a Song Playing the Song If you want to select a song from a USB flash drive, you Use the following buttons to play back the song . must first connect the USB flash drive to the TD (p. 9). NOTE Button Function If you have recorded your drum performance along Play/stop song with a song, this data will be lost when changing Selects the previous song. songs. [F1] ( Hold down to rewind the song. Press the [SONG] button . Selects the next song. [F2] ( Hold down to fast-forward the song. -
Page 28: Changing The Song Settings
Performing Along with a Song Changing the Song Settings Selecting a Folder In the SONG MENU screen, press the [F2] In the SONG screen, press the [MENU] button . (FOLDER) button . The SONG MENU screen will appear. The FOLDER SELECTION screen will appear. Use the cursor buttons ( / ) or the [MENU] button to scroll the screen . -
Page 29: Repeatedly Playing A Specified Region
Performing Along with a Song At the location where you want to stop Repeatedly Playing a Specified repeating, press the [F3] (SET B) button . Region (A-B Repeat) The “B” character will light, and the song will continue repeating between “A” and “B. ” You can use the “A-B Repeat” function to repeatedly play back a specified region. Repeat If you want to respecify the region, press the [F3] (RESET) button. If you press the [F1] (CANCEL) button, conventional NOTE playback will resume and the A-B REPEAT screen will This setting cannot be made if the repeat region is close. -
Page 30: Play Along With A Song And Record Your Performance (Quick Rec)
* You must first select the drum kit and song that you want to use for practicing (performing). The recorded data is saved in the following folder * The sound from the MIX IN jack will not be recorded. of the USB flash drive. In the SONG screen, select a song . Roland Press the [ ] (QUICK REC) button . TD-15 or TD-11 The QUICK REC screen will appear, and the TD will be in record-standby mode. Backup QUICK REC SONG_01 .MID SONG_02 .MID SONG_03 .MID SONG_04 .MID SONG_05 .MID... -
Page 31: Practicing In Coach Mode
Practicing in Coach Mode Correctly Playing in Time with the Beat The TD’s Coach mode is a unique set of exercises specifically designed to help build speed, accuracy and (TIME CHECK) stamina, as well as develop better timing skills. Throughout the Coach modes, you will discover that some of them have programmable parameters, allowing This mode lets you practice playing accurately along you to adapt the functions to your specific needs. with the metronome. Start practicing Selecting a Practice Menu In the COACH MENU screen, press the [F1] (TIME CHECK) button; practice will start immediately. Press the [COACH] button so it’s lit . Strike the pad in time with the metronome . The COACH MENU screen will appear. - Page 32 Practicing in Coach Mode Settings Parameter Value Description Display 1 In the QUIET COUNT screen, press the [F2] (SETUP) In the screen, select the pad for which a timing graph button to access the settings screen. will be shown. Display 2 LEFT The left side of the timing graph is Parameter Value Description BEHIND shown as BEHIND (late). Gauge Specify the length (measures) of the LEFT The left side of the timing graph is 2, 4, 8, 16 interval for which the metronome will AHEAD shown as AHEAD (early). Measures (Measures) alternate between “Sounding” and “Quiet. ” * You can press the [F2] (METRO) button to make Of the measures specified by “Measures, ” this setting metronome settings (p. 13).
- Page 33 Practicing in Coach Mode Step 1: Change-Up Overall evaluation In this step, the rhythm type will change every two This grades your performance at each step, and displays measures. the overall evaluation. Starting from half notes, the note values will gradually become shorter, and will then return to half notes; this change in rhythms will be repeated. Evaluation EXCELLENT!, VERY GOOD!, GOOD, AVERAGE, (display) START OVER Step 2: Auto Up/Down Settings The tempo will gradually be raised and lowered. In the WARM UPS screen, press the [F2] (SETUP) button to The tempo will increase by 1 BPM (beat-per-minute) for access the settings screen. each beat until the metronome reaches the upper limit; then the tempo will continue slowing down by 1 BPM Param- until it reaches the initial tempo. Value Description eter * Auto Up/Down will be executed if Duration(p. 33) is 10 Specifies the time. MINS or 15 MINS. Time required: 5 minutes 5 MINS Change-Up: 2 minutes...
-
Page 34: Settings For The Entire Td (System)
Settings for the Entire TD (SYSTEM) Parameters that apply to the entire TD, such as the metronome settings and the pad sensitivity, are called “system parameters. ” Here we’ll explain the procedure for setting the system parameters, and what each parameter does. Basic procedure In the DRUM KIT screen (p . 11), press the [MENU] button . The KIT MENU screen will appear. Press the ( ) cursor button to scroll the screen until the SYSTEM icon appears . Press the [F3] (SYSTEM) button . The SYSTEM screen will appear. -
Page 35: Overall Settings For The Td (Options)
Settings for the Entire TD (SYSTEM) Overall Settings for the TD (Options) For details on the procedure, refer to “Basic procedure” (p. 34). Parameter Value Description Adjusts the contrast of the display. MEMO Display Contrast 1–10 In the DRUM KIT screen, you can adjust this by holding down the [MENU] button and turning the value dial. Display Brightness 1–10 Adjusts the brightness of the display. You can make the ring of the value dial light up in synchronization with your performance. The ring will not light. DYNAMIC The ring will light according to the dynamics of your playing. Illumination Ring KICK The ring will light when you play the kick drum. TEMPO The ring will light in synchronization with the tempo setting. You can make the [DRUM KIT] buttons light up. The [DRUM KIT] buttons will not light. Illumination Kit Buttons The [DRUM KIT] buttons will light. -
Page 36: Metronome Setup (Metronome)
Settings for the Entire TD (SYSTEM) Metronome Setup Using a Pad as a Switch (Metronome) (Pad Control) A pad connected to the TRIGGER IN AUX jack can In step 4 of the basic procedure (p . 34), choose function as a switch to change drum kits or to start/stop “Metronome” and press the [F3] (ENTER) button a song. to access the METRONOME SETUP screen . * This setting is valid only in the DRUM KIT screen and the SONG screen. -
Page 37: Midi-Related Settings (Midi)
Settings for the Entire TD (SYSTEM) MIDI-Related Settings (MIDI) Here you can set MIDI settings for the entire TD. There are many possibilities when using MIDI, such as: Use the pads to play external MIDI instruments You can layer sounds on the TD as well as play sounds from MIDI sound modules and samplers. Use the TD as a sound module Using the DAW software, you can use the TD as a dedicated drum sound module. Control an external video device When connected to a video device, you can use the TD to switch images. For details on the procedure, refer to “Basic procedure” (p. 34). Parameter Value Description [F1] (MIDI) Std MIDI Setup Lock OFF, ON Turn this ON if you’re using V-Drums Friend Jam or V-Drums Tutor (sold separately) (p. 47). -
Page 38: Using Usb Flash Drive (Usb Memory)
Settings for the Entire TD (SYSTEM) Choose “Save Backup“ and press the [F3] (ENTER) Using USB Flash Drive button (p . 38) . (USB Memory) Use the value dial to select the save-destination number . Next you can assign a name to the data that will be First connect your USB flash drive to the TD (p . 9) . saved. -
Page 39: Loading Data From A Usb Flash Drive Back Into The Td (Load Backup)
Settings for the Entire TD (SYSTEM) Loading Data from a USB Flash Drive Deleting Data from a USB Flash Back into the TD (Load Backup) Drive (Delete Data) Data you’ve saved on a USB flash drive can be loaded Here’s how to delete data that’s been saved on a USB back into the TD. flash drive. NOTE • All data and settings in the TD will be overwritten. • You can’t load data if “Write Protect” (p. 35) is turned Choose “Delete Data“ and press the [F3] (ENTER) button (p . -
Page 40: Viewing Information About The Usb Flash
Settings for the Entire TD (SYSTEM) Viewing Information About the Formatting a USB Flash Drive USB Flash Drive (Information) (Format) Here’s how to view information about the USB flash drive. NOTE When you execute the Format operation, all data on the USB flash drive will be erased. Parameter Description Backups Number of data backups Choose “Format“ and press the [F3] (ENTER) Kits Number of saved drum kits button (p . 38) . Amount of memory used on the USB Size Used flash drive... -
Page 41: Optimizing The Pad Settings (Pad Settings)
Settings for the Entire TD (SYSTEM) Optimizing the Pad Settings (Pad Settings) In step 4 of the basic procedure (p . 34), choose “Pad Settings” and then press the [F3] (ENTER) button to access the PAD SETTINGS screen . Choose one of the following items to edit . Button Description Page... -
Page 42: Setting The Pad Sensitivity [F2] (Basic)
Settings for the Entire TD (SYSTEM) Setting the Pad Sensitivity [F2] (BASIC) When you specify the pad type (p. 41), the following settings (basic trigger parameters) are automatically set to the values appropriate for each pad, meaning that you will normally not need to adjust them. If you wish to make detailed adjustments, you can edit the following parameters for each pad. MEMO The velocity monitor at the left of the screen indicates the velocity. Parameter Value Description Pad Type Refer to p. 41. You can adjust the sensitivity of the pads to accommodate your personal playing style. This allows you to have more dynamic control over the sound volume, based on how hard you play. Sensitivity 1–32 Higher sensitivity allows the pad to produce a loud volume even when played softly. Lower sensitivity will keep the pad producing a low volume even when played forcefully. Threshold This setting allows a trigger signal to be received only when the pad is above a determined dynamic level (velocity). This can be used to prevent a pad from sounding because of vibrations from other pads. In the example at the right, B will sound but A and C will Threshold 0–31 not sound. When set to a higher value, no sound is produced when the pad is struck lightly. -
Page 43: Advanced Settings For The Trigger Parameters
Settings for the Entire TD (SYSTEM) Advanced Settings for the Trigger Parameters [F3] (ADVNCD) When you specify the Pad Type (p. 41), the settings in this screen (advanced trigger parameters) will automatically be set to the values that are most suitable for that type of pad; this means that with the exception of crosstalk cancellation, you will normally not need to edit these settings. You should make fine adjustments to these parameters for each pad only if you experience the problems described in the explanation of each parameter. Press one of the [F1]–[F3] buttons to select the item that you want to edit . Strike a pad to specify the pad whose settings you want to edit . Use the cursor buttons ( / ) to select a parameter . - Page 44 Settings for the Entire TD (SYSTEM) Parameter Value Description Mask Time This setting prevents double triggering. When playing a kick trigger, the beater can bounce back and hit the head a second time immediately after the intended note—with acoustic drums sometimes the beater stays against Time the head—is causes a single hit to “double trigger” (two sounds instead of one). The Mask Time setting helps to prevent this. Once a pad has been hit, any additional trigger signals occurring within Sound not produced the specified “Mask Time” (0–64 msec) will be ignored. Mask Time 0–64 (ms) Adjust the “Mask Time” value while playing the pad. When using a kick trigger, try to let the beater bounce back and hit the head very quickly, then raise the “Mask Time” value until there are no more sounds made by the beater rebound. * When set to a high value, it will be difficult to play very quickly. Set this to as low a value as you can. MEMO If two or more sounds are being produced when you hit the head just once, then adjust Retrig Cancel (p. 43). This setting cancels “crosstalk, ” which means that when you play one pad you hear a sound coming from another pad. This can happen when two pads are installed on the same stand. In some cases you can prevent crosstalk by increasing the distance between the two mounted pads. Crosstalk Example: If you hit the snare pad and the tom 1 also sounds Xtalk Cancel 0–80 While striking the Snare pad, gradually increase the “Xtalk Cancel” value for the tom 1 pad until the tom 1...
- Page 45 Settings for the Entire TD (SYSTEM) Connecting the VH-11 and making Press the [F3] (ADVNCD) button, and then press the [F3] (HIHAT) button . settings on the TD The following screen will appear. Connections Clutch screw Motion sensor unit While you watch the meter that’s displayed in the left side of the screen, turn the VH-11’s VH offset adjustment screw to adjust it .
-
Page 46: Viewing Information About The Td (Information)
Settings for the Entire TD (SYSTEM) Press the [F3] (RESET) button . Viewing Information About A confirmation message will appear. the TD (Information) Here you can view information about the TD itself. For details on the procedure, refer to “Basic procedure” (p. 34). Item Description If you decide to cancel, press the [F1] (CANCEL) button. Program Ver . System program version If you’re sure you want to execute the factory reset, press the [F3] (OK) button . Restoring the Factory Settings Once again, a confirmation message will appear. -
Page 47: Connecting To A Computer Or Video Device
MIDI Visual Control is an internationally-used recommended practice that was added to the Installing the USB Driver MIDI specification so that visual expression could be linked with musical performance. Video equipment that is compatible with MIDI Visual Before connecting the TD to your computer, you must Control can be connected to electronic musical first install the USB driver. instruments via MIDI in order to control video equipment in tandem with a performance. Install the USB driver in your computer . What is the V-LINK? The dedicated driver for the TD-15 and TD-11 is included in the attached CD-ROM, or you can download it from V-LINK is a function that allows music and images the Roland website. to be performed together. By using MIDI to connect two or more V-LINK compatible devices, you can easily enjoy a wide range of visual effects Roland website that are linked to the expressive elements of a http://www.roland.com/ music performance. For the operating requirements, refer to the Roland Use a MIDI cable to connect the TD’s MIDI OUT connector website. The driver program and installation procedure to your video device. -
Page 48: Troubleshooting
Troubleshooting If you don’t hear sound, or if the system does not operate as you expect, please check the following points first. If you are still unable to resolve the problem, contact your retailer, the nearest Roland Service Center, or an authorized Roland distributor, as listed on the “Information” page. Problem Items to check Action Page Is the connection cable correctly con- nected to the TRIGGER INPUT connector? — Are the cables correctly connected to each pad and pedal? Check the connections. Are the cables correctly connected to the TD’s OUTPUT jacks or the PHONES jack? p. 8 Are the cables correctly connected to the input jacks of your amp or audio system? No sound Could there be a problem with the Try using other cables. — connection cables? Try raising the volume of the TD. Could the [VOLUME] knob be turned all p. 7 If you’re using the TD-15, check the side the way to the left? panel [VOLUME] knob as well. Have you made the correct input selection Check your amp or audio system. — setting on your amp or audio system? Are the volume settings of your amp or Try raising the volume of your amp or —... -
Page 49: Error Messages
• If this error message appears when playing back high bit-rate MP3 data, or when you’ve raised the playback Data could not be read fast enough from the speed of MP3 data, you may be able to solve the problem USB memory busy . USB flash drive. by lowering the bit rate or setting the speed to normal. • Use a USB flash drive sold by Roland. Error messages related to the TD’s internal memory The QUICK REC storage capacity is full, and Internal memory full . — recording has stopped. Error messages related to the system Contact your retailer, the nearest Roland Service Center, Device error . -
Page 50: Main Specifications
Main Specifications Roland TD-15 Roland TD-11: Drum Sound Module TD-15 Drum Kits TD-11 Ambience (10 types) Effect Types 4-Band Equalizer Multi Effect (10 types) *TD-15 ONLY Resolution 480 ticks per quarter note Recording Real-time Quick Rec Method Maximum Note approx. 30,000 Notes Storage File Format Audio File WAV/MP3 Illumination Ring *TD-15 ONLY Dynamic, Kick, Tempo Display 64 x 128 dots Graphic Type LCD (backlit LCD) TRIGGER INPUT connector (DB-25 type) (Kick, Snare, Tom1, Tom2, Tom3, Hi-Hat, Crash1, Ride, Ride Bell, Hi-Hat Control) -
Page 51: Index
Index A-B repeat ...... 29 link ........ 17 saving ADVNCD . - Page 52 MEMO...
- Page 53 Information When you need repair service, call your nearest Roland Service Center or authorized Roland distributor in your country as shown below. TAIWAN ECUADOR RUSSIA OMAN AFRICA EUROPE ROLAND TAIWAN ENTERPRISE Mas Musika Roland Music LLC TALENTZ CENTRE L.L.C. Rumichaca 822 y Zaruma Dorozhnaya ul.3,korp.6...
- Page 55 For the USA DECLARATION OF CONFORMITY Compliance Information Statement Model Name : Type of Equipment : Responsible Party : Address : Telephone :...
Need help?
Do you have a question about the TD-11 and is the answer not in the manual?
Questions and answers