Table of Contents
Advertisement
Quick Links
Advertisement
Table of Contents

Related Manuals for Tecdesk 5500i


Summary of Contents for Tecdesk 5500i
- Page 1 Fixed Wireless Phones Tecdesk 5500i User Manual English tecdesk.com...
-
Page 2: Table Of Contents
SECTION 1: GETTING STARTED SECTION 13: CLOCK SECTION 2: GETTING TO KNOW YOUR PHONE SECTION 14: SETTINGS SECTION 3: POWER ON/OFF SECTION 15: TECDESK 5500i SECTION 4: TEXT ENTRY EXPANSION MODULE (OPTIONAL) SECTION 5: CALL FUNCTIONS SECTION 16: TROUBLE SHOOTING... -
Page 3: Introduction
INTRODUCTION Thank you for purchasing the Tecdesk 5500i 3G Fixed Wireless Phone. This phone is designed for use with with GSM 900/1800 and UMTS 900/2100 MHz networks. You will require a valid SIM card from your network operator. Please refer to your network operator for more information. -
Page 4: Section 1: Getting Started
SECTION 1: GETTING STARTED Please check the box includes the following components. If there are any items missing please contact your supplier. Quick User Manual Start-Up Guide Tecdesk 5500i USB data cable User manual Quick start-up guide AC/DC power Lithium-polymer... - Page 5 USIM card Ensure a valid SIM card is inserted correctly into the desktop phone.
- Page 6 Battery The phone is powered by a rechargeable, standard Li-Ion battery. It comes with a charger to charge your phone. The battery is under a removable cover on the back of the phone. Ensure the polarity of the battery is aligned correctly with the connectors on the device before inserting the battery into the device.
- Page 7 SDcard Your phone supports a removable microSD™ memory card of up to 32GB, to store music, pictures and other files.
-
Page 8: Section 2: Getting To Know Your Phone
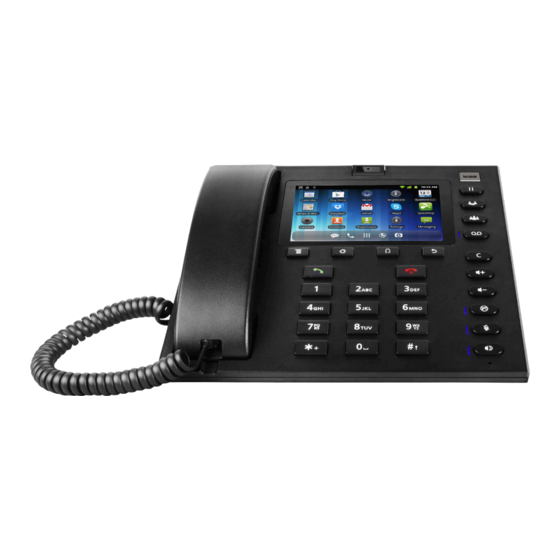
SECTION 2: GETTING TO KNOW YOUR PHONE ] Options button Press to display options for the current screen. ] Home button Press to display the home screen. ] Headset button Press to use the phone via a RJ11 headset rather than the receiver. ] Back button Press to revert to the previous screen or to go back to home screen. - Page 9 ] End button Press to terminate a call or power ON/OFF. [0-9] Alphanumeric keypad When entering usernames/ passwords or writing messages, you can press the buttons to toggle between numbers (123), lowercase characters (abc), and uppercase characters (ABC). Use this buttons to dial the phone numbers you want to call. ] Hold button Press the [ ] button and the current call will be placed on hold.
- Page 10 16. [ ] Speakerphone button Press the [ ] button to enable or disable the speakerphone. 17. Camera For video conferencing 18. Antenna port 19. Power adaptor/ charging port 20. RJ11 headset port 21. USB cable connector 22. Security slot...
- Page 11 Finger Gestures Touch Touch items to select or launch them. For example: • Touch the screen keyboard to enter characters or text. • Touch an application icon to launch the application. Touch and Hold Activate onscreen items by touching and holding them. For example: •...
- Page 12 Applications The Application’s screen holds all applications installed on your device. Applications that you download and install from Android Market or from the web are also added to the Applications screen. From the Home screen, touch the Applications icon. Slide your finger up or down to scroll through the Applications. Touch an icon to launch the application.
- Page 13 Status icons Signal Strength: Current signal strength Battery Level: Displays current battery level New Message: One or several message alerts Voice Call: Voice call in progress Missed Call: Displays missed calls Active 3G Connection: Phone is on an active 3G connection USB Connected: A USB cable is connecting the device to a PC/ laptop Alarm Set: Alarm is active Silent Mode: All sounds except media and alarms are silenced...
-
Page 14: Section 3: Power On/Off
SECTION 3: POWER ON/OFF Before powering ON the phone, make sure the phone is charged and the SIM card is inserted correctly. If the phone is powered ON without a SIM card, the screen displays a SIM card insertion message and the phone can only make calls to the emergency services. To call the emergency services, input the emergency service number and press the [ ] button to call. -
Page 15: Section 5: Call Functions
SECTION 5: CALL FUNCTIONS Making Calls Your phone offers multiple ways to make calls: Making a phone call by dialing a number On the Home screen, enter the phone number using the alphanumerical keypad, and press the [ ] button to make the call. To end the call, press the [ ] button. - Page 16 Making a phone call using contacts From the Home screen, select (Applications) Contacts. Find the contact and touch it to open details. Touch to dial the default number for the Contact. Making a call using Favourites From the Home screen, touch (Phone).
- Page 17 Answering/ Ending a call Answer or silence an incoming call Press the [ ] button or touch the icon to answer a call. Press the [ ] button or touch the icon to reject the call. Adjusting the receiver volume Press [ ] button to increase or decrease the volume on the handset during a call.
- Page 18 Calls via Headset You can use the a headset instead of the reciever to make and answer calls. If you are usign a headset with a RJ11 connection, plug the connector into the RJ11 port on the rear side of the phone and press the [ button.
-
Page 19: Section 6: Contacts
SECTION 6: CONTACTS This section explains how to manage your Contacts. Touch to access the contacts menu in the main menu. Creating Contacts Creating Contacts In the Contacts menu, touch New contact. Touch where you would prefer to save the contact - phone/ SIM. Creating Contacts from the Phone Dial Status Enter a phone number with the Phone Dialer keypad, touch Add to contacts then save the entry. -
Page 20: Section 7: Messages
SECTION 7: MESSAGES This section explains how to send and receive messages, and other features associated with messaging. Your phone supports these types of messages: SMS Text messages: Send and receive simple messages containing text. MMS Multimedia messages: Send and receive text messages with pictures and/or sound files to other mobile phones or email addresses. - Page 21 Settings Configuring message settings: 1. From a Home screen, touch (Messaging). 2. Touch Menu Settings to set: Storage settings Delete old messages: Touch to enable or disable automatic erasure of messages when storage reaches its default limits. When this function is disabled, you will be prompted to delete old messages when the limit capacity has been reached. Text message limit: Touch to set a limit for the number of text messages per thread.
-
Page 22: Section 8: Browser
SECTION 8: BROWSER Your phone is equipped with a full HTML Browser, which allows you to access the internet. From the Home screen, select Browser. Selecting items on a page While browsing pages, use gestures and menus to navigate through different links: •... - Page 23 Using Bookmarks Bookmark a site to have quick access. Creating a bookmark From the Home screen, select (Browser). Browse to the desired website, and then touch (Bookmarks) next to the URL field. The new website is displayed as a thumbnail with the command Add. Touch the bookmark to add it. At the Add bookmark prompt, confirm the Name and Location for the bookmark, and then touch OK to save the bookmark.
- Page 24 Remove from history: Remove the record of this page. Set as homepage: Set this page as the default first page when opening the Browser. On the History tab, use the following options: • Touch a page to load it. • Touch the star next to a page to bookmark it.
-
Page 25: Section 9: Music
SECTION 9: MUSIC Play audio files stored on the memory card. From Home screen, select (Applications) (Music). Music Player scans your memory card and displays your songs: Artists, Albums, Songs and Playlists. Touch a song or playlist to begin playback. 4. -
Page 26: Section 10: Video Player
SECTION 10: VIDEO PLAYER The 800x480px LCD screen can play videos and is DivX Certified®, it can play DivX® up to HD 720p, including premium content. Use Video Player to view and manage videos stored on a memory card. 1. From Home screen touch (Applications) (Videos). -
Page 27: Section 12: Calendar
SECTION 12: CALENDAR Create events and appointments to manage your schedule. From Home screen, select (Applications) (Calendar). Touch (Menu) for the following options: Day: Display today’s schedule, scroll to other days. Week: Display the current week, scroll to other weeks. Month: Display the current month, scroll to other months. -
Page 28: Section 14: Settings
SECTION 14: SETTINGS This section explains the settings you need to use to customise your phone. Theme settings Turn ON/OFF the Google theme and QRD theme. Wireless & networks Aeroplane mode When airplane mode is activated, your phone’s wireless connections are disabled, and you cannot make or receive calls, messages or con- nect to networks. - Page 29 Discoverable timeout: Set the time frame the device will be discoverable for. Scan devices: Touch to scan for nearby Bluetooth devices within range. After searching, touch a device to pair with a compatible Bluetooth device. Tethering & portable hotspot Share your phone’s mobile data connection via a USB or as a portable WLAN hotspot. VPN settings Set up and manage Virtual Private Networks (VPNs).
- Page 30 Notifications Notifications ringtone: Select a default ringtone for messages, alarm and other notifications. Feedback Audible touch tones: Play tones when you dial numbers on the Phone Dialler. Audible selection: Play tones when you touch the screen for selections. Display Brightness Sets the brightness for your screen.
- Page 31 Credential storage Use secure credentials You can install credentials from an installed memory card and use the Credential storage settings to allow applications to access the secure certificates and other credentials. Install from SD card Install encrypted certificates from an installed memory card. Set password Set or change a password to protect credentials.
- Page 32 enabled, a check mark appears in the check box. Auto-sync Touch Auto-sync to enable or disable the setting. When enabled, a check mark appears in the check box. All accounts will automatically sync and further options are available for setting specific accounts. Privacy Factory data reset Use Factory data reset to return your phone to its factory default settings.
- Page 33 To delete a word, touch the word, and then select Delete. Keyboard settings Enables you to change the settings on the Android keyboard. Date & time By default, your phone receives date and time information from the wireless network. When you are outside network coverage, you may want to set date and time information manually using the Date &...
-
Page 34: Section 15: Tecdesk 5500I
SECTION 15: TECDESK 5500i EXPANSION MODULE (OPTIONAL) This section helps you setup your Tecdesk 5500i Expansion Module. This is an optional module available from your place of purchase. Please contact your network operator for more information. Make sure the Expansion Module and the Tecdesk 5500i Main Unit are connected. - Page 35 Adding multiple Expansion Modules The Tecdesk 5500i can have a maximum of 3 Expansion modules connected to the main unit. Ensure you connect the 2nd Expansion Module onto 1st Expansion module. Select to access the Contacts menu in the main menu.
-
Page 36: Section 16: Trouble Shooting
SECTION 16: TROUBLE SHOOTING To save the time and expense of an unnecessary service call, perform the simple checks in this section before contacting a service professional. Your phone cannot be switched ON • Be sure that you press and hold the power button for more than 1 second. •... - Page 37 Your correspondent cannot reach you • Be sure that your phone is switched ON and connected to network. • Be sure that your USIM card is valid. • Be sure that you have not set incoming call barring. Your correspondent cannot hear you speaking •...
-
Page 38: Section 17: Legal Information
Tecdesk reserves the right to modify or change specifications or information without any consequential liability or prior notice. - Page 39 To the fullest extent permissible by applicable law, by using the applications provided with your device, you acknowledge that the application is provided as is. Tecdesk does not provide a warranty, make any representations, or take any responsibility for the...
-
Page 40: Section 18: Health And Safety
SECTION 18: HEALTH AND SAFETY RF/SAR information Your desk phone is a radio transmitter and receiver. When switching ON, your phone sends out low-level radio-frequency (RF). Country governments all over the world adopt state security guidelines developed by independent scientific organisations such as ICNIRP and IEEE. - Page 41 Medical devices Ensure that you switch OFF your phone in areas, near electronic medical equipment, that obviously require the phone to be switched OFF such as heart pacemakers, hearing aids, etc. Most medical devices can shield the phone’s RF signal, but some cannot. If you have any doubts, or need to find out more, please consult your doctor or medical device manufacturer.
- Page 42 Emergency calls Your phone, like any wireless phone, operates using radio signals, which cannot guarantee connection in all conditions. Therefore, you should never rely solely on any wireless phone for essential communications like medical emergencies. To make or receive calls, the phone must be switched ON and in a service area with adequate signal strength.
-
Page 43: Section 19: Declaration Of Conformity
SECTION 19: DECLARATION OF CONFORMITY Hereby, we declare under our sole responsibility that this product and in combination with the accessories are in compliance with the appropriate standards 3GPP TS 51.010-1, EN 301908-1/-2, EN 301511, EN 300328, EN 301489-1/-7/-17/-24, EN 60950-1, EN 50360, EN 50361, following the provisions of, Radio Equipment and Telecommunication Terminal Equipment directive 99/5/EC with requirements covering EMC directive 04/108/EC, and Low Voltage directive 06/95/EC. - Page 45 MODEL NO: TD5500i...
Need help?
Do you have a question about the 5500i and is the answer not in the manual?
Questions and answers