WESTEK TMDW30 - Indoor Digital Wall Switch Timer Manual
- Instruction manual (2 pages)
Advertisement
- 1 Getting Started
- 2 Setting Current Time
- 3 Programming ON/OFF Events
- 4 Block Programming
- 5 Random Function
- 6 Daylight Savings Time Function
- 7 Off/Timer Switch
- 8 Reviewing Programs
- 9 Deleting Programs
- 10 Manual Override
- 11 TMDW30
- 12 Initial Startup
- 13 Memory Backup
- 14 Disable Function
- 15 RATINGS
- 16 Limited One Year Warranty
- 17 Documents / Resources
- Wire in accordance with National and Local Electrical Codes.
- This device requires installation by a licensed electrician or qualified professional. Use of high voltage detector or meter is recommended.
- Turn power OFF at circuit breaker or fuse box.
- Remove and disconnect the existing switch.
- Connect TMDW30 wire leads to LOAD according to diagram.
- Turn power back ON at circuit breaker or fuse box.
Getting Started
- Lift up bottom of door using a small flathead screwdriver.
- Position the slide switch to TIMER.
- Press the RESET button using a paper clip.
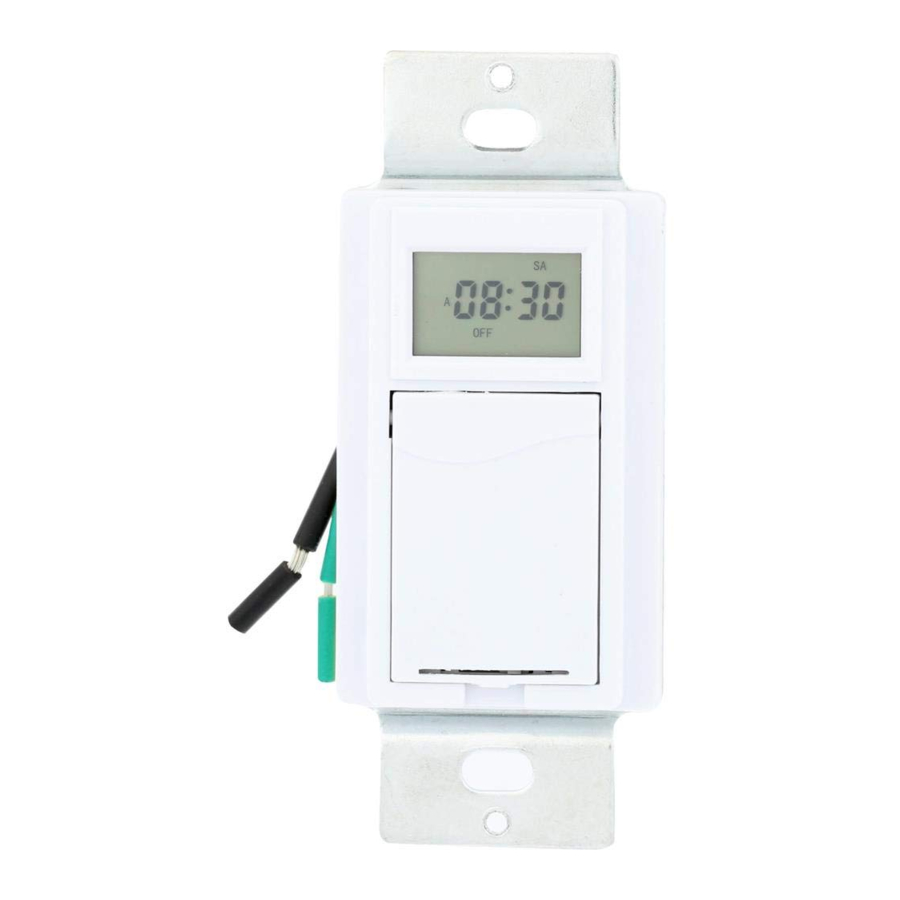
- The display should flash 12:00AM Monday, see Figure 1.
![]()
- If screen is blank, be sure slide switch is on time, check LOAD connected to the TMDW30 and check 120VAC power source.

Setting Current Time
- Press and hold CLK (Clock) button during entire process.
- Press HOUR button to advance the hours.
- Press MIN button to advance the minutes.
- Press DAY button to advance the day.
(If any key is pressed for a prolonged period, display will advance rapidly)
Release the CLK button once time and day have been entered. Timer is now ready to be programmed. The colon after the hours will continue to flash, indicating time is advancing.
Programming ON/OFF Events
- Press PROG button once, display will look as shown in Figure 2, indicating ON programming of timer setting 1.
![]()
- Using HOUR and MIN buttons, enter desired ON time. It is necessary to press MIN at least once to have "00" for minutes. By default, all days are indicated.
- When complete, press the PROG button again, display will look as shown in Figure 3, indicating OFF programming of timer setting 1.
![]()
- Using HOUR and MIN buttons, enter desired OFF time. It is necessary to press MIN at least once to have "00" for minutes. By default, all days are indicated. If done, press CLK button to return to current time and day.
- To set additional ON/OFF cycles (maximum of 7 events) press PROG button and follow procedures in steps 1 to 4 for each new ON/OFF event.


Block Programming
When programming ON/OFF events, all days are indicated by default, To change day selection, press DAY button and display will change as follows:
- Individual day (MO, TU, etc)
- MO-FR, SA-SU, MO-SA, MO-SU
- MO-WE-FR, TU-TH-SA
- MO-WE, TH-SA
Follow steps above to complete programming.
Random Function
Turns On/Off within 2-30 minutes of your programmed settings. To activate Random Function, press DAY and HOUR button until TIMER flashes on display. Press again to cancel.
Daylight Savings Time Function
Adds 1 hour to current time to adjust for Daylight Savings Time. Press MIN and HOUR buttons simultaneously until DST is on display. Press MIN and HOUR buttons again to go back 1 hour.
Off/Timer Switch
To turn off all programs, move switch to OFF position. Timer will not run any programs when switch is in OFF position. Programs will be saved by battery for up to 30 days.
Reviewing Programs
To review programs that have been entered, press and release PROG button to scroll through programs. Any program can be edited by pressing the HOUR, MIN, and DAY buttons. Press PROG button to accept changes. When done, press CLK button to return to current time and day.
Deleting Programs
Press PROG button until desired program is displayed.
Press the ON/OFF button until - -: - - is displayed.
When done, press CLOCK button to return to current time and day.
Manual Override
Pressing ON/OFF button will alternate the unit ON or OFF.
TMDW30

* Note: Ensure neutral (white) wire is present in junction box. If this wire is not present, additional wiring will be necessary before installation can be completed. Consult a qualified electrician.
Initial Startup
When initially programming unit, press the manual override button. For example, if it is 2:00PM and you set it to turn on at 1:00PM, you will need to press the manual override button to turn it on. Unit will then resume normal operation.
Memory Backup
Unit is equipped with a rechargeable Ni-Mh battery which will protect your programs during power failure for up to 30 days. No need to replace battery.
Note: Screen will go blank during a power failure.
Disable Function
This unit has a disable function whereby the programs do not execute.
It's perfect for vacations if the unit is not to perform any function.
Slide switch to OFF.
RATINGS
120V~, 60Hz
15A General Purpose
8A Tungsten
1HP Motor
8A Ballast
Limited One Year Warranty
AmerTac™ warrants this product to be free from defects in material and workmanship for a period of one year from the date of purchase. AmerTac's obligations are limited to repairing or replacing any defective unit and are effective only if such units are returned within one year of the purchase date to AmerTac, S250 Boulder Drive, Breinigsville, PA 18031. Warranty void if damage is due to misuse or improper installation. In no circumstance will AmerTac be liable for consequential or incidental damages relating in any way to this product.
Questions? 201.661.9944
©2010 AmerTac™
250 Boulder Drive
Breinigsville, PA 18031
www.amertac.com
Made in China

Documents / Resources
References

Download manual
Here you can download full pdf version of manual, it may contain additional safety instructions, warranty information, FCC rules, etc.
Download WESTEK TMDW30 - Indoor Digital Wall Switch Timer Manual
Advertisement


Need help?
Do you have a question about the TMDW30 and is the answer not in the manual?
Questions and answers