Advertisement
Quick Links
Advertisement

Related Manuals for BCP SKY6126


Summary of Contents for BCP SKY6126
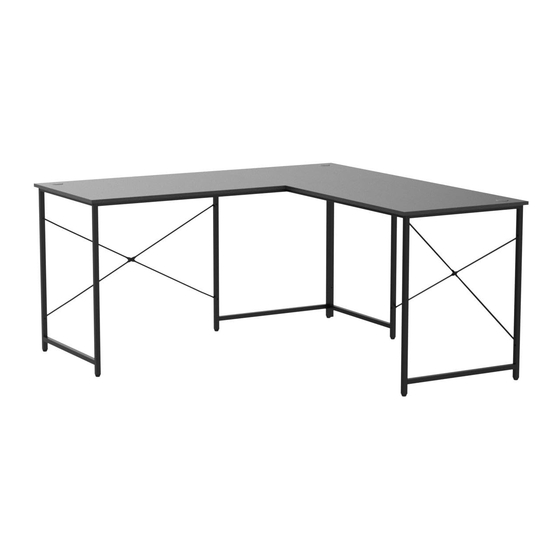
- Page 1 INSTRUCTION MANUAL Computer Desk SKY6126 + SKY6127 Ver. 2...
- Page 2 As shoppers, we’re always trying to find the perfect balance between quality & value. At BCP, we believe we’ve achieved that. Our diverse catalog of everyday essentials is tailored especially to our customers & guaranteed to hit that sweet spot of high quality & low price.
-
Page 3: Tools Required
NOTICE Please retain these instructions for future reference. • Please do not exceed the weight limitations of this item. • Do not stand on or use any part of this item as a step ladder. • Firmly secure all bolts, screws, and knobs before use. •... - Page 4 PARTS LEFT DESKTOP RIGHT DESKTOP CENTER DESKTOP 1 PC 1 PC 1 PC END FRAME PANEL MIDDLE FRAME PANEL BACK SUPPORT PANEL 2 PCS 1 PC 1 PC BACK CONNECTOR FRONT CONNECTOR FEMALE CONNECTOR PANEL PANEL PANEL 2 PCS 1 PC 1 PC MALE CONNECTOR SUPPORT ROD...
- Page 5 PARTS WIRE FUNNEL 3 PC This product features two construction methods, depending on your preference. PRODUCT ASSEMBLY (CORNER DESK) Attach the part I female connector rod to the part J male connector rod with two part 1 bolts, then set aside. Locate the part E middle frame panel and attach to the part F back support panel with two part 5 bolts and two part 7 end nuts, then set aside.
- Page 6 PRODUCT ASSEMBLY (CORNER DESK) Connect the part G connector rod to the back support panel assembly with one part 2 bolt and one part 7 end nut. Connect the part D and E panels with the male/female connector rod and secure with two part 4 bolts.
- Page 7 PRODUCT ASSEMBLY (CORNER DESK) Secure two support rods between the part D and E panels with four part 2 bolts and four part 7 end nuts. Connect the rods with one part 1 bolt and one part 7 end nut. Secure two support rods between the part D and F panels with four part 2 bolts and four part 7 end nuts.
- Page 8 PRODUCT ASSEMBLY (CORNER DESK) Flip the assembly and insert three part M wire funnels into the tabletop. PRODUCT ASSEMBLY (LONG DESK) Attach the part I female connector rod to the part J male connector rod with two part 1 bolts, then set aside.
- Page 9 PRODUCT ASSEMBLY (LONG DESK) Connect the part G connector rod to the back support panel assembly with one part 2 bolt and one part 7 end nut. Connect the part D and E panels with the male/female connector rod and secure with two part 4 bolts.
- Page 10 PRODUCT ASSEMBLY (LONG DESK) Secure two support rods between the part D and E panels with four part 2 bolts and four part 7 end nuts. Connect the rods with one part 1 bolt and one part 7 end nut. Secure two support rods between the part D and F panels with four part 2 bolts and four part 7 end nuts.
- Page 11 PRODUCT ASSEMBLY (LONG DESK) Flip the assembly and insert three part M wire funnels into the tabletop.
-
Page 12: Help Center
HELP CENTER HELP CENTER Question about your product? We're here to help. Visit us at: Question about your product? We're here to help. Visit us at: help.bestchoiceproducts.com help.bestchoiceproducts.com CHAT CHAT Product Assembly Product Assembly Returns & Refunds Returns & Refunds PRODUCT WARRANTY INFORMATION PRODUCT WARRANTY INFORMATION All items can be returned for any reason within 60 days of the receipt and will receive a full refund as long...
Need help?
Do you have a question about the SKY6126 and is the answer not in the manual?
Questions and answers