Advertisement
Available languages
Available languages
Quick Links
Advertisement

Subscribe to Our Youtube Channel
Related Manuals for Malloca MH-5903 I


Summary of Contents for Malloca MH-5903 I
- Page 1 USER MANUAL NG D N S D NG Model: MH-5903 I...
- Page 3 Safety Warnings Your safety is important to us. Please read this information before using your cooktop. Installation Electrical Shock Hazard • Disconnect the appliance from the mains electricity supply before carrying out any work or maintenance on it. • Connection to a good earth wiring system is essential and manda- tory.
- Page 4 at the mains power supply (wall switch) and contact a qualified technician. • Switch the cooktop off at the wall before cleaning or maintenance. • Failure to follow this advice may result in electrical shock or death. Health Hazard • This appliance complies with electromagnetic safety standards. Hot Surface Hazard •...
- Page 5 • Do not leave children alone or unattended in the area where the appliance is in use. • Children or persons with a disability which limits their ability to use the appliance should have a responsible and competent person to instruct them in its use.
- Page 6 supervision or instruction concerning use of the appliance in a safe way and understand the hazards involved. • Children shall not play with the appliance. Cleaning and user maintenance shall not be made by children without supervision. • WARNING: Unattended cooking on a cooker with fat or oil can be dangerous and may result in fire.
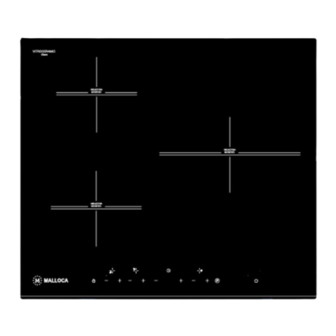
- Page 7 Product Overview Top View Max. 2600 W/zone Max. 1800 W/zone Max. 3000 W/zone Glass plate Control panel Control Panel 1. Heating zone position controls 2. Timer control 3. Power/Timer regulating controls 4. Keylock control 5. ON/OFF control 6. Boost function...
- Page 8 A Word on Induction Cooking Induction cooking is a safe, advanced, efficient, and economical cooking technology. It works by electromagnetic vibrations generat- ing heat directly in the pan, rather than indirectly through heating the glass surface. The glass becomes hot only because the pan eventually warms it up.
-
Page 9: Using The Touch Controls
• Remove any protective film that may still be on your hob. • Do not use cookware with jagged edges or a curved base. • Make sure that the base of your pan is smooth, sits flat against the glass, and is the same size as the cooking zone. Always centre your pan on the cooking zone. - Page 10 Using your Hob To start cooking • After power on, the buzzer beeps once, all the indicators light up for 1 second then go out, indicating that the hob has entered the state of standby mode. 1. Touch the ON/OFF control. After power on, the buzzer beeps once, all displays show “–”...
- Page 11 4. Adjust the power setting by touch the “-“ or “+” controls. The power will show in the power display. When you have finished cooking 1. Touching the "+" or "-" heating zone position control that you hope to switch off . 2.
- Page 12 4. Beware of hot surfaces “H” will show which cooking zone is hot to touch. It will disappear when the surface has cooled down to a safe temperature. It can also be used as an energy saving function if you want to heat further pans, use the hotplate that is still hot.
- Page 13 3. The boost power will last for 5 minutes and then the zone will go back to the power stage which was set before boost. 4. If you want to cancel boost function, touch the heating zone position button first, an indicator next to the key will flash. And then touch the boost button.
- Page 14 Over-Temperature Protection A temperature sensor equipped can monitor the temperature inside the hob. When an excessive temperature is monitored, the hob will stop operation automatically. Residual Heat Warning When the hob has been operating for some time, there will be some residual heat.
- Page 15 Hint: Touch the “ - ” or “ + ” control of the timer once to decrease or increase by 1 minute. Touch and hold the “ - ” or “ + ” control of the timer to decrease or increase by 10 minutes. If the setting time exceeds “99”...
- Page 16 Hint: Touch the “ - ” or “ + ” control of the timer once to decrease or increase by 1 minute. Touch and hold the “ - ” or “ + ” control of the timer to decrease or increase by 10 minutes. If the setting time exceeds “99”...
-
Page 17: Cooking Guidelines
2. When cooking timer expires, the corresponding cooking zone will be switch off automatically. NOTE: If you want to change the time after the timer is set, you have to start from step 1 Cooking Guidelines Take care when frying as the oil and fat heat up very quickly, partic- ularly if you’re using PowerBoost. -
Page 18: For Stir-Frying
it. Times may vary from about 2 – 8 minutes per side. Press the steak to gauge how cooked it is the firmer it feels the more ‘well done’ it will be. 5. Leave the steak to rest on a warm plate for a few minutes to allow it to relax and become tender before serving. -
Page 19: Care And Cleaning
Care and Cleaning What? How? Important Everyday soiling on 1. Switch the power to • When the power to the cooktop is glass (fingerprints, the cooktop off. switched off, there will be no ‘hot marks, stains left by food 2. Apply a cooktop surface’... -
Page 20: Hints And Tips
Hints and Tips Problem Possible causes What to do The induction cooker No power. Make sure the induction cooker is cannot be turned on. connected to the power supply and that it is switched on. Check whether there is a power outage in your home or area. - Page 21 The above are the judgment and inspection of common failures. Please do not disassemble the unit by yourself to avoid any dan- gers and damages to the induction cooker Technical Specification. MH-5903 I Cooking Hob Cooking Zones 3 Zones Supply Voltage...
-
Page 22: Installation
Installation Selection of installation equipment Cut out the work surface according to the sizes shown in the draw- ing. For the purpose of installation and use, a minimum of 5 cm space shall be preserved around the hole. Be sure the thickness of the work surface is at least 30mm. Please select heat-resistant work surface material to avoid larger deforma- tion caused by the heat radiation from the hotplate. -
Page 23: Before Locating The Fixing Brackets
A(mm) B(mm) C(mm) 50 Min 30 Min Air Intake Air exit 10mm Before you install the cooker, make sure that • the work surface is square and level, and no structural members interfere with space requirements • the work surface is made of a heat-resistant material •... - Page 24 The unit should be placed on a stable, smooth surface (use the packaging). Do not apply force onto the controls protruding from the cooker. Adjusting the bracket position Fix the cooker on the work surface by screw 2 brackets on the bottom of cooker(see picture) after installation.
- Page 25 a suitably qualified person. Before connecting the cooker to the mains power supply, check that: 1. the domestic wiring system is suitable for the power drawn by the cooker. 2. the voltage corresponds to the value given in the rating plate 3.
- Page 26 olar circuit-breaker must be installed with a minimum opening of 3mm between contacts. • The installer must ensure that the correct electrical connection has been made and that it is compliant with safety regulations. • The cable must not be bent or compressed. •...
- Page 27 CẢNH BÁO AN TOÀN Sự an toàn của bạn rất quan trọng đối với chúng tôi. Vui lòng đọc kỹ hướng dẫn sử dụng trước khi dùng thiết bị. LẮP ĐẶT An toàn điện • Ngắt kết nối thiết bị khỏi nguồn điện trước khi thực hiện vệ sinh hoặc bảo trì.
- Page 28 hệ với nhân viên kỹ thuật. • Tắt bếp trước khi vệ sinh hoặc bảo trì. • Việc không tuân theo lời khuyên này có thể dẫn đến điện giật. Hại cho sức khỏe • Thiết bị này tuân thủ các tiêu chuẩn về an toàn điện. Bề...
- Page 29 • Không đứng trên bếp • Không sử dụng chảo có các cạnh gồ ghề dẫn đến bề mặt kính thủy tinh có thể bị xước. • Không sử dụng chất tẩy rửa gây ăn mòn để làm sạch mặt bếp của bạn vì...
- Page 30 TỔNG QUÁT Bề mặt kính Công suất 2600W Công suất 1800W Công suất 3000W Bề mặt kính Bảng điều khiển Bảng Điều Khiển 1. Vị trí vùng nấu 2. Hẹn giờ cho bếp 3. Cài đặt công suất bếp 4. Khóa phím trẻ em 5.
- Page 31 Về Bếp Từ Bếp từ sử dụng công nghệ nấu ăn an toàn, tiên tiến, hiệu quả và tiết kiệm. Được hoạt động bởi dòng cảm ứng điện từ tạo ra nhiệt trực tiếp trong chảo, chứ không phải gián tiếp thông qua việc làm nóng bề...
- Page 32 • Đảm bảo rằng đáy nồi phẳng, cùng kích thước với vùng nấu. Luôn luôn đặt nồi lên khu nấu ăn. • Luôn nhấc các nồi ra khỏi bếp - không trượt có thể làm xước kính. Sử dụng Điều khiển cảm ứng •...
- Page 33 Hướng Dẫn Sử Dụng Bắt đầu nấu ăn • Sau khi bật nguồn, tiếng còi báo hiệu tiếng bíp một lần, tất cả các chỉ số sáng lên trong 1 giây và sau đó tắt, cho biết rằng bếp đang ở chế...
- Page 34 4. Điều chỉnh cài đặt công suất bằng cách chạm vào các nút điều khiển "-" hoặc "+". Chỉ báo công suất sẽ hiển thị trong màn hình công suất. Khi bạn nấu xong 1. Nhấn vào nút "+" hoặc "-" vị trí vùng nấu mà bạn muốn tắt. 2.
- Page 35 4. Hãy cẩn thận với bề mặt nóng "H" sẽ cho biết vùng nấu nào nóng không nên chạm vào. Kí tự “H” sẽ biến mất khi bề mặt đã nguội xuống đến một nhiệt độ an toàn. Sử dụng chức năng Boost Đối với bếp nấu, Boost là...
- Page 36 4. Nếu bạn muốn hủy chức năng tăng công suất, hãy chạm vào nút "+" hoặc "-" vị trí bếp trước tiên, một chỉ báo bên cạnh phím sẽ nhấp nháy. Và sau đó chạm vào nút Booster. Khu vực nấu sẽ trở lại giai đoạn công suất đã...
- Page 37 Cảnh báo nhiệt dư Khi bếp đã được hoạt động một thời gian, nhiệt độ trên mặt kính còn nóng. Chữ "H" hiển thị để cảnh báo rằng bếp còn nóng. Bảo vệ tự động tắt bếp Tắt tự động là một chức năng bảo vệ an toàn cho bếp của bạn. Bếp sẽ...
- Page 38 tăng thêm 10 phút. Nếu thời gian cài đặt vượt quá "99" phút, hẹn giờ sẽ tự động trở về "00" phút. 4. Chạm vào nút "+" hoặc "-" vị trí vùng nấu, sau đó chạm vào 'Timer', bộ hẹn giờ sẽ bị hủy, và "-" sẽ hiển thị trong màn hình hiển thị...
- Page 39 "00" phút. 4. Chạm vào nút "+" hoặc "-" vị trí vùng nấu, sau đó chạm vào 'Timer', bộ hẹn giờ sẽ bị hủy, và "-" sẽ hiển thị trong màn hình hiển thị phút. 5. Khi thời gian được thiết lập, bếp sẽ bắt đầu đếm ngược ngay lập tức.
- Page 40 đặt, bạn phải bắt đầu từ bước 1 Hướng dẫn nấu ăn Cẩn thận khi chiên vì dầu và chất béo nóng rất nhanh, đặc biệt nếu bạn đang sử dụng tăng công suất Boost. Ở trường hợp công suất cao dầu và...
- Page 41 Bảo Trì và Vệ Sinh Vấn đề Cách giải quyết Quan Trọng Bị bẩn mỗi ngày trên 1. Tắt nguồn điện bếp. • Khi tắt nguồn bếp, bề mặt kính có kính (vết dấu vân tay, 2. Nên vệ sinh trong khi thể...
- Page 42 Gợi Ý Lời Khuyên Vấn đề Nguyên nhân Cần phải làm Bếp từ không thể bật Không có công suất Đảm bảo bếp được nối với nguồn điện và được bật. Kiểm tra xem có nguồn điện hay không trong nhà hoặc khu vực của bạn.
- Page 43 Trên đây là việc đánh giá và kiểm tra các lỗi phổ biến. Xin vui lòng không tháo rời các bộ phận bếp để tránh bất kỳ mối nguy hiểm và thiệt hại cho bếp từ Thông số kỹ thuật Model MH-5903 I Vùng nấu 3 vùng Điện Áp 220-240V~ Công Suất...
- Page 44 Cài đặt Lựa chọn thiết bị lắp đặt Cắt bề mặt lỗ đá theo kích cỡ được thể hiện trong bản vẽ. Với mục đích lắp đặt và sử dụng, phải giữ khoảng cách tối thiểu là 5cm quanh lỗ. Đảm bảo độ...
- Page 45 A(mm) B(mm) C(mm) 50 Min 30 Min Air Intake Air exit 10mm Trước khi lắp đặt bếp, đảm bảo rằng • Bề mặt lắp bếp được làm bằng vật liệu chịu nhiệt • Nếu bếp được lắp trên lò nướng, lò nướng nên có một quạt làm mát gắn sẵn •...
- Page 46 Cảnh báo 1. Bếp phải được lắp đặt bởi nhân viên có tay nghề hoặc kỹ thuật viên. Chúng tôi có trung tâm dịch vụ khách hàng, nên liên hệ chúng tôi khi cần thiết. 2. Bếp không được đặt trực tiếp trên máy rửa chén, tủ lạnh, tủ đông, máy giặt hoặc máy sấy quần áo, vì...
- Page 47 thực hiện và phù hợp với các quy định an toàn. • Cáp không được uốn cong hoặc nén. • Cáp phải được kiểm tra thường xuyên và thay thế bởi nhân viên kỹ thuật được ủy quyền. Thiết bị được dán nhãn phù hợp với chỉ thị tiêu chuẩn của châu Âu 2002/96/EC về...
- Page 48 Customer Care: Hotline: 1800 12 12 Email: chamsockh@malloca.com CÔNG TY TNHH MALLOCA VI T NAM Showroom: 279 Đư ng Nguy n Văn Tr i, Phư ng 10, Qu n Phú Nhu n, TP.HCM Đi n Tho i: (84) 28 39975 893 / 94 Fax: (84) 28 38447 102 - (84) 28 38633 882 Email: info@malloca.com...
Need help?
Do you have a question about the MH-5903 I and is the answer not in the manual?
Questions and answers