Table of Contents
Advertisement
Quick Links
Advertisement
Table of Contents

Related Manuals for Altrad MINI CATCH NET FAN


Summary of Contents for Altrad MINI CATCH NET FAN
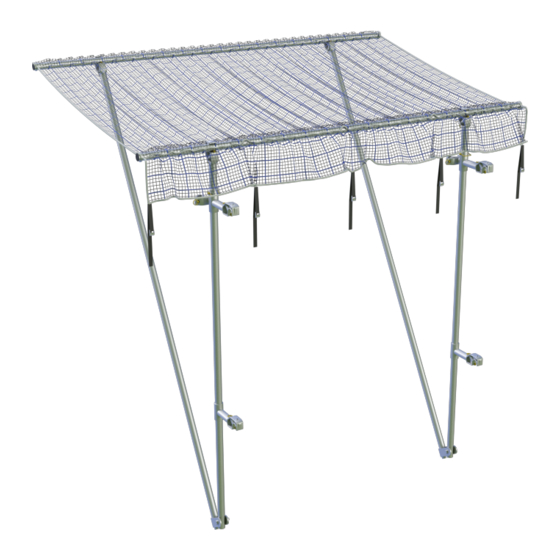
- Page 1 MINI CATCH NET FAN USER GUIDE...
-
Page 2: Table Of Contents
Contents 1.0 Introduction ..............................3 2.0 Key features ..............................3 3.0 Component Recognition ..........................4 4.0 Catalogue ................................5 5.0 Assembly Instructions ..........................7 6.0 Setting the fans in the out of service position ..................14 7.0 Corner Formation ............................15 8.0 Connection to a facade ..........................20 9.0 Technical Details ............................ -
Page 3: Introduction
1.0 Introduction DESSA offers efficient lightweight temporary roofing, encapsulation solutions, aluminium lattice girders and safety products. DESSA’s unique and distinctive aluminium solutions are suitable for not only grandstands, stages and events but also public utility works, local authorities, government buildings, historic buildings, highways, bridges and industrial market sectors. Time proven on demanding and complex applications across varied climates throughout the UK, Canada, UAE, Australia and Europe, DESSA offer unrivalled span capabilities and alternative configurations. -
Page 4: Component Recognition
3.0 Component Recognition Net Rail Y09003 Y09002 Support Assembly Y09001... -
Page 5: Catalogue
4.0 Catalogue DESCRIPTION PART No WEIGHT (kg) DIM 1 (m) DIM 2 (m) Support Assembly Supplied complete with Sliding lower bracket and adjustable top bracket with locking pin. For securing the net to a scaffold or a facade. Y09001 2.55 0.43 Net Rail To support the net at outer and... - Page 6 This enables attaching the Mini Catch Net Fan directly onto a facade. Y09006 2.10 0.16 0.10 90mm offset shear anchor Alternative way of fixing the Mini Catch Net Fan to a facade utilizing scaffold tubes. AB0001 2.00 0.16 0.16 Net Rail connector Bracket...
-
Page 7: Assembly Instructions
5.0 Assembly Instructions 5.1 Inspection. Lay the components out for inspection. Unfurl the net in full. It is essential that the 20x20mm mesh is uppermost and the cam buckle straps are on the edge closest to the scaffold following the installation. Check that the service tag is attached and a valid test date is stipulated. Carry out a visual inspection and report any discrepancies or concerns immediately. - Page 8 Employing a safe method of work the supports need to be located vertically outside the scaffold elevation. The uppermost claw needs to be located above the desired connection point and then push-locked onto the ledger (as shown below). The locking pin will slide out allowing for the ledger to enter the claw. Do not force the claw over the ledger - it should not require force when the assembly is perpendicular to the face of the scaffold.
- Page 9 Install the second support assembly. The distance between the supports should be 2m. This can be achieved using the optional DESSA spacer Y09004. optional spacer...
- Page 10 5.3 Installing the net With the 20x20mm mesh on the inside connect the outer rail to the upper claws. The claws should be located centrally between the collars as shown below. 20x20 100x100 Simply put the rail into the claw. Ensure the claw is central between the collars.
- Page 11 Install the internal rail making sure that the net stays on top of the rail, does not get in the way and is not clipped in the claw. Hold the upright and open the fan by reaching under the net flap and disengaging the claw spring pins on both the supports.
- Page 12 Complete the installation by attaching the five cam buckle straps to the scaffold. This should introduce tension to the net flap allowing you to close the gap between the fan and the scaffold.
- Page 13 5.4 Installing a row of fans In order for the fans to function correctly an overlap needs to be ensured between them. This can be achieved by installing the fans 0.6m apart. To ensure this is done correctly use the DESSA provided 0.6m spacer ( Y09005).
-
Page 14: Setting The Fans In The Out Of Service Position
6.0 Setting the fans in the out of service position 6.1 Using spacer with hook Y09004 retract each upper fan rail assembly locking the uprights into the rear safety claw. Following this lift each remaining fan locking in a similar manner. Proceed to lift the remaining, lower fans to complete the entire row:... -
Page 15: Corner Formation
7.0 Corner Formation 7.1 Assembling the net extension. Place the rails with net on a flat surface. Make sure that the 20x20mm mesh is the uppermost. Expose the rails by twisting the net on the outer rail and flipping the net flap next to the inner rail. Locate four Y09007 brackets as shown below. - Page 16 Use AF0002 pins in the U-shaped brackets and snap the claws on. 7.2 Connect the support spurs Y09008. Use the AF0002 quick release pins to connect two support spurs to the ends of net rails of the upper set.
- Page 17 7.3 Install a pair of supports next to a corner of the scaffold, install spacer Y09004 above the lower hinge as shown below. Using the methods as detailed previously at- tach the double fan assembly to the support frames. 7.4 Unfold the fan as you would a single one, bearing in mind that the assembly is heavier. The optional spacer Y09004 with hook can be used to restrain the fan allowing the fan to be low- ered slowly.
- Page 18 7.5 Using the integrated hook on spacer Y09004 reach out and bring the support spurs back to the outer support assembly.
- Page 19 7.6 Tie the support spurs back to the outer support assembly using standard scaffold swivel couplers.
-
Page 20: Connection To A Facade
8.0 Connection to a facade 8.1 Using the dedicated catch fan offset bracket Y09006. You will need four brackets per fan. Suitable and safe connectors need to be chosen according to the type of wall you wish to anchor to - see below (net omitted for clarity). 8.2 Using the 88mm offset shear tie AB0001. -
Page 21: Technical Details
9.0 Technical Details This fan is classed as light duty (Class A) according to TG20 (section 10.5) and is intended to catch small falling objects such as fittings and/or tools from a vertical distance of no more than 6m. Please note that a protection fan is not a guarantee of stopping a falling object due to all the factors that play a part in this: initial trajectory of a falling object, influence of the wind etc. - Page 22 This can be done by simply reading the “YYYY/MM” date on the label or identifying the colour on the right margin of the label that will correspond with the date of manufacture of that batch of nets. MINI CATCH NET FAN CLASSIFICATION: BS EN 12811-4...
- Page 23 Other products from DESSA include: • TEMPORARY ROOFING SYSTEMS • RANGER STAIR • SAFETY PRODUCTS • LATTICE GIRDERS...
- Page 24 DESSA LIMITED Unit 25 Little End Road, Eaton Socon, St. Neots, Cambridgeshire, PE19 8JH - United Kingdom Tel +44 (0)1480 475297 - Fax +44(0)1480 215378 - Email: info@altrad-dessa.com www.altrad-dessa.com...
Need help?
Do you have a question about the MINI CATCH NET FAN and is the answer not in the manual?
Questions and answers