Table of Contents
Advertisement
Quick Links
Advertisement
Table of Contents

Related Manuals for AlterG Pro 100


Summary of Contents for AlterG Pro 100
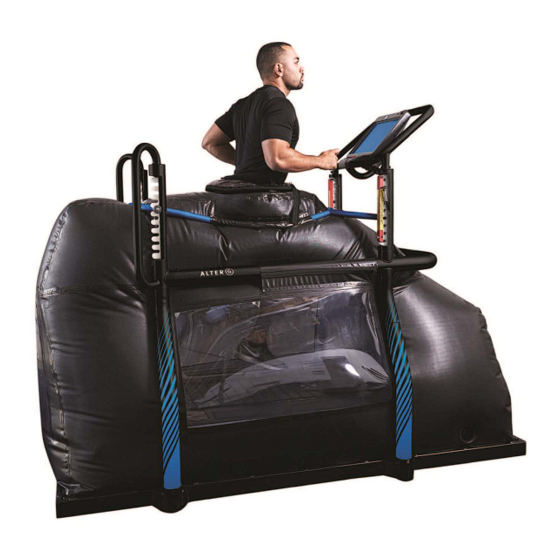
- Page 1 User Manual ® Pro 100 Anti-Gravity Treadmill Product...
- Page 2 Note: The following symbol is used throughout this manual to call attention to Warnings, Cautions or operational procedures that may directly affect the safe operation of the Pro 100 Anti-Gravity Treadmill. Read and understand these instructions and statements before operating the Pro 100 Anti-Gravity Treadmill.
-
Page 3: Table Of Contents
Table of Contents Owner Responsibility ............................ 5 AlterG Contact Information..........................6 Safety: Warnings and Cautions........................7 Introduction..............................9 Consulting a Physician ..........................9 The Importance of Warming Up and Cooling Down ................. 9 Setup and Installation ..........................10 Electrical Requirements .......................... 10 Grounding Requirements ........................ - Page 4 Adjust Treadmill Creep ........................... 38 Appendix D: Warranty ..........................40 D000535-00 Rev. C...
-
Page 5: Owner Responsibility
Should such repair or replacement become necessary, it is recommended that a request for service be made to AlterG, Inc. The Anti-Gravity Treadmill, or any of its parts, should only be repaired in accordance with instructions provided by AlterG, Inc., authorized representatives of AlterG, Inc., or by AlterG, Inc. -
Page 6: Alterg Contact Information
AlterG Contact Information AlterG welcomes your inquiries and comments. If you have any questions or comments, please contact our service and support team. AlterG Headquarters, Service and Support 48368 Milmont Drive Fremont, CA 94538 U.S. 510 270-5900 www.alterg.com D000535-00 Rev. C... -
Page 7: Safety: Warnings And Cautions
Safety: Warnings and Cautions Before using the Pro 100 Anti-Gravity Treadmill, please read this manual. As a physical therapist, trainer, or clinician (the operator of the product), you must understand the safety features and user interface. We want you and your clients or patients (the users of the product) to have a safe and enjoyable exercise experience. - Page 8 • Keep hands away from all moving parts. • Do not use the Pro 100 Anti-Gravity Treadmill if the user’s weight is less than 85lbs (39kg) or greater than 400lbs (182kg). • Care should be taken when the user enters and exits the Anti-Gravity Treadmill. Users should never enter the Anti-Gravity Treadmill while the treadmill surface is moving.
-
Page 9: Introduction
Do not abruptly end the workout session on the Pro 100 Anti-Gravity Treadmill. The user’s full body weight should be restored slowly and should include a few minutes of walking at full body weight and low intensity before stopping the workout session. -
Page 10: Setup And Installation
12ft (3.7m) (from the front of the treadmill) of the proper electrical outlet. Check with a qualified electrician or AlterG if you plan on extending the cord in any way. Make sure you leave at least 24” (0.6m) on either side of the treadmill to allow the enclosure to expand during inflation. Allow at least 40” (1m) behind the treadmill to accommodate a user getting in and out safely. -
Page 11: Operation
Operation Powering On the Anti-Gravity Treadmill 1. The main power switch is located at the front of the Anti-Gravity Treadmill. Switch it on to start the system. 2. To boot up the software and turn on the touchscreen display, press the power button located in back of the console. -
Page 12: Putting On The Shorts
Putting on the Shorts Your Anti-Gravity Treadmill comes with customized neoprene compression shorts that ensure an airtight seal between the user’s body and the lifting enclosure of the treadmill. It is recommended that the user put the shorts on before stepping into the treadmill. Have the user select a size that is snug but not uncomfortable, and make certain the tag is at the users back and on the inside of the shorts. - Page 13 3. Use the numbers on the height adjusters as a reference and to ensure alignment between front, back and sides of the support frame. It is particularly important that the frame be level side-to-side. 4. Set the support frame at a height that places the zipper at the user’s iliac crest (the top, outer edge of the pelvic bone felt just below waist level).
-
Page 14: Zipping Into The Enclosure
8. Close the safety latches located on the 2 front height adjusters. Press the latches down all the way and secure them with the spring loaded safety pins. CAUTION: Never operate the Anti-Gravity Treadmill without the safety latches closed and locked in place. -
Page 15: Attaching The Safety Lanyard
Always use the magnetic safety lanyard supplied with the Anti-Gravity Treadmill. If you lose the safety magnet, order a replacement from AlterG. As a precaution, the treadmill will not operate without the safety magnet directly over the Emergency Stop label. -
Page 16: Starting And Completing A Workout Session
Starting and Completing a Workout Session The procedures in this section describe: • Starting a workout session • Using the touchscreen features and controls • Adjusting Anti-Gravity Treadmill speed and direction • Adjusting pain levels Starting a Workout Session Operator or User Action Screen 1. - Page 17 Operator or User Action Screen 4. Use the features and controls on the touchscreen to view and modify the workout session. See “Using the Touchscreen Controls”. D000535-00 Rev. C...
-
Page 18: Using The Touchscreen Controls
Using the Touchscreen Controls Workout session information: Session time counter (minutes and seconds), calories burned, running pace (in minutes to run a mile), distance (in miles or kilometers), heart rate in beats per minute (bpm). Incline %. Tap up arrow to increase; tap down arrow to decrease. The Anti-Gravity Treadmill surface can be inclined between 0% and 15% in 1% increments. -
Page 19: Adjusting Anti-Gravity Treadmill Speed And Direction
Adjusting Anti-Gravity Treadmill Speed and Direction Treadmill speed is expressed as a numerical value in miles per hour (mph) or kilometers per hour (km/h). Increase or decrease the speed using the arrow controls. Speed is adjusted in 0.1 mph (or 0.1 km/h) increments. -
Page 20: Setting Pain Levels
Setting Pain Levels Operator or User Action Screen 1. Tap PAIN on the session screen. A graphical display showing a 10-point number scale appears. The lowest pain level is 0 (no pain) and the highest pain level is 10 (worst possible). 2. -
Page 21: Stopping The Workout Session
Stopping the Workout Session Before the user stops exercising, gradually return the user’s body weight to 100% and have the user perform a low intensity cool-down phase. When you end the workout session, the user should continue to step in place while exiting the system; this prevents light-headedness experienced by some people following exercise. -
Page 22: Stepping Out Of The Anti-Gravity Treadmill
Operator or User Action Screen 3. If you selected the e-mail option, enter a report name and e-mail address. Tap SEND REPORT. If you selected the USB option, enter a report name. Tap SAVE REPORT. 4. After you send or save the report, the Session Complete screen reappears. -
Page 23: Operating Optional Accessories
Operating Optional Accessories Heart Rate Monitor The Anti-Gravity Treadmill display is designed to receive a user’s heart rate in conjunction with the use of a Polar® (Chest Strap) Heart Rate Monitor. For the screen to correctly display a user’s heart rate, the receiver within the display must obtain a stable heart rate signal from the Polar transmitter. -
Page 24: Labels, Locations, Interpretation
Labels, Locations, Interpretation You must read and understand the labels on the Pro 100 Anti-Gravity Treadmill. The labels provide information on the operation of the Anti-Gravity Treadmill. Follow all instructions on the labels for a safe and enjoyable exercise experience. - Page 25 Label #2 This label is located on areas of the Anti-Gravity Treadmill frame that present a pinch hazard when the enclosure is inflated. The metal frame of the Anti-Gravity Treadmill helps to shape and contain the fabric enclosure. As the enclosure inflates, the enclosure expands to touch the frame in the areas where the labels are placed.
- Page 26 Label #5 Users must be in good health to exercise on the Anti-Gravity Treadmill. Users must consult a physician before beginning an exercise program on the treadmill. If a user experiences any pain, discomfort or unusual symptoms while exercising on the treadmill, they must stop immediately and consult their physician before resuming an exercise program.
- Page 27 Label #8 AlterG manufactures the system. This label is located on the base of the Anti-Gravity Treadmill and identifies the serial and model number of the system as well as the power and voltage requirements. Label #9 This label is located within the structure of the Anti-Gravity Treadmill and indicates that a high voltage is present in that location.
-
Page 28: Maintenance
Shorts Cleaning and Disinfection • Before the user puts on or takes off the AlterG’s Shorts, make sure they always remove their shoes. Keeping shoes on while putting on the shorts puts a great deal of stress on their seams and will significantly reduce the life of the shorts. -
Page 29: Enclosure And Frame Cleaning And Disinfection
Regular cleaning and wiping of the surfaces after each use is recommended. Following exposure to infectious agents, clean the surfaces of the treadmill in accordance with CDC guidelines or consult AlterG, Inc. General Cleaning and Inspection Periodic cleaning and inspection will help lengthen the life of your Anti-Gravity Treadmill and keep it looking good. -
Page 30: Enclosure Windows
Note: If your Anti-Gravity Treadmill is exposed to the sun, it is necessary to order a special window cleaner that contains UV protection. For a list of retailers and distributors in your area, contact AlterG or visit Amazom.com and order the IMAR™ Strataglass protective cleaner. If you have any problems with your Strataglass, contact AlterG immediately. -
Page 31: Enclosure Removal And Cleaning
Enclosure Removal and Cleaning 1. Power off and unplug the Anti-Gravity Treadmill. 2. Locate the metal strips under the metal tabs at the base of the enclosure. The metal strips are retained by black plastic sliders that slide under the metal tabs. 3. -
Page 32: Enclosure Reattachment
6. Lift the base of the enclosure up and inward away from the retaining tabs. Note that you may not need to remove both the front and back to clean the entire treadmill. Removing one end and both sides should be sufficient. Typically, it is best to leave the front of the enclosure attached to the frame. - Page 33 2. Place the bottom edge of the metal slats on the enclosure side of the plastic rods located in the hem of the enclosure. The rod should be trapped between the slat and the outer frame. Set the plastic sliders on the slat with the tapered end of each slider facing the metal tab.
- Page 34 3. Slide the black plastic sliders under each metal tab on each side of the enclosure that you are reattaching. Push the sliders far enough such that the metal tab rests on the flat surface of the slider. You might need to tap the sliders into place using the plastic tool and a mallet.
-
Page 35: Appendix A: Anti-Gravity Treadmill Specifications
Appendix A: Anti-Gravity Treadmill Specifications Fits individuals from 5’6” (168cm) to 6’10” (208 cm); 18.5” (47cm) hip width; 58” Sizes (147 cm) hip circumference. Performance User Weight Capacity: 400lbs (182kg) Body Weight Range Adjustment: As low as 20% of user’s body weight, 1% increments Running Surface Area: •... -
Page 36: Appendix B: Options And Accessories
Appendix B: Options and Accessories Please visit the AlterG Store at http://store.alter-g.com/ or contact your AlterG Sales representative for pricing and ordering. D000535-00 Rev. C... -
Page 37: Appendix C: Troubleshooting
System Error messages and contact AlterG. Leaks If the fabric enclosure is torn, or if the shorts are torn, discontinue use and contact AlterG. System Errors The Anti-Gravity Treadmill software has built in error checking to ensure that all systems are operating within specifications. - Page 38 If the error persists, contact AlterG. Note the circumstances under which the error occurs and the diagnostic code. Adjust Treadmill Creep You may want to use a step stool for access to the touchscreen while you adjust the treadmill creep.
- Page 39 Operator or User Action Screen 4. Tap the Adjust Creep up arrow and down arrow to adjust the belt such that it no longer creeps when the treadmill is in standby. • If the belt is creeping forward, tap the up arrow to reduce the creep.
- Page 40 If you purchase the Extended Warranty at the time of your purchase, AlterG will provide one (1) free preventative maintenance check and service of the Pro 100 by a qualified technician at the end of the first year of use.
Need help?
Do you have a question about the Pro 100 and is the answer not in the manual?
Questions and answers