Ricoh Aficio AP4510 Setup Manual
Ricoh ap4510: setup guide
Hide thumbs
Also See for Aficio AP4510:
- Printing manual (114 pages) ,
- Supplementary manual (38 pages) ,
- Operating instructions manual (32 pages)
Table of Contents
Advertisement
Quick Links
RICOH COMPANY, LTD.
15-5, Minami Aoyama 1-chome,
Minato-ku, Tokyo 107-8544, Japan
Phone: +81-(0)3-3479-3111
Overseas Affiliates
U.S.A.
Spain
RICOH CORPORATION
RICOH ESPAÑA S.A.
5 Dedrick Place
Avda. Litoral Mar, 12-14,
West Caldwell, New Jersey 07006
08005 Barcelona
Phone: +1-973-882-2000
Phone: +34-(0)93-295-7600
The Netherlands
Italy
RICOH EUROPE B.V.
RICOH ITALIA SpA
Groenelaan 3, 1186 AA, Amstelveen
Via della Metallurgia 12,
Phone: +31-(0)20-5474111
37139 Verona
Phone: +39-045-8181500
United Kingdom
Hong Kong
RICOH UK LTD.
Ricoh House,
RICOH HONG KONG LTD.
1 Plane Tree Crescent, Feltham,
21/F., Tai Yau Building,
Middlesex, TW13 7HG
181, Johnston Road,
Phone: +44-(0)20-8261-4000
Wan Chai, Hong Kong
Phone: +852-2862-2888
Germany
Singapore
RICOH DEUTSCHLAND GmbH
Mergenthalerallee 38-40,
RICOH ASIA PACIFIC PTE.LTD.
65760 Eschborn
260 Orchard Road,
Phone: +49-(0)6196-9060
#15-01/02 The Heeren,
Singapore 238855
France
Phone: +65-830-5888
RICOH FRANCE S.A.
383, Avenue du Général de Gaulle
BP 307-92143 Clamart Cedex
Phone: +33-(0)-821-01-74-26
Model number: RICOH Aficio AP4510
Printed in The Netherlands
EE
GB
G065-8620
Setup Guide
For safety, please read this manual carefully before you use this product and keep it
handy for future reference.
Advertisement
Table of Contents

Related Manuals for Ricoh Aficio AP4510


Summary of Contents for Ricoh Aficio AP4510
-
Page 1: Setup Guide
RICOH FRANCE S.A. 383, Avenue du Général de Gaulle BP 307-92143 Clamart Cedex Phone: +33-(0)-821-01-74-26 Model number: RICOH Aficio AP4510 Printed in The Netherlands G065-8620 Setup Guide For safety, please read this manual carefully before you use this product and keep it... - Page 2 For good image quality, Ricoh recommends that you use genuine Ricoh toner. Ricoh shall not be responsible for any damage or expense that might result from the use of parts other than genuine Ricoh parts with your Ricoh office products.
- Page 3 PCL is a registered trademark of Hewlett-Packard Company. AppleTalk, Apple, Macintosh, TrueType and LaserWriter are registered trade- marks of Apple Computer, Incorporated. IPS-PRINT Printer Language Emulation Copyright© 1999-2000 Oak Technolo- gy, Inc., All rights reserved. Ethernet is a registered trademark of Xerox Corporation.
-
Page 4: Safety During Operation
Safety Information When using your printer, the following safety precautions should always be fol- lowed. Safety During Operation In this manual, the following important symbols are used: R WARNING: Indicates a potentially hazardous situation which, if instructions are not followed, could result in death or serious injury. - Page 5 • When removing misfed paper, do not touch the fusing section because it be- comes very hot. • To prevent an injury, this printer should be lifted by at least two people. • When moving the machine, each person should hold the handles that are located on opposite sides, and then lift it slowly.
-
Page 6: Energy Star Program
Low-power mode. • Energy Saver mode This printer automatically lowers its power consumption 60 seconds after the last operation has been completed. To exit Energy Saver mode, press any key on the control panel. To change the setting of the Energy Saver mode, see “System Menu”... -
Page 7: Manuals For This Printer
Manuals for This Printer The following manuals describe the operational procedures and maintenance of this machine. To enhance safe and efficient operation of this printer, all users should read and follow the instructions carefully. ❖ ❖ ❖ ❖ Quick Installation Guide Describes how to install the printer. -
Page 8: How To Read This Manual
How to Read This Manual Symbols In this manual, the following symbols are used: R WARNING: This symbol indicates a potentially hazardous situation which, if instructions are not followed, could result in death or serious injury. R CAUTION: This symbol indicates a potentially hazardous situation which, if instructions are not followed, may result in minor or moderate injury or damage to property. -
Page 9: Table Of Contents
Installing Printer Hard Disk Type4510... 18 Installing 1394 Interface Unit Type 4510... 22 3. Configuring the Printer for the Network Configuring the Printer for the Network with the Control Panel ... 31 IEEE 1394 Configuration... 34 4. Installing the Printer Driver and Software Installation Method... - Page 10 viii...
-
Page 11: Getting Started
Features of This Printer This printer is designed especially for office work groups. It can be used for net- work environments and allows you to handle documents efficiently. ❖ ❖ ❖ ❖ High Performance The new 45 print per minute (ppm) engine with RM7000A 250 MHz proces- sor and built-in 10 GB Printer Hard Disk (HDD) reduces waiting time for out- put. - Page 12 Finisher SR720 (1000–sheet finisher) Finisher SR730 (3000–sheet finisher) Mailbox CS360 (9-bin mailbox) Printer Hard Disk Type 4510 (10 GB or more) 1394 Interface Unit Type 4510 Memory Unit Type C 64MB, Memory Unit Type C 128MB, Memory Unit Type C 256MB...
-
Page 13: Printer Drivers For This Printer
Microsoft Windows NT Server operating system version 4.0, Microsoft Windows NT Workstation operating system version 4.0 in a computer using x86 processors. Versions 8.6 to 9.1 of the Mac OS can be used. With OS X, the printer operates in Clas- sic Mode. - Page 14 Getting Started ❖ ❖ ❖ ❖ Adobe PostScript Printer Drivers and PPD files The Adobe Postscript printer drivers and the PPD files are included on the CD-ROM that comes with this printer. Adobe PostScript printer driver allows the computer to communicate with the printer via a printer language. The PPD files allow the printer driver to enable the printer specific functions.
-
Page 15: Software And Utilities Included On The Cd-Rom
SmartNetMonitor for Admin. ❖ ❖ ❖ ❖ SmartNetMonitor for Client A utility for users to manage their own print status on the network. This man- ual is provided as a PDF file on the CD-ROM labeled “Printer Drivers and Utilities”. Reference See SmartNetMonitor for Client online Help for more information about using SmartNetMonitor for Client. -
Page 16: Guide To This Printer
Ethernet Cable Connector Plug the Ethernet cable, which connects the printer to the network, into this sock- HDD (Option) Slot Set the optional Printer Hard Disk. ⇒ p.18 “Installing Printer Hard Disk Type4510”... - Page 17 Allows you to print onto both sides of the paper. Duplex Unit Right Cover Open this cover when accessing the in- side of the printer. Bypass Tray Holds up to 50 sheets of plain paper. (80 , 20 lb. bond)
- Page 18 Turn up the lever when replacing the toner. Toner Holder Slide this out when replacing the toner. Development Unit When “Replace Maintenance Kit” ap- pears on the panel display, replace this unit. Right Cover Open this cover when accessing the in- side of the printer.
-
Page 19: Control Panel
Note ❒ This does not work if the printer is on- line. { { { { Menu} } } } Key Press this key to make and check the cur- rent printer settings. - Page 20 Press this key to execute menu items se- lected on the panel display. Press this key to clear some errors. See “Troubleshooting” in the Printer Refer- ence on the CD-ROM labeled "Operating Instructions". { { { { U U U U } } } } { { { { T T T T } } } } Keys...
-
Page 21: Installing Options
• When lifting the machine, use the grips on both sides. The machine could break or cause an injury if dropped. See "Specifications" in the Printer Reference to confirm what kind of options are available. Important ❒... - Page 22 ❖ ❖ ❖ ❖ Interior Slot for the Memory Unit TypeC Install the memory unit into the slots in the printer board. There are three types of Memory Unit TypeC, 64 MB, 128 MB and 256 MB. Only one of them can be installed at once.
-
Page 23: How To Use The Screwdriver
Available Options How to Use the Screwdriver The screwdriver (A) is attached in the standard paper tray (Tray 1). It is used to install options. To easily drive a screw, first place the screw in the screwdriver, and then tighten the screw. -
Page 24: Installing Options
D D D D Hold the handle, and carefully pull out the printer board. E E E E Put the printer board on a flat sur- face. F F F F Insert the memory unit diagonal- ly into the slot (A A A A ), and then push it down to the direction shown until it clicks into place (B B B B ). -
Page 25: Installing Paper Bank Ps430
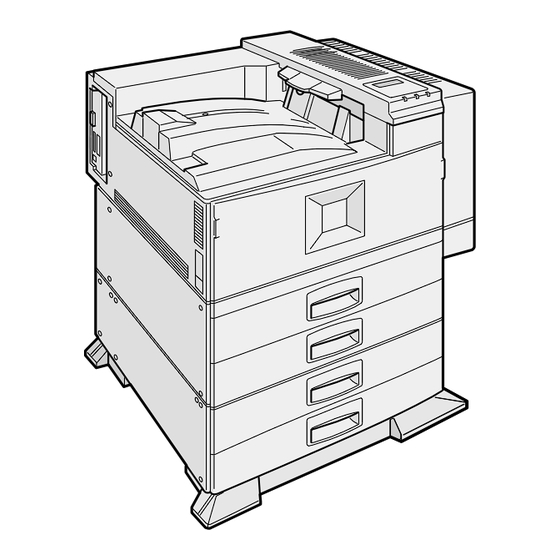
❒ When the bidirectional transmis- sion is not in operation, you must set up the installed Paper Bank us- ing the printer driver in order to use it. See p.37 “Installing the Printer Driver and Software” for setting up options. See p.48 “The conditions of the bidirectional transmissions”... - Page 26 Align the printer over the Paper Bank, and then lower it carefully onto the Paper Bank. Important ❒ The printer should be held by at least two people. ❒ When lifting the printer, pull out the grips from the front of TAPP801E the printer.
- Page 27 1) , and take the screwdriver (A A A A ) from the tray. H H H H Lock the Paper Bank and the printer with the screw. Note ❒ Be sure to return the screwdriv- er to the paper tray after using...
-
Page 28: Installing Printer Hard Disk Type4510
It may cause a machine malfunc- tion or a burn. Important ❒ The Printer Hard Disk can be dam- aged by a small amount of static electricity. You should touch some metal to discharge static electricity. ❒ When the bidirectional transmis-... - Page 29 The screws are needed to lock the printer board afterwards. E E E E Remove the two screws locking the Printer Hard Disk cover next to the printer board. The screws are needed to lock the cover afterwards. F F F F...
- Page 30 D D D D Note ❒ Be sure to return the screwdriv- er to the paper tray after using The Printer Hard Disk will be for- matted automatically when the power is turned on. Note ❒ Print a configuration page to con- firm that the Printer Hard Disk is properly installed.
-
Page 31: Hdd Format
Press# to Start F F F F Press { { { { Enter q Important ❒ Do not turn off the printer while formatting the Printer Hard Disk. Turning off the printer while formatting the Printer Hard Disk c an dam age the Printer Hard Disk. -
Page 32: Installing 1394 Interface Unit Type 4510
❒ When the 1394 Interface Unit is in- stalled, uninstall the printer driver after the 1394 interface cable is un- plugged. ❒ Before pulling out printer board, make sure that the printer’s power switch is off, and 1394 interface ca- bles are unplugged. If there is elec-... - Page 33 E E E E Hold the handle, and carefully pull out the printer board. F F F F Put the printer board on a flat sur- face. G G G G Remove the two screws locking the 1394 Interface Unit cover.
- Page 34 ❒ This function is available under Windows 2000 only. It is not avail- able under Windows 95/98/Me or Windows NT 4.0. ❖ ❖ ❖ ❖ Installing the Printer Driver • “SCSI print” must be set active from the control panel. For more information, see p.34 “IEEE 1394 Configuration”.
- Page 35 • If the printer driver for the con- nected printer has already been installed, the icon is automati- cally added to the Printers fold- e r . I n t h i s c a s e , d r i v e r installation is not necessary.
- Page 36 [Next>]. K K K K In [Network path or queue name], type [http://<IP address of print- er>/printer] for the printer IP ad- dress and the port number, and then click [Next>]. L L L L Click [Next>].
- Page 37 Configuration and Usage from a Web Browser Preparation If you want to use this printer from a Web browser, its IP address must be specified and the TCP/IP proto- col (IP over 1394) set on the control panel. For more information, see p.34 “IEEE 1394 Configuration”.
- Page 38 Installing Options Troubleshooting IEEE 1394 Printer Removal Utility If you cannot print when the printer is connected via the 1394 Interface Unit or error messages appear, follow the procedure: A A A A Make sure the 1394 Interface Unit is installed properly.
- Page 39 - 1394 Interface Unit specification ❖ ❖ ❖ ❖ Operating System: Windows 2000 Service Pack 1 or later (when connecting with SCSI print) Windows Me (when connecting with IP over 1394) ❖ ❖ ❖ ❖ Interface: IEEE Std 1394-1995 compliant, IEEE Std 1394a-2000 compliant ❖...
- Page 40 Installing Options...
-
Page 41: Configuring The Printer For The Network With The Control Panel
3. Configuring the Printer for Configuring the Printer for the Network with the Control Panel After installing the optional Network Interface Board, configure it for the network using the printer's control panel. Configure the printer for the network using the printer's control panel. -
Page 42: Host Interface
Note ❒ Leave unused protocols "Not Active". G G G G If you use TCP/IP, you should as- sign the IP address to the printer. Note ❒ To get the IP address for the printer, contact your network administrator. A Press { { { { U U U U } } } } or { { { { T T T T } } } } until the fol- lowing message appears. -
Page 43: Network Boot
• Ethernet 802.3 • Ethernet 802.2 • Ethernet II • Ethernet SNAP Configuring the Printer for the Network with the Control Panel Note ❒ Usually, use the default setting (“Auto ”). When you first select “Auto ”, the frame type detected by the printer is adopted. -
Page 44: Ieee 1394 Configuration
Configuring the Printer for the Network IEEE 1394 Configuration Configure the printer for using in the IEEE 1394 environment. The follow- ing table shows the control panel set- tings and their default settings. These are included in the "Host Interface"... - Page 45 Note ❒ To get the IP address for the printer, contact your network administrator. A Press { { { { U U U U } } } } or { { { { T T T T } } } } until the fol- lowing message appears.
- Page 46 Configuring the Printer for the Network...
-
Page 47: Installing The Printer Driver
If you are not, see the documentation that comes with Windows for details. Installation Method The following table shows how to install the printer drivers and software. PCL 6 printer driver PCL 5e printer driver RPCS printer driver... -
Page 48: Quick Install
• An IP address must be allocated to this machine and to the computer. Limitation ❒ If your system is Windows 2000 or Windows NT 4.0, installing a printer driv- er by Auto Run requires Administrators permission. When you install a print- er driver by Auto Run, log on using an account that has Administrators permission. - Page 49 F F F F Click to select a model name you want to use when the "Select Printer" di- alog box appears. Note ❒ For a network connection with TCP/IP, select the printer whose IP address is displayed in [Connect To].
-
Page 50: Installing The Pcl 6/5E Printer Driver
Installing the Printer Driver and Software Installing the PCL 6/5e Printer Driver Installing the PCL 6/5e Printer Driver Two kinds of PCL printer drivers, PCL 6 and PCL 5e, are provided with this printer. We recommend PCL 6 as your first choice. Limitation ❒... - Page 51 Setting up options Important ❒ If the printer is equipped with certain options, you should set up the options with the printer driver. Limitation ❒ In Windows 2000, changing the printer settings requires Manage Printers per- mission. Members of the Administrators and Power Users groups have Man- age Printers permission by default.
-
Page 52: Installing The Rpcs Printer Driver
Installing the RPCS Printer Driver Limitation ❒ If your system is Windows 2000 or Windows NT 4.0, installing a printer driv- er by Auto Run requires Administrators permission. When you install a print- er driver by Auto Run, log on using an account that has Administrators permission. - Page 53 Setting up options Important ❒ If the printer is equipped with certain options, you should set up the options with the printer driver. Limitation ❒ In Windows 2000, changing the printer settings requires Manage Printers per- mission. Members of the Administrators and Power Users groups have Man- age Printers permission by default.
-
Page 54: Installing The Postscript Printer Driver
Default interface language is English. Note ❒ The printer driver with the selected language will be installed. ❒ The printer driver will be installed in English if you select the following languages: Cestina, Magyar, Polski, Portugues and Suomi. D D D D Select [PostScript 3 Printer Driver]. -
Page 55: Windows 2000 - Installing The Postscript Printer Driver
Setting up options Important ❒ If the printer is equipped with certain options, you should set up the options with the printer driver. A A A A Click [Start] on the taskbar, point to [Settings], and then click [Printers]. The [Printers] window appears. - Page 56 In this case, click [Yes] to continue the installation. Setting up options Important ❒ If the printer is equipped with certain options, you should set up the options with the printer driver. Limitation ❒ Changing the printer settings requires Manage Printers permission. Members of the Administrators and Power Users groups have Manage Printers permis- sion by default.
-
Page 57: Windows Nt 4.0 - Installing The Postscript Printer Driver
Default interface language is English. Note ❒ The printer driver with the selected language will be installed. ❒ The printer driver will be installed in English if you select the following languages: Cestina, Magyar, Polski, Portugues and Suomi. D D D D Select [PostScript 3 Printer Driver]. - Page 58 When you set up options, log on using an account that has Manage Printers permission. Important ❒ If the printer is equipped with certain options, you should set up the options with the printer driver. A A A A Click [Start] on the taskbar, point to [Settings], and then click [Printers].
-
Page 59: Using Adobe Pagemaker Version 6.0 Or 6.5
• On Windows 2000 and Windows NT 4.0, [Enable bi-directional support] must be selected and [Enable printer spooling] must not be selected on the [port] tab. ❖ ❖ ❖ ❖ When connecting with the network • SmartNetMonitor for Admin or SmartNetMonitor for Client included on the CD-ROM must be installed, and the TCP/IP protocol must be used. -
Page 60: Installing The Smartnetmonitor For Client/Admin
Client/Admin Limitation ❒ If your system is Windows 2000 or Windows NT 4.0, installing software by Auto Run requires Administrators permission. When you install a printer driver by Auto Run, log on using an account that has Administrators permis- sion. -
Page 61: Installing The Agfa Monotype Font Manager 2000
Manager 2000 Limitation ❒ If your system is Windows 2000 or Windows NT 4.0, installing software by Auto Run requires Administrators permission. When you install a printer driver by Auto Run, log on using an account that has Administrators permis- sion. -
Page 62: Macintosh
Macintosh - Installing the PostScript 3 Printer Driver It is necessary to install a printer driver and a PPD file to print from a Macintosh. Follow these steps to install a printer driver and a PPD file on Macintosh run- ning the 8.6 operating system or later up to 9.1. -
Page 63: Setting Up Options
B B B B Click the [Adobe PS] icon. C C C C In the [Select the PostScript Printer:] list, click the name of the machine you want to use, and then click [Setup]. D D D D Click [Configure]. -
Page 64: Index
INDEX 1394 Interface Unit Type 4510 , 12 , 22 Active Protocol , 31 Agfa Font Manager , 5 , 51 Bridge Unit Type1045 , 12 Bridge Unit Type460 , 12 Bypass Tray , 7 Caution , ii Control Panel , 6 , 9 Data In Indicator , 9 development unit , 8 Duplex Unit , 7... - Page 65 Power Indicator , 9 power switch , 6 printer board , 6 printer driver , 3 Printer Hard Disk Type4510 , 12 , 18 Printer Reference , v PS430 , 6 , 11 , 15 Quick Install , 38 Quick Installation Guide , v...
- Page 66 MEMO G065...
Need help?
Do you have a question about the Aficio AP4510 and is the answer not in the manual?
Questions and answers