Advertisement
OVERVIEW

SETUP AND SAFETY
- This device is designed for the playback of audio signals. Any other use is expressly prohibited.
- Protect the device from moisture (water drops or splashes). Do not place any vessels such as vases on the device. These may be knocked over and spill fluid on the electrical components, thus presenting a safety risk.
- Do not place any naked flames such as candles on the device.
- Thunderstorms are a danger to all electrical devices. Even if the device is switched off, it can be damaged by a lightning strike to the mains cable.
Always disconnect the mains cable during a storm. - If malfunctions occur due to static electricity charges or brief mains voltage surges, reset the device. To do this, pull out the mains adapter and connect it again after a few seconds.
- Make sure the device is adequately ventilated. Do not cover the ventilation slots with newspapers, table cloths, curtains, etc.
- When deciding where to place the device, please note that furniture surfaces are covered by various types of varnish and plastic, most of which contain chemical additives. These additives can corrode the device supports, leaving residues on the furniture surfaces which can be difficult or impossible to remove.
- Only use the device in a moderate climate.
- Do not use any cleaning agent, as this may damage the casing. Clean the device with a clean, moist leather cloth.
- Do not expose the back-up battery to extreme heat, caused for example by direct sunlight, heaters or fire.
- Never open the device casing. No warranty claims are accepted for damage caused by incorrect handling.
- The type plate is located on the bottom of the device.
- Do not expose the device to extreme heat, caused for example by direct sunlight, heat or fire.
SPECIFICATIONS
Power supply:
AC Adaptor Input: 100 - 240V~, 50/60 Hz 0.25A
Output: 5V  1500mA
Max. Power consumption:
<11W (operation)
<1W (standby)
Output:
USB host: 5V 1A charge out
Back up micro batteries:
Back up DC Batt: 2 x 1.5v UM4/R03/AAA
Frequency bands:
FM 87.5...108.0 MHz
Circuit features:
Loudspeaker: 3 inch
Output Power: 2 W
Dimensions:
W x H x L 200 x 120 x 65 cm
Weight: 450 gr
Technical and design modifications reserved.
POWER SUPPLY
Mains operation
Check that the mains voltage on the type plate (on the bottom of the device) corresponds to your local mains supply. If this is not the case, contact your specialist dealer.
- Plug the power adaptor into the socket (100 - 240V~, 50/60 Hz).

- The device is connected to the mains with the power plug. To fully disconnect the device from the mains, pull out the plug.
- The mains plug is used to disconnect the device. It shall remain readily operable and should not be obstructed during intended use.
Inserting the back-up battery
The back-up batteries ensure that the stored set¬tings are not lost in the case of a power failure.
- Open the battery compartment by pressing the area market and pushing down the cover.
- Observe the polarity marked on the base of the battery compartment when inserting the batteries (micro batteries, 2 x 1.5 V, R03/ UM 4/ AAA).
- Close the battery compartment.
Note:
- Remove the back-up battery when it is flat or when you know that the device will not be used for a long period of time.
Environmental note:
- Batteries, including those which do not contain heavy metal, should not be disposed of with household waste. Always dispose of used batteries in accordance with local environmental regulations.
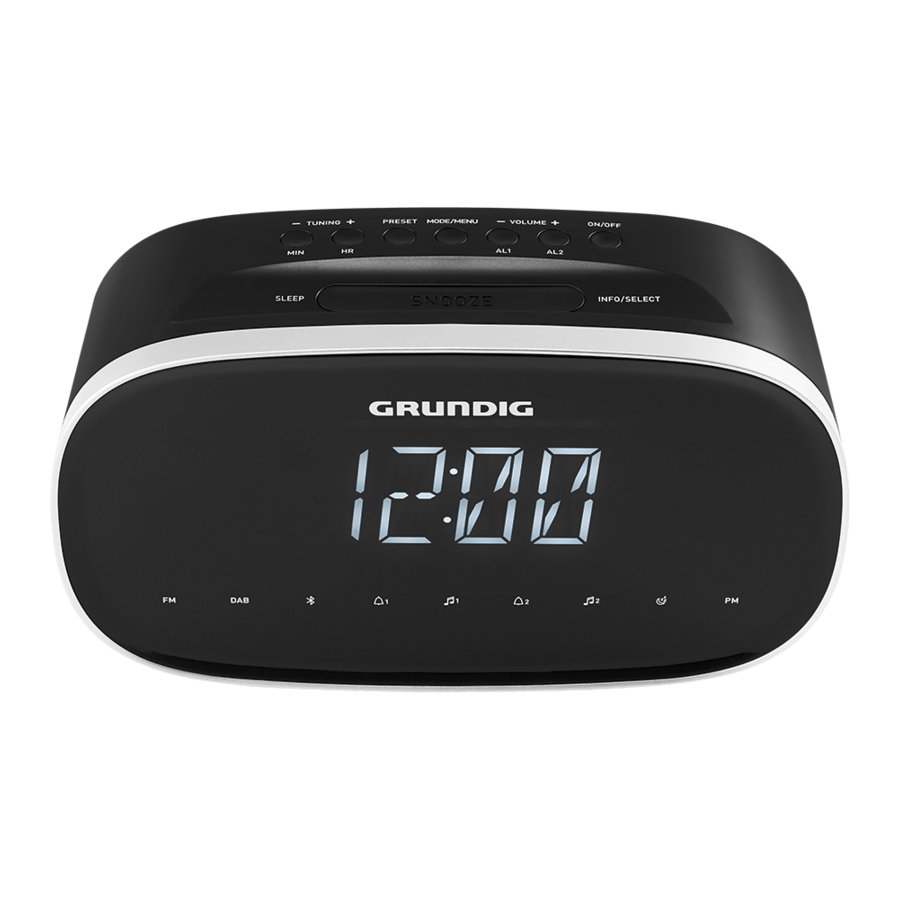
RADIO MODE
Antenna
For the best FM (UHF) reception it is sufficient to align the wire antenna accordingly.
Switching on and off
- Switching the device from standby with »ON/OFF« button.
- Switch the device to standby with »ON/OFF« button.
Searching for and saving radio stations - automatically
You can store 10 radio stations on presets.
- Activate the station search by pressing »TUNING+/HR« or »TUNING-/MIN« buttons until the frequency display changes to rapid run-through.
The search stops when a station is found.
Note:- To move the frequency forward in steps, briefly press »TUNING+/HR« or »TUNING-/MIN« several times.
- Press and hold the »PRESET« button to activate the memory function.
- Press »TUNING+/HR« or »TUNING-/MIN« buttons to select the preset.
- Press the »PRESET« button to save the station.
Note:- If the stations are already stored on the presets, they are overwritten when new stations are stored.
- To store more stations, repeat the steps 1 to 4.
Selecting stored stations
- Select the preset by pressing the »PRESET« button to select the preset stations one after another.
Adjusting the volume
- Adjust the volume with »VOLUME -/AL 1« or »VOLUME +/AL 2« buttons.
Setting the brightness of the display
- Press the »SLEEP/SNOOZE/DIMMER« button to adjust brightness levels in high, middle and low levels.
TIMER MODE
Setting the time
- Switching the device to standby with »ON/OFF« button.
- Press and hold the »TIME/MODE« button for two seconds to activate the setting. The current day of the week will be flashing on the LCD. »
![]() « is Monday, and »
« is Monday, and »![]() « is Sunday.
« is Sunday. - Then press the »TIME/MODE« button again for setting the current time.
- Press »TUNING-/MIN« to set the minutes;
- Press »TUNING+/HR« to set the hours;
- Press the »TIME/MODE« button again to confirm the settings.
 « is Monday, and »
 « is Sunday.
Setting the alarm time
- Switch the device to standby with »ON/OFF« button;
- Press and hold the »VOLUME -/AL 1« button for alarm 1 or »VOLUME +/AL 2« for alarm 2;
- For example, press and hold »VOLUME -/AL 1« button to Then the alarm days will be flashing on the LCD.
- Press the »TUNING-/MIN« or »TUNING+/HR« buttons to adjust the alarm days.
- Press the »VOLUME -/AL 1« button to confirm;
- Press the »TUNING-/MIN« button to set the alarm minutes;
- Press the »TUNING+/HR« button to set the alarm hours;
- Press the »VOLUME -/AL 1« button to finish the alarm 1 settings.
Note:
- The device wakes you up at the set alarm time, the alarm duration is 60 minutes.
Interrupting the alarm
- Press the »SLEEP/SNOOZE/DIMMER« while the alarm is sounding.
Note:
- The alarm signal will be stopped, and the alarm will be sounded again after nine minutes.
Cancelling the alarm
- Press »ON/OFF« while the alarm is sounding.
Note:
- The alarm will be sounded again at the next set alarm time.
Activating and deactivating the alarm
- In standby mode, press »VOLUME -/AL 1« or »VOLUME +/AL 2« button to activate the alarm with last used alarm settings.
- For example, if pressed »VOLUME -/AL 1« button, the last used alarm time would be displayed;
- By repeatedly pressing the »VOLUME -/AL 1« button, the radio will display last set alarm time, the »
![]() « and the »
« and the »![]() « icons.
« icons.
 « and the »
 « icons.
Sleep timer
- Press and hold the »SLEEP/SNOOZE/DIMMER« button for about 2 seconds to activate the sleep timer.
- Then repeatedly press the »SLEEP/SNOOZE/DIMMER« button to select the auto switch-off timer from 90 minutes to 10 minutes.
- To switch off the sleep timer before the set time press and hold »SLEEP/SNOOZE/DIMMER« button for about 2 seconds, then repeatedly press the button again until »OFF« is displayed.
Charging a mobile phone
The USB socket on the back side can provide DC power of 5V for charging a mobile phone. Connect the mobile phone to the USB socket with an appropriate cable. The USB power is available in all the operating modes and including standby mode. Refer to the user manual or the manufacturer of the mobile phone to verify if it supports charging from an USB power. The USB socket is suitable for DC power-out only and cannot be used for e.g. playback of music from a USB stick.
Grundig Intermedia GmbH
Thomas-Edison-Platz 3
D-63263 Neu-Isenburg

Documents / Resources
References
Download manual
Here you can download full pdf version of manual, it may contain additional safety instructions, warranty information, FCC rules, etc.
Advertisement


Need help?
Do you have a question about the Sonoclock 3000 and is the answer not in the manual?
Questions and answers