
Related Manuals for Wouxun KG-Q10H


Summary of Contents for Wouxun KG-Q10H
- Page 1 Thank you for purchasing the Wouxun KG-Q10H portable Amateur radio. Your feedback makes our products better. Please share your thoughts. feedback@buytwowayradios.com www.buytwowayradios.com...
-
Page 2: Table Of Contents
Contents Safety Information ���������������������������������������������������������������������������������� 11 FCC Licensing Information .................14 Getting Started ��������������������������������������������������������������������������������������� 15 Feature Summary ..................15 What’s Included ...................17 Front Panel Guide ..................18 Right / Left Side Guide ................19 Display Guide ....................20 Dust and Water Protection ................21 Installing and Removing the Battery ............22 Charging the Battery ..................23 Antenna Information ..................25 Installing the Belt Clip .................25... - Page 3 Introducing Amateur Radio and the KG-Q10H ..........26 Power On/Off and Adjusting Volume ............27 Your First Transmit ..................27 Dual Display: Using Areas “A” and “B” ............28 Channel and Frequency Modes ..............30 Channels and Tones ..................32 Using Repeaters ....................33 Channel Scan ....................34 Priority Channel Scan ..................35...
- Page 4 Keypad Function Keys ................44 Programmable PTT Keys ................46 Programmable Function Keys ..............47 FM Radio .....................52 Stopwatch Timer ..................53 Area Menu Functions ������������������������������������������������������������������������������ 55 Using the Area Menu ...................55 [01: SQUELCH] Squelch ................55 [02: TX-POWER] Output Power ..............56 [03: W/N] Bandwidth ..................56 [04: STEP] Frequency Step ................56 [05: RX-CTCSS] Receive CTCSS Tone .............57 [06: RX-DCS] Receive DCS Code ..............57...
- Page 5 [08: TX-DCS] Transmit DCS Code ............58 [09: SHIFT] Frequency Shift Direction ............58 [10: OFFSET] Offset Frequency ..............59 [11: CH-NAME] Channel Name ..............59 [12: CH-FAV] Favorite Channel ..............60 [13: CH-ADD] Add Memory Channel ............61 [14: CH-DELETE] Delete Memory Channel ..........61 [15: BUSY-LOCK] Busy Channel Lockout ..........61 [16: MUTE-MODE] Speaker Mute ............62 [17: SCRAMBLE] Scrambler ..............62 [18: COMPAND] Compander ..............62...
- Page 6 [22: TONE-SCAN] CTCSS/DCS Scanning ..........64 [23: SCAN-GROUP] Scan Group ..............64 [24: VFO-SCAN] Frequency Mode Scan Options ........65 [25: WORK-MODE] Work Mode .............65 [26: AM-MODE] AM Modulation Mode ..........66 System Menu Functions �������������������������������������������������������������������������� 67 Using the System Menu ................67 [01: BRT-ACTIVE] Active Brightness ............67 [02: BRT-STANDBY] Standby Brightness ..........67 [03: BACKLIGHT] Backlight Timeout ............68 [04: BATT-SAVER] Battery Saver ..............68...
- Page 7 [08: SCAN-MODE] Scan Mode ..............70 [09: SC-TONE-DET] Tone Scanning Detection ........70 [10: PRI-SCAN] Priority Scan ..............71 [11: PRI-CH] Priority Channel ..............71 [12: TONE-SAVE] CTCSS/DCS Tone Save Options .......72 [13: ROGER] Roger Beep ................72 [14: TOT] Transmit Overtime Timer ............73 [15: TOA] Transmit Overtime Alarm ............73 [16: VOX] Voice Activated Transmit ............74 [17: VOICE] Voice Guide ................74 [18: BEEP] Button Beeps ................74...
- Page 8 [22: PF1-LONG] Side Key PF1 Long Press Assignment ......76 [23: PF2-SHRT] Side Key PF2 Short Press Assignment ......76 [24: PF2-LONG] Side Key PF2 Long Press Assignment ......77 [25: TOP-SHRT] Top Key Short Press Assignment ........77 [26: TOP-LONG] Top Key Long Press Assignment ........78 [27: STARTUP] Power On Message ............78 [28: TOP-MSG] Custom Top Message ............79 [29: AREA-MSG] Custom Area Message ..........79...
- Page 9 [36: ALERT] Tone Alert................83 [37: TIMER] Stopwatch Timer ..............83 [38: SMUTESET] Secondary Area Mute Setting ........84 [39: BATT-TYPE] Battery Level Display Type ...........84 [40: RPT-MODE] Repeater Mode .............85 [41: RPT-SPK] Repeater Speaker Setting ...........85 [42: RPT-PTT] Repeater PTT Setting ............86 [43: RPT-TONE] Squelch Tone ..............86 [44: TIME] Time Display ................86 [45: TIMEZONE] Set Time Zone ..............87...
- Page 10 Setting Non-Standard CTCSS or DCS ............90 Adding and Removing Channels ..............91 GPS / Location Function ................95 Cross Band Repeat ..................100 DTMF Encoding ..................103 Remote Control ..................107 Troubleshooting ����������������������������������������������������������������������������������� 112 Technical Information �������������������������������������������������������������������������� 114 Specifications ....................114 Standard CTCSS and DCS Tones .............116 NOAA Weather Channels .................118 Optional Accessories �����������������������������������������������������������������������������...
-
Page 11: Safety Information
Safety Information Safety Information Safety Information The KG-Q10H is an electrical apparatus, as well as a generator of RF (Radio Frequen- cy) energy, and you should exercise all safety precautions as are appropriate for this type of device. Please read the suggestions and warnings below before using the transceiver. - Page 12 Use of other accessories may exceed RF exposure guidelines. Notice ▪ These tips are important for safe operation of your KG-Q10H radio and its accessories. If the transceiver does not function normally, please get in touch with your dealer immediately.
- Page 13 Safety Information Safety Information Caution Please read this manual before using the radio, as it includes important instructions for the safe handling, use and operation of your radio. FCC Compliance This device complies with Part 15 of the FCC Rules. Operation is subject to the follow- ing two conditions: (1) This device may not cause harmful interference, and (2) This device must accept any interference received, including interference that may...
-
Page 14: Fcc Licensing Information
DO NOT attempt to use the radio with a damaged antenna. FCC Licensing Information The Wouxun KG-Q10H is FCC approved for use on the Amateur Radio Service. The KG-Q10H operates on Amateur Radio Service (HAM) frequencies according to the Federal Communications Commission (FCC) Rules in the United States. As such, a Amateur radio license is required to transmit on these frequencies. -
Page 15: Getting Started
Getting Started Getting Started Getting Started Getting Started Feature Summary ▪ ▪ Quad Band Transmit 10 Colorful Theme Options ▪ (2m/1.25m/6m/70cm) 4 Customizable Display Themes ▪ ▪ 999 Memory Channels 4 Selectable Power Levels ▪ ▪ 7 NOAA Weather Channels Wide/Narrow Bandwidth Selectable ▪... - Page 16 Getting Started ▪ Incoming Caller ID Display 50-54 MHz/144-148 MHz ▪ DTMF Encode/Decode 222-225 MHz/420-450 MHz ▪ ▪ Reverse Frequency English Voice Guide ▪ ▪ Talkaround Superheterodyne Receiver ▪ ▪ Full Backlit Keypad ▪ ▪ Receive (RX) Frequency Range: Stopwatch Timer ▪...
-
Page 17: What's Included
Getting Started Getting Started What’s Included Carefully unpack the contents of the box and be sure that you have the items in the list below. If any items are missing or damaged, please contact your dealer. Transceiver High Gain Antennas Lithium-ion Battery Pack Intelligent Charger Belt Clip... -
Page 18: Front Panel Guide
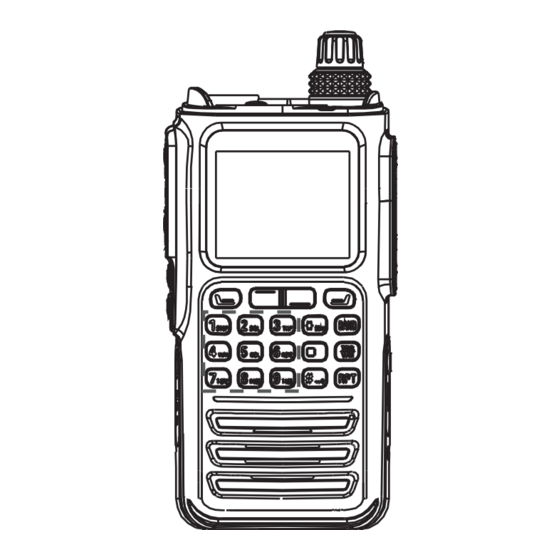
Getting Started Front Panel Guide Antenna Flashlight On/Off/Volume Knob Top Key Channel Knob RX/TX LED (Green/Red) Display Scan (Long Press) Menu/Enter Exit/Cancel Up/Down Keys A/B Area Switch TDR/MODE Switch Keypad MODE RPT/Talkaround Switch SHIFT Keypad Lock Microphone Speaker AREA... -
Page 19: Right / Left Side Guide
Getting Started Getting Started Right / Left Side Guide Top Key Short Press: FM-RADIO Long Press: FLASHLIGHT PTT2 Default: SECONDARY PTT PTT1 Earphone Jack Default: MAIN AREA PTT Short Press: SCAN Long Press: LOC-MAP USB-C Charging Port Short Press: WEATHER Long Press: MONITOR Note: Defaults are shown for Programmable and PTT Keys. -
Page 20: Display Guide
Getting Started Display Guide Battery Save Weather Alert Keypad Lockout GPS Active Talkaround Time Repeater Channel Battery Voltage Priority Scan FM Radio AM/FM Modulation Reverse W/N Band Weather Radio CTCSS/DCS Priority Channel Current Channel TX Status TX Power Scrambler DTMF Mute Channel Number Offset Shift Last RX... -
Page 21: Dust And Water Protection
Getting Started Dust and Water Protection The KG-Q10H is waterproof to IP67 standards. It is dust resistant and rated to with- stand any ingress of solid objects and can withstand immersion in up to 1 meter of water for up to 30 minutes. This radio is dust and waterproof only while the battery is properly installed and locked in place with no gaps and all ports are completely sealed with their port covers using the original supplied screws. -
Page 22: Installing And Removing The Battery
Getting Started Installing and Removing the Battery The lithium-ion battery pack included with the radio is not fully charged out of the box. It is recommended to charge it before using the radio for the first time. Installing the Battery Slide the battery pack up along the back of the radio until it stops. -
Page 23: Charging The Battery
Getting Started Charging the Battery The KG-Q10H features two charging options for the battery pack. It can be charged using the included desktop charger or the built-in USB-C port on the side of the radio. Charging with the Desktop Charger The KG-Q10H includes an intelligent desktop charger. - Page 24 3. When the LED light on the charger turns green, charging is complete. Charging with the USB-C Port The KG-Q10H can charge the battery from the USB-C charging port on the side of the radio using an optional USB-C cable (not included). The battery pack can be fully charged with a USB cable connected to a USB to AC adapter plugged into an AC outlet or to a USB port in a vehicle.
-
Page 25: Antenna Information
Getting Started Antenna Information The KG-Q10H includes two antennas, each with an SMA female connector. One is tuned for 2m and 70cm frequencies, the other is tuned for 6m and 1.25m frequencies. For best performance, use the antenna that is tuned for the band you wish to use. -
Page 26: Operation
10 years. The KG-Q10H was designed to allow you to take advantage of all that ham radio has to offer and more. This fully configurable, quad band radio is built to transmit on ama- teur frequencies on the 1.25 meter, 2 meter, 6 meter and 70cm ham bands, supporting... -
Page 27: Power On/Off And Adjusting Volume
Your First Transmit Selecting a Channel When you power on your KG-Q10H for the first time, the display will likely show the currently selected channel name with a small “CH-001” designating the channel num- ber on the right side. Turn the Channel Knob or the [UP] / [DOWN] keys to navigate through the list of channels. -
Page 28: Dual Display: Using Areas "A" And "B
Dual Display: Using Areas “A” and “B” The KG-Q10H is two radios in one! The dual display function allows you to monitor two channels at the same time. While this may sound complex, the KG-Q10H is de- signed to make this powerful feature easy to use. - Page 29 Turning the Dual Display On and Off The dual display is on by default on the KG-Q10H. Instead of a frequency or channel name, customizeable text is displayed in the inactive area when the dual display is off.
-
Page 30: Channel And Frequency Modes
Primary side. Channel and Frequency Modes The KG-Q10H supports tuning frequencies via two methods: channel and frequency modes. In channel mode, frequencies that have been saved can be selected from the channel list. - Page 31 Note When entering 50 MHz frequencies, prefix with a zero. The KG-Q10H can only transmit on frequencies assigned to the amateur radio bands. All other available frequencies entered in Frequency mode or through the programming software are receive only. The WORK-MODE menu option (page 65) allows you to switch between Channel and Frequency (VFO) modes.
-
Page 32: Channels And Tones
Channels and Tones The KG-Q10H supports amateur (ham) frequencies and 155 tones and codes.To suc- cessfully communicate between your stations or members of your group, all the con- necting radios must be using the same frequency and CTCSS tone or DCS code. -
Page 33: Using Repeaters
Advanced Operations section (page 91). Using Repeaters The KG-Q10H is is designed to be used with repeaters. The channels can be fully pro- grammed with repeater offsets and split tones. What is a Repeater? In basic terms, a repeater is a device that is used to increase the range of two way radios. -
Page 34: Channel Scan
Operation and connected to an antenna that is mounted at a higher elevation to provide better range than is normally available with radio-to-radio (simplex) communications. Locating a Repeater Using amateur repeaters can significantly increase the range of your radio, but just tun- ing to one of the repeater frequencies isn’t necessarily going to work. -
Page 35: Priority Channel Scan
Priority Channel Scan The KG-Q10H supports Priority Channel Scanning. When the Priority Channel Scan function is activated using the PRI-SCAN menu option (page 71), the KG-Q10H will check the priority channel every 3 seconds for activity during normal operation. This helps prevent missing all or part of a transmission when you are primarily con- cerned with a single channel. - Page 36 When Priority Scan is active, the screen displays a “ C ” icon in a square box. Frequency Scan The KG-Q10H includes advanced options for scanning frequencies. The VFO- SCAN menu option (page 65) allows you to set the frequency bands and ranges to...
- Page 37 Operation Operation (VFO) Mode. The CUR-BAND option will only scan the frequencies in the currently active band. For instance, if you are using the 50MHz band, the radio will only scan the frequencies on that band. The RANGE option will scan all frequencies that are set within a predetermined range. A frequency range for the Range option can be configured in the programming soft- ware.
-
Page 38: Scan Groups
(pp. 75-78). Scan Groups The KG-Q10H is equipped with the ability to create scan groups. This is a handy tool for power users, particularly those managing a large number of channels or who operate in various regions. Scan Groups allow more selective scanning. -
Page 39: Scanning Ctcss / Dcs Codes
Operation Scanning CTCSS / DCS Codes The KG-Q10H is equipped with the ability to scan an incoming signal for a CTCSS tone or DCS code and update the current channel’s tone or code settings once the tone or code is identified. -
Page 40: Noaa Weather Mode
Operation NOAA Weather Mode NOAA Weather Mode allows you to quickly access weather information from a local NOAA broadcast station. To activate NOAA Weather Mode, you must first assign the WEATHER function to either the [PF1], [PF2] or [TOP] key (pp 75-78). Once it is assigned, press the appropriate PF key active it. - Page 41 The KG-Q10H features a Weather Alert option (page 68). When Weather Alert mode is active and the radio is in standby mode, the KG-Q10H will monitor the currently selected weather channel for an alert tone (1050Hz) that indicates a weather warning or alert has been issued.
-
Page 42: Key Lock
Displays weather icon and flashlight LED pulses 5 times every 60 seconds. TONE+FLSH Displays icon, emits alert and the flashlight LED pulses every 60 seconds. Key Lock The keys on the KG-Q10H can be locked to prevent them from being accidentally... -
Page 43: Keypad Hotkeys
To disable the Key Lock, press and hold the [#] key for two seconds. The key icon will disappear from the top of the display. The buttons should now be enabled. The KG-Q10H also has an AutoLock feature. When activated, it will automatically lock the keypad after a specified period of time. The [AUTOLOCK] option is located in the System Menu (page 80). -
Page 44: Keypad Function Keys
Operation Hotkey Function/Menu Item Squelch menu function (page 55) Transmit Power menu function (page 56) Bandwidth menu function (page 56) STEP Frequency Step menu function (page 56) R-CTC Receive CTCSS Tone menu function (page 57) T-CTC Transmit CTCSS Tone menu function (page 57) R-DCS Receive DCS Tone menu function (page 57) T-DCS... - Page 45 Operation Operation Function AREA Short Press: Switches primary and secondary areas (page 29) Long Press: Switches band in Frequency Mode (page 30) Short Press: Switch single and dual display (page 29) MODE Long Press: Switches Channel/Frequency Modes (page 30) Short Press: Cross Band Repeat (page 107) Long Press: Talkaround (page 49) *SCAN Short Press: Reverse Frequency (page 48)
-
Page 46: Programmable Ptt Keys
Operation Programmable PTT Keys The KG-Q10H features two push-to-talk (PTT) buttons designated [PTT1] and [PTT2]. PTT1 is the lower and primary PTT by default. PTT2 is the upper PTT. These buttons can be configured to perform specific transmit operations from the Sys- tem Menu (page 75). -
Page 47: Programmable Function Keys
Operation Programmable Function Keys The KG-Q10H has two programmable keys called [PF1] and [PF2] located on the left side of the radio below the PTT keys. It also has a programmable [TOP] key. Each key can perform two different functions, one activated with a short press and one with a long press. - Page 48 Operation Default Key Function Description PF1 Long LOC-MAP Display GPS Location Map (page 99) PF2 Long MONITOR Monitor channel (page 50) REVERSE Activate reverse frequency (page 48) PF1 Short SCAN Scan function (page 34) SCAN-CTC Activate CTCSS tone scan (page 39) SCAN-DCS Activate DCS tone scan (page 39) Transmit SOS (page 50)
- Page 49 Operation Operation quency and receive on the transmit frequency. This feature is useful for checking if you are within simplex range of other units before activating Talk Around. Press the [*SCAN] key on the active channel to activate or deactivate this feature. When activated, an “R”...
- Page 50 Operation The radio can transmit an SOS alarm to other stations on the same channel. When SOS is activated, the radio will emit an oscillating alarm. After 5 seconds, the radio will transmit the alarm to other radios on the same channel. To activate the SOS function, it must first be assigned to the [PF1], [PF2] or [TOP] key (pp.
- Page 51 [TOP] key using the System Menu (pp. 75-78). Flashlight/Strobe The KG-Q10H has a built-in LED flashlight at the top of the radio. It can operate in two modes. [FLASHLIGHT] provides steady illumination. [STROBE] functions as a flashing strobe light. To access one or both of these features, they must first be assigned to the [PF1], [PF2] or [TOP] key using the System Menu (pp.
-
Page 52: Fm Radio
System Menu (pp. 75-78). FM Radio The KG-Q10H features a commercial broadcast FM Radio. To access the FM Radio, it must first be assigned to the [PF1], [PF2] or [TOP] key (pp. 75-78). When active, the current FM radio frequency will appear near the top of the display above Area A. -
Page 53: Stopwatch Timer
(page 87). Stopwatch Timer The KG-Q10H has a built-in stopwatch timer. It can be enabled using the TIMER menu option (page 83). Once enabled, Press [#] on the radio to activate the timer. Press any key to stop the timer. When stopped, press any key to deactivate the timer... - Page 54 Operation When the timer is activated, it will appear on the display in place of the current chan- nel information. The menu is not accessible while the timer is active.
-
Page 55: Area Menu Functions
Area Menu Functions Using the Area Menu The Wouxun KG-Q10H has two menus to access its primary features and functions. The Area Menu includes menu options and settings that are only applied directly to or otherwise affect the funtionality of each individual channel when in Channel Mode or the selected frequency when in VFO Mode. -
Page 56: [02: Tx-Power] Output Power
Area Menu Functions [02: TX-POWER] Output Power Function: Sets the transmit power of the radio. The radio has four power optons: Low, Mid, High and UltraHigh. Wattage is different for each band and is approxi- mate. Refer to the Technical Specifications chapter (page 114) for details. Options: HIGH/MID/LOW/UltraHigh Default: (Varies by channel) [03: W/N] Bandwidth... -
Page 57: [05: Rx-Ctcss] Receive Ctcss Tone
Area Menu Functions Area Menu Functions Default: 5K [05: RX-CTCSS] Receive CTCSS Tone Function: Sets the receiving CTCSS tone for the selected channel. Use the arrow keys to select your preferred code or the [*] key to choose OFF and then MENU to confirm. -
Page 58: [08: Tx-Dcs] Transmit Dcs Code
Area Menu Functions keys to select your preferred code or the [*] key to choose OFF and then MENU to confirm. Options: OFF/50 CTCSS Tones Default: OFF [08: TX-DCS] Transmit DCS Code Function: Sets the transmitting DCS code for the selected channel. Short press the [#] key to choose DCS+ (N) or DCS- (I) codes. -
Page 59: [10: Offset] Offset Frequency
Area Menu Functions Area Menu Functions [10: OFFSET] Offset Frequency Function: Sets the offset frequency for accessing a repeater. Frequency must be typed in from the keypad of the radio. Offset works in conjunction with the Shift setting (option 9) to set the transmit frequency of the radio when transmit- ting to a repeater. -
Page 60: [12: Ch-Fav] Favorite Channel
Area Menu Functions select the desired character, then press the [PF1] key to move to the next position. Press the [PF2] key to move back to the previous position. When you finish editing the name, press [MENU] to save. Pressing the [*] key will toggle between upper case, lower case, numeral, punctuation/symbols or space characters in the list, beginning with A, a, 0, ?, [space]. -
Page 61: [13: Ch-Add] Add Memory Channel
Area Menu Functions Area Menu Functions [13: CH-ADD] Add Memory Channel Function: Adds a channel to the memory channel list. Refer to the section Adding and Removing Channels (page 91) for details. Options: None Default: Current channel [14: CH-DELETE] Delete Memory Channel Function: Deletes a channel from the memory channel list. -
Page 62: [16: Mute-Mode] Speaker Mute
Area Menu Functions [16: MUTE-MODE] Speaker Mute Function: Selects the method to filter transmissions received on the current channel. Options: QT/QT+DTMF/QT*DTMF Default: QT QT: Only those signals with a CTCSS tone or DCS code matching the selected chan- nel will be heard through the speaker. QT+DTMF: Transmissions will be filtered by both CTCSS/DCS tones AND a DTMF tone of the current radio ID (followed by a # sign). -
Page 63: [19: Send-Loc] Send Location
[19: SEND-LOC] Send Location Function: Transmits the GPS location of the radio when enabled. Useful for geoloca- tion of users in your group equipped with GPS capable Wouxun Q Series radios. See page 95 for more about how to use location features. -
Page 64: [21: Scan-Add] Scan Add / Delete
Area Menu Functions [21: SCAN-ADD] Scan Add / Delete Function: Add or remove a channel to/from the list of channels to scan. ON indicates the channel is in the scan list. Options: ON/OFF Default: ON [22: TONE-SCAN] CTCSS/DCS Scanning Function: Scans the incoming signal for CTCSS or DCS tones to identify or confirm the correct tone. -
Page 65: [24: Vfo-Scan] Frequency Mode Scan Options
Area Menu Functions Area Menu Functions group number is selected, only channels in that group will be scanned when the Scan feature is activated. Groups can be defined in the programming software. Options: ALL/1-10 Default: ALL [24: VFO-SCAN] Frequency Mode Scan Options Function: Defines what frequencies are scanned when scan mode is activated while in Frequency (VFO) Mode. -
Page 66: [26: Am-Mode] Am Modulation Mode
CH-FREQ: Channel Mode. Displays the channel frequency (Example: 146.47500) CH-NUM: Channel Mode. Displays the channel number (Example: CH-001) VFO (FREQ): Frequency Mode. Allows directly tuning any frequency in the wide receive range of the KG-Q10H. The radio transmits on amateur frequencies only. [26: AM-MODE] AM Modulation Mode Function: Sets the modulation mode of the radio. -
Page 67: System Menu Functions
System Menu Functions System Menu Functions System Menu Functions System Menu Functions Using the System Menu The System Menu contains the menu settings that manage or affect the operation of the radio. These including options for configuring power management, display prefer- ences, and other system-level functions. -
Page 68: [03: Backlight] Backlight Timeout
System Menu Functions Options: OFF/1-10 Default: 2 [03: BACKLIGHT] Backlight Timeout Function: Sets the amount of time that the display will remain active before entering standby. The timer can be set from 1-30 seconds in one second increments. It can also be set to turn off imediately or always remain on. Options: ALWAYS OFF/1-20S/ALWAYS ON Default: 10 Seconds [04: BATT-SAVER] Battery Saver... -
Page 69: [06: Wx-Notify] Weather Alert Notification Setting
System Menu Functions System Menu Functions NOAA weather channel. Options: ON/OFF Default: OFF [06: WX-NOTIFY] Weather Alert Notification Setting Function: Sets type of notification for the alert when a NOAA weather alert signal is received. Options: WEATHER/ICON-ONLY/TONE/FLASH/TONE+FLASH Default: WEATHER ICON-ONLY: Displays weather alert icon and radio remains on regular channel. TONE: Displays weather icon and emits an alert beep every 60 seconds. -
Page 70: [08: Scan-Mode] Scan Mode
System Menu Functions Options: WHITE-1/WHITE-2/BLACK-1/BLACK-2/COOL/RAIN/NotARubi/ SKY/BTWR/CANDY/CUSTOM-1/CUSTOM-2/CUSTOM-3/CUS- TOM-4 Default: BLACK-2 [08: SCAN-MODE] Scan Mode Function: Scan mode settings Options: TO/CO/SE Default: TO TO: When a signal is detected, scanning stops. Scan will pause to wait for further activity and will then resume if no operation is carried out within 5 seconds. Pressing PTT will transmit on the currently selected channel. -
Page 71: [10: Pri-Scan] Priority Scan
System Menu Functions System Menu Functions Function: Determines if the incoming transmissions are filtered by CTCSS/DCS tones during scan mode. Options: ON/OFF Default: OFF [10: PRI-SCAN] Priority Scan Function: Allows you to turn the priority channel scan on or off. When enabled, the radio will scan the priority channel every 3 seconds for activity. -
Page 72: [12: Tone-Save] Ctcss/Dcs Tone Save Options
System Menu Functions [UP] and [DOWN] keys to select a channel number. Options: 999 channels Default: CH-001 [12: TONE-SAVE] CTCSS/DCS Tone Save Options Function: This item determines how a CTCSS or DCS tone is saved to a channel after a CTCSS/DCS scan. Options: BOTH/RX/TX Default: TX. -
Page 73: [14: Tot] Transmit Overtime Timer
System Menu Functions System Menu Functions EOT: Sets the roger beep at the end of transmission BOTH: Sets the roger beep at the beginning and end of transmission [14: TOT] Transmit Overtime Timer Function: When the transmission time exceeds the time set by the Transmit Overtime Timer, the unit will emit an error prompt and stop transmitting. -
Page 74: [16: Vox] Voice Activated Transmit
System Menu Functions [16: VOX] Voice Activated Transmit Function: The VOX function allows you to transmit without pressing the PTT key. The VOX function will detect that you are speaking into the microphone and then automatically begin transmitting. VOX gain levels of 1-9 are provided to allow you to adjust the voice detection sensitivity. -
Page 75: [19: Ptt1-Def] Push-To-Talk 1 Key Assignment
System Menu Functions System Menu Functions [19: PTT1-DEF] Push-To-Talk 1 Key Assignment Function: Assigns a function to a press of the [PTT1] key. This is the lower PTT locat- ed on the left side of the radio. Refer to PTT Key Options on page 54 for more information about each option. -
Page 76: [22: Pf1-Long] Side Key Pf1 Long Press Assignment
System Menu Functions Function: Assigns a function to a short press of the [PF1] side key. Refer to PF Key Options on page 46 for more information about each option. Options: DISABLE/ALARM/BACKLIGHT/BRIGHT+/FAVORITE/FLASH- LIGHT/FM-RADIO/LOC-MAP/MONITOR/REVERSE/SCAN/ SCAN-CTC/SCAN-DCS/SOS/STROBE/TALKAROUND/WEATHER Default: SCAN [22: PF1-LONG] Side Key PF1 Long Press Assignment Function: Assigns a function to a long press of the [PF1] side key. -
Page 77: [24: Pf2-Long] Side Key Pf2 Long Press Assignment
System Menu Functions System Menu Functions Options: DISABLE/ALARM/BACKLIGHT/BRIGHT+/FAVORITE/FLASH- LIGHT/FM-RADIO/LOC-MAP/MONITOR/REVERSE/SCAN/ SCAN-CTC/SCAN-DCS/SOS/STROBE/TALKAROUND/WEATHER Default: WEATHER [24: PF2-LONG] Side Key PF2 Long Press Assignment Function: Assigns a function to a long press of the [PF2] side key. Refer to PF Key Options on page 46 for more information about each option. Options: DISABLE/ALARM/BACKLIGHT/BRIGHT+/FAVORITE/FLASH- LIGHT/FM-RADIO/LOC-MAP/MONITOR/REVERSE/SCAN/ SCAN-CTC/SCAN-DCS/SOS/STROBE/TALKAROUND/WEATHER... -
Page 78: [26: Top-Long] Top Key Long Press Assignment
46 for more information about each option. Options: DISABLE/ALARM/BACKLIGHT/BRIGHT+/FAVORITE/FLASH- LIGHT/FM-RADIO/LOC-MAP/MONITOR/REVERSE/SCAN/ SCAN-CTC/SCAN-DCS/SOS/STROBE/TALK-AROUND/WEATH- Default: LOC-MAP [27: STARTUP] Power On Message Function: Select the item displayed when the radio is powered on. Options: LOGO/VOLTAGE Default: LOGO LOGO: Wouxun logo VOLTAGE: Battery voltage... -
Page 79: [28: Top-Msg] Custom Top Message
System Menu Functions System Menu Functions [28: TOP-MSG] Custom Top Message Function: Allows you to customize the message in the top banner of the display. To edit the message, long press [MENU] and choose the TOP-MSG option. the current message will be in edit mode and the first character will flash to indi- cate it is currently being edited. -
Page 80: [30: Autolock] Auto Lock
System Menu Functions edited. Press the [UP] and [DOWN] keys to select the desired character, then press the [PF1] key to move to the next position. Press the [PF2] key to move back to the previous position. Pressing the [#] key will clear the entire message field. -
Page 81: [32: Radio-Id] Edit Radio Id
System Menu Functions System Menu Functions be heard by other radios. Options: OFF/DTMF/ID/DTMF+ID Default: OFF DTMF: Only non-radio ID tones will be heard through the speaker. ID: Only radio ID tones will be heard through the speaker. Tones entered manually from the keypad will not be heard. -
Page 82: [34: Id-Dly] Id-Delay
System Menu Functions point it will be sent. Options: OFF/BOT/EOT/BOTH Default: OFF BOT: Radio ID will be sent at the beginning of the transmission. EOT: Radio ID will be sent at the end of the transmission. BOTH: Radio ID will be sent at both the beginning and end of transmission. [34: ID-DLY] ID-Delay Function: Determines the amount of time in milliseconds to wait before sending the PTT-ID. -
Page 83: [36: Alert] Tone Alert
System Menu Functions System Menu Functions QT+DTMF or QT*DTMF. Selectable: OFF/1S-10S (seconds) Default: 5S [36: ALERT] Tone Alert Function: Allows selection of the specific hertz of the tone burst. Some relay systems used for single-tone pulse transmissions need a single-tone pulse signal to activate. -
Page 84: [38: Smuteset] Secondary Area Mute Setting
System Menu Functions [38: SMUTESET] Secondary Area Mute Setting Function: The Secondary Mute function mutes the speaker on the secondary area when the primary area is used. This prevents conflicting audio sounds and noise from both sides simultaneously when the radio is in dual receive mode. Options: OFF/ RX/TX/ RX+TX Default: OFF TX: Mutes the speaker on the Secondary area when transmitting on the Primary area. -
Page 85: [40: Rpt-Mode] Repeater Mode
[40: RPT-MODE] Repeater Mode Function: Set the type of repeater function when enabled as a cross band repeater. Re- quires the KG-Q10H to be in cross-band repeater mode for this to function. See page 100 for more information. Options: X-DIRPT/X-TWRPT... -
Page 86: [42: Rpt-Ptt] Repeater Ptt Setting
Selectable: ON/OFF Default: OFF [42: RPT-PTT] Repeater PTT Setting Function: When the KG-Q10H is configured as a cross-band repeater, enabling this option will allow you to use the radio’s Push-To-Talk button to transmit. Selectable: ON/OFF Default: OFF [43: RPT-TONE] Squelch Tone Function: Enables or disables the squelch tail sent to the receiving radio at the end of a transmission. -
Page 87: [45: Timezone] Set Time Zone
System Menu Functions System Menu Functions pears in the upper right corner of the display. The time is received from GPS and will only display when GPS is enabled. Options: ON/OFF Default: OFF [45: TIMEZONE] Set Time Zone Function: Sets the Greenwich Mean Time (GMT) time zone in one hour increments. Options: GMT/GMT+12 to GMT-12 Default: GMT [46: FM-RADIO] FM Radio... - Page 88 System Menu Functions more radios that support this feature. Requires Wouxun Q Series radios for this feature to function. Accessing this menu option takes you to a sub-menu with options to activate and configure the following GPS functions. See page 95 for more about using the location features of the KG-Q10H.
-
Page 89: [48: Reset] Factory Reset
System Menu Functions System Menu Functions GPS-RECEIVE: Function: Enables and disables the receiving GPS location data. Options: OFF/ON Default: OFF DISPLAY-MAP: Function: Displays the GPS locator Map on the screen with location co-ordinates. Options: None [48: RESET] Factory Reset Function: Resets the transceiver to factory defaults. Options: VFO/ALL Default: VFO VFO: Resets function settings to factory defaults but retains channel parameters. -
Page 90: Advanced Operation
Advanced Operation Setting Non-Standard CTCSS or DCS How to Set Non-Standard CTCSS The KG-Q10H supports non-standard CTCSS codes in the range of 65.0-255.0Hz with a minimum spacing of 0.1Hz. After selecting the CTCSS menu setting (RX-CTCSS or TX-CTCSS), enter the desired CTCSS code via the keyboard and then press [MENU] to confirm. -
Page 91: Adding And Removing Channels
[1] + [0] + [5], then press [#] to select the Negative code. The screen will display D105I. Press [MENU] to confirm, and then press [EXIT] to return to standby. Adding and Removing Channels The KG-Q10H allows you to add and delete channels directly from the keypad of the... - Page 92 Advanced Operation radio using the CH-ADD and CH-DELETE options in the menu. New channels can be created in Frequency mode or cloned from existing channels in Channel mode. How to Clone an Existing Channel When creating a new channel, it is often easier to start by cloning an existing channel. This is particularly true with amateur repeater channels.
- Page 93 How to Add a Channel in Frequency Mode New channels can also be created from scratch, including “Receive-Only” channels for frequencies supported by the KG-Q10H but outside of the bands allowed for amateur use. To create a new channel: 1. Be sure that your radio is in Frequency mode by using the WORK-MODE menu option (page 65).
- Page 94 Advanced Operation 5. Turn the channel knob or press the [UP] and [DOWN] keys to select an available channel number, then press [MENU] to save it and return to standby mode. Channels that are available to program will be a different color from channels already assigned. For example, to save a channel in Frequency mode with a 146.520 receive frequency and a 67.0 receive CTCSS tone: 1.
-
Page 95: Gps / Location Function
GPS / Location Function The KG-Q10H has a location function that utilizes GPS technology. It allows you to send, receive and map geo-location data between two or more Q-Series radios. - Page 96 GPS coordinate data is not transmitted when the KG-Q10H is in Frequency Mode. How to Activate the Global Location Functions Be sure that your radio is in Channel mode by using the WORK-MODE menu option (page 65).
- Page 97 Advanced Operation Advanced Operation should appear at the top of the display. 3. While still in the LOCATION sub-menu, press [2] to select the SEND-FREQ option and press [MENU]. Turn the channel knob or press the [UP] and [DOWN] keys to select the desired interval with which to send the GPS location data, then press [MENU] to save it and return to the LOCATION menu.
- Page 98 [MENU] to save it and return to standby mode. The Send Location function should now be active for your channel. For another Wouxun Q-Series radio to display your location using the Location Map, your radio must also be configured to transmit a Radio ID. Configure your unique Ra- dio ID by using the RADIO-ID system menu option (page 81).
- Page 99 ON for the current channel to send location data. How to Access and Display GPS Location Data The KG-Q10H can list location coordinates of other Q Series radios and display a map of their locations on the screen. To access and display the GPS data: 1.
-
Page 100: Cross Band Repeat
To exit the GPS Locator Map, press the [EXIT] key. Cross Band Repeat The KG-Q10H features a cross band repeater. It can be configured either as a direction- al cross band repeater or a two way cross band repeater. There are four options in the System Menu related to configuring the cross band repeat... - Page 101 Advanced Operation Advanced Operation and RPT-TONE (page 86). To set up cross band repeat, long press [MENU] + [4] + [0] to enter the RPT-MODE function in the system menu. There are two options, X-DIRPT and X-TWRPT. X-DIRPT: The receiving frequency in the Primary Area is the receiving frequency of the cross-band repeater and the transmitting frequency in the Secondary Area is the transmitting frequency.
- Page 102 Advanced Operation unmute it. While still in the system menu, press [4] + [1] to select the RPT-SPK op- tion and press [MENU]. Turn the channel knob or press the [UP] and [DOWN] keys to select ON or OFF, then press [MENU] to save it and return to the system menu. To transmit with the PTT key while in cross band repeat mode, enable the RPT-PTT function.
-
Page 103: Dtmf Encoding
Using the DTMF Keypad The KG-Q10H has a full function DTMF keypad. While pressing the [PTT] key to transmit, press the key on the keypad that corresponds to the DTMF tone that you wish to send. - Page 104 Advanced Operation Sending a Radio ID The KG-Q10H is capable of automatically sending a radio ID number using DTMF functionality. When activated, the radio ID will be sent during a transmission. When the radio ID is transmitted, radios capable of displaying a radio ID will typically show the ID number on the display while receiving the transmission.
- Page 105 ID when the ID is shorter than six digits. Once a KG-Q10H receives a DTMF signal matching its radio ID, it will play a ring sound and then open the speaker to allow the incoming transmission to be heard. The...
- Page 106 Up to 99 Call ID tones can be assigned using the programming software. Transmitting DTMF Tones The KG-Q10H provides a way to send pre-configured DTMF tones via a Push-to-Talk (PTT) key. First, assign a PTT key to the CALL option (page 75). This is available as an option for the [PTT1] or [PTT2] key.
-
Page 107: Remote Control
To send the tone, press the [PF2] side key while transmitting. Remote Control The Remote Control function allows some settings of the KG-Q10H to be modified remotely. The remote control function must be configured using the PC programming software, and the radio used to control the KG-Q10H remotely must have DTMF support. - Page 108 Advanced Operation Generally when using radio IDs, each radio in your group should have a unique value. Control Code: The Control Code value determines if the radio will allow requests to be controlled remotely. The control code is a value that you determine. This number works like a password.
- Page 109 Advanced Operation Advanced Operation To activate the stun function on a remote radio, perform the following steps. From the controlling radio, transmit a DTMF sequence matching the following: Control Code + CB (DTMF stun code) + Radio ID. Using our example, the transmitted sequence would be: 654321 CB 123456.
- Page 110 Advanced Operation Monitor Monitor opens the microphone on a remote radio, forcing the radio to transmit for 15 seconds. No input is needed on the remote radio. To activate the monitor function on a remote radio, perform the following steps. From the controlling radio, transmit a DTMF sequence matching the following: Control Code + DA (DTMF monitor code) + Radio ID.
- Page 111 Advanced Operation Advanced Operation would be: 654321 DB 123456. On the controlled radio, if the received Control Code matches the Control Code and the DTMF ID matches, the inspect function will be activated.
-
Page 112: Troubleshooting
Troubleshooting Troubleshooting Before assuming your KG-Q10H is defective, please check the following list of possi- ble problems and solutions. The RESET option provided in the menu can be used to restore factory standard settings and programming, and will often solve issues. - Page 113 Troubleshooting Troubleshooting Problem Solution ▪ Cannot power on Check that the battery pack is attached correctly. ▪ Check that the battery pack is fully charged. ▪ Battery life lower than Be sure the charger indicates the battery is fully expected charged.
-
Page 114: Technical Information
Technical Information Technical Information Specifications Entire Radio Frequency Range TX: 50-54 MHz / 222-225 MHz / 420-450 MHz / 144-148 MHz RX: 50-54 MHz (FM) / 76-108 MHz (FM) 108-136 MHz (Air Ground, AM) 136-174 MHz (FM) / 222-225 MHz (FM) 320-400 MHz (FM) / 400-480 MHz (FM) / 714-999 MHz (FM) Memory Channels Work Mode... - Page 115 Technical Information Technical Information Narrow Band Receiver Wide Band Narrow Band Transmitter Wide Band Adjacent Channel Adjacent Channel ≤70dB ≤60dB ≥70dB ≥60dB Selectivity Power ≤65dB ≤60dB Inter-modulation Spurious ≤-60dBm ≤-60dBm ≤70dB ≤70dB +3dB +3dB Spurious Response Audio Response (0.3~3KHz) (0.3~2.55KHz) +1~3dB +1~3dB Audio Response...
-
Page 116: Standard Ctcss And Dcs Tones
The following is a list of the standard CTCSS and DCS tones supported by the KG-Q10H. Some radios display a number instead of a specific tone. The number to the left of the tone matches what is used by most manufacturers. - Page 117 Technical Information Technical Information DCS codes ending in N are positive. Negative DCS codes end in I. The KG-Q10H includes 105 positive and 105 negative codes. D462N D627N D023N D074N D165N D261N D356N D464N D631N D025N D114N D172N D263N D364N...
-
Page 118: Noaa Weather Channels
Technical Information NOAA Weather Channels Ch. Frequency Ch. Frequency 162.4000 162.5000 162.4250 162.5250 162.4500 162.5500 162.4750... -
Page 119: Optional Accessories
Optional Accessories Optional Accessories Optional Accessories Optional Accessories Shop Wouxun Accessories: www.buytwowayradios.com/accessories/by-radio-brand/wouxun-radio-accessories.html... -
Page 120: Limited Warranty
Limited Warranty Limited Warranty We warrant this product against defects in material and workmanship as follows: Radio and its original primary components for a period of one (1) year from date of purchase. Accessories (including battery, charger, belt clip, antenna and adapter) for a period of six (6) months from date of purchase. - Page 121 This warranty is valid only within the United States of America. Note: Product features, specifications and warranty terms are subject to revision by the manufacturer without notice. We are not responsible for unintentional errors or omis- sions on product packaging. Version: KG-Q10H-2203-V1.0...
Need help?
Do you have a question about the KG-Q10H and is the answer not in the manual?
Questions and answers