
Related Manuals for Wouxun KG-1000G Plus


Summary of Contents for Wouxun KG-1000G Plus
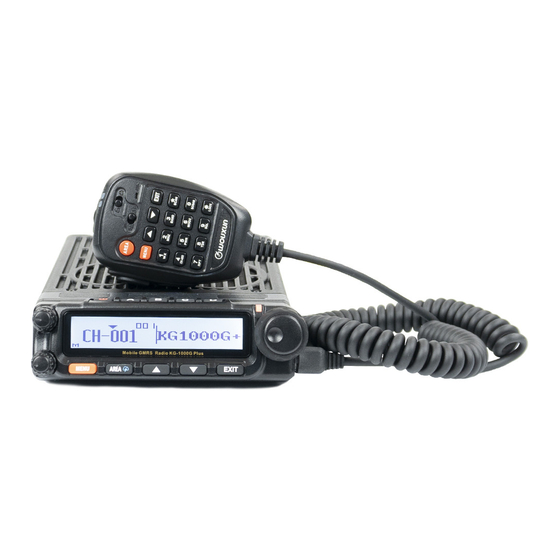
- Page 1 Thank you for purchasing the Wouxun KG-1000G Plus mobile GMRS radio. Your feedback makes our products better. Please share your thoughts. feedback@buytwowayradios.com www.buytwowayradios.com...
-
Page 2: Table Of Contents
Contents Safety Information ���������������������������������������������������������������������������������� 10 FCC Licensing Information .................14 Installation and Setup ����������������������������������������������������������������������������� 15 What’s Included ...................15 Transceiver Installation .................16 Connecting a Power Source ................18 Replacing the Fuse ..................19 Connecting an Antenna ................20 Front Panel Installation ................21 External Speakers ..................26 Hand Microphone Installation ..............27 Getting Started ���������������������������������������������������������������������������������������... - Page 3 Back Panel ....................32 Side Panels ....................32 Hand Microphone ..................33 Basic Operation �������������������������������������������������������������������������������������� 34 Introducing GMRS and the KG-1000G Plus ..........34 Power On/Off and Adjusting Volume ............35 Your First Transmit ..................35 Dual Display: Using Areas “A” and “B” ............37 Channel and Frequency Modes ..............39 Channels and Privacy Codes.................41...
- Page 4 NOAA Weather Mode .................49 Hand Microphone Hotkeys .................49 Menu Functions ������������������������������������������������������������������������������������� 57 [01: SQL] Squelch ..................57 [02: W/N] Bandwidth ..................57 [03: BACK-LT] Backlight Timeout .............57 [04: REPEATER] Repeater Offset ..............58 [05: TX-POWER] Output Power ..............58 [06: TDR] Dual Display ................59 [07: WORKMODE] Work Mode ...............59 [08: FM-RADIO] FM Radio ..............60 [09: RX-CTCSS] Receive CTCSS Tone .............61...
- Page 5 [12: TX-DCS] Transmit DCS Code ............62 [13: SCANMODE] Scan Mode ..............62 [14: SCAN-GRP] Scan Group ..............63 [15: SCAN-ADD] Scan Add / Delete ............63 [16: SCAN-CTC] Scan CTCSS ..............63 [17: SCAN-DCS] Scan DCS ..............64 [18: TONESAVE] CTCSS/DCS Tone Save Options .........65 [19: TONESCAN] CTCSS/DCS Scan Filter ..........65 [20: PRI-SCAN] Priority Scan ..............66 [21: PRI-SAVE] Set Priority Channel ............66...
- Page 6 [26: TOA] Transmit Overtime Alarm ............68 [27: VOICE] Voice Guide ................68 [28: BEEP] Button Beeps ................69 [29: BUSYLOCK] Busy Channel Lockout ..........69 [30: CH-NAME] Channel Name ..............69 [31: CH-ADD] Add Memory Channel ............70 [32: CH-DEL] Delete Memory Channel ............70 [33: DESCRAMB] Descrambler ..............71 [34: COMPAND] Compander ..............71 [35: SP-MUTE] Speaker Mute ..............71 [36: ID-EDIT] Edit Radio ID..............72...
- Page 7 [40: DTMF-DUR] DTMF Duration ............74 [41: SIDETONE] Sidetone Setting ............74 [42: RING] Ring Time ................75 [43: ALERT] Tone Alert................75 [44: REM-CTRL] Remote Control ............76 [45: AM-MODE] AM Mode ..............76 [46: AM-AUTO] Auto Detect AM ............76 [47: AUTOLOCK] Auto Lock ..............77 [48: AUTO-OFF] Auto Power Off .............77 [49: MED-PWR] Medium Power Setting ..........77 [50: VOLT-ALT] Low Voltage Alert ............78...
- Page 8 [54: RPT-MODE] Repeater Mode .............80 [55: RPT-SPK] Repeater Speaker Setting ...........80 [56: RPT-PTT] Repeater PTT Setting ............81 [57: RPT-DLY] Repeater Hold Timer ............81 [58: WT-LED] Standby LED Color ............81 [59: RX-LED] Receive LED Color ............82 [60: TX-LED] Transmit LED Color ............82 [61: KEY-PF1] PF1 Side Key Assignment ..........82 [62: KEY-A] Key A Assignment ..............83 [63: KEY-B] Key B Assignment..............83...
- Page 9 Setting Non-Standard CTCSS or DCS ............85 Adding and Removing Channels ..............87 Repeater Mode Operation ................90 DTMF Encoding ..................95 Remote Control ....................98 Wire Clone ....................112 Troubleshooting ����������������������������������������������������������������������������������� 114 Technical Information �������������������������������������������������������������������������� 116 Specifications ....................116 Standard CTCSS and DCS Tones .............117 Default GMRS Channels and Frequencies ..........119 Optional Accessories �����������������������������������������������������������������������������...
-
Page 10: Safety Information
Safety Information Safety Information The KG-1000G Plus is an electrical apparatus and a generator of RF (Radio Frequen- cy) energy, and you should exercise all safety precautions as are appropriate of this type of device. These safety tips apply to any device installed in a well-designed radio station. - Page 11 Safety Information Safety Information ⚠ Never allow unsupervised children to play in the vicinity of your mobile radio or antenna installation. ⚠ Be certain to wrap any wire or cable splices thoroughly with insulating electrical tape, to prevent short circuits. ⚠...
- Page 12 Notice ▪ These tips are important for safe operation of your KG-1000G Plus mobile radio and its accessories. If they do not function normally, please get in touch with your dealer immedi- ately. ▪ If you use components or accessories not produced by the Wouxun Company, Wouxun will not guarantee the safety and usability of the transceiver.
- Page 13 Safety Information Safety Information Caution Please read this manual before using, as it includes important instructions for the safe handling, use and operation of your radio. FCC Compliance This device complies with Part 15 of the FCC Rules. Operation is subject to the follow- ing two conditions: (1) This device may not cause harmful interference, and (2) This device must accept any interference received, including interference that may...
-
Page 14: Fcc Licensing Information
DO NOT attempt to use the radio with a damaged antenna or feed line. FCC Licensing Information The Wouxun KG-1000G Plus is FCC Part 95E type accepted for use on the GMRS. The KG-1000G Plus operates on General Mobile Radio Service (GMRS) frequencies according to the Federal Communications Commission (FCC) Rules in the United States. -
Page 15: Installation And Setup
Installation and Setup Installation and Setup Installation and Setup Installation and Setup What’s Included Carefully unpack the contents of the box and be sure that you have the items in the list below. If any items are missing, please contact your dealer. FM N Rx CT FM N... -
Page 16: Transceiver Installation
Installation and Setup Transceiver Installation Choose a safe place inside your vehicle to install the transceiver, considering a location that would not cause harm to passengers while the vehicle is in motion or in case of an accident or sudden braking. Install the transceiver in an area with good ventilation and away from direct exposure to the sun. - Page 17 Installation and Setup Installation and Setup 3. Several screw slots are provided along the side of the support bracket to allow for installing the transceiver at different angles.
-
Page 18: Connecting A Power Source
Installation and Setup Connecting a Power Source The power requirement of the transceiver ranges from 13.8V±15%. If the power source exceeds 16V, TX will be disabled but RX will operate as normal. If the power source falls below 11.5V, the transceiver will automatically shut off to prevent it from draining the battery and affecting the normal operation of the vehicle (See VOLT-ALT, page 78). -
Page 19: Replacing The Fuse
In the event that the transceiver blows a fuse, first determine the cause, then replace the fuse. If after installing the new fuse it blows again, disconnect the power source imme- diately and contact your authorized Wouxun dealer for assistance. The specified fuse current is 15A. The specified power source current is 20A and above. -
Page 20: Connecting An Antenna
Installation and Setup Connecting an Antenna Before using the transceiver, you must correctly connect a properly tuned and installed antenna. To get the best results, be sure the antenna is tuned for the frequencies that you intend to use, and the antenna’s impedance is 50 ohms. Using an incorrect or improperly installed antenna could harm the transceiver. -
Page 21: Front Panel Installation
Installation and Setup Installation and Setup Front Panel Installation The transceiver includes two switchboard panels for the front display: an angled pan- el for an inclined display, and a flat panel for a traditional display. The angled panel is installed by default. Install Inclined Switchboard Panel 2. - Page 22 Installation and Setup Install Flat Switchboard Panel 1. Align switchboard with front panel. 2. Insert tabs into base of front panel Tabs 4. Fasten using supplied screws 3. Close switchboard as shown Self-Tapping screws (2) Specification: 2x11...
- Page 23 Installation and Setup Installation and Setup Connecting Front Panel to Transceiver 1. Connect the 8-pin front panel cable to both the transceiver and the front panel. 2. With the front panel slightly off-center to the right, hold the front panel flush with the transceiver and slide to the left to lock into place.
- Page 24 Installation and Setup Removing Front Panel from Transceiver 1. Press and hold tab on the right side of the switch- board / front panel while sliding the front panel in the direction of the arrow. Front Panel to Transceiver Cable Specifications The cable connecting the front panel to the transceiver uses 8-pin RJ-45 type connec- tors.
- Page 25 Installing the Front Panel Support Bracket The front panel can be installed detached from the transceiver body. This allows for considerable flexibility when considering where to install the KG-1000G Plus. For an installation with a detached front panel, you will use the included support bracket.
-
Page 26: External Speakers
Installation and Setup External Speakers The KG-1000G Plus is equipped with two 3.5mm external speaker jacks on the back of the transceiver. Connecting speakers to one or both of these ports will direct audio to the external speaker instead of the speaker inside the radio body. -
Page 27: Hand Microphone Installation
Installing the Magnetic Microphone Mount The KG-1000G Plus includes a magnetic microphone mount kit. To install the mount, unscrew the round hook on the back of the mic, screw in the magnet and attach the... -
Page 28: Getting Started
Getting Started Getting Started Feature Summary ▪ ▪ 30 GMRS Channels Wide Receive (RX) Frequency Range: ▪ 8 Built-In GMRS Repeater Channels 50-53.995 & 108-179.995 MHz ▪ Up to 50W Output Power 320-349.995 & 400-479.995 MHz ▪ Built-in NOAA Weather Channels 700-985 MHz ▪... - Page 29 Getting Started Getting Started ▪ ▪ DTMF Hand Microphone with Automatic Temperature Testing ▪ Speaker, TX/RX Indicator and Vol- Scan with CTCSS / DCS Detection ▪ ume Control Simultaneous Scanning on A/B Areas ▪ ▪ 4 Configurable Front Panel Buttons Priority Channel Scanning ▪...
-
Page 30: Front Panel Guide
Getting Started Front Panel Guide Mobile GMRS Radio KG-1000G Plus 1. Menu / Enter Key 9. LCD 2. A/B Area Switch / Weather Mode 10. On / Off Button 3. Up Key 11. Configurable Hotkey “A” (Page 83) 4. Down Key 12. -
Page 31: Lcd Guide
Getting Started Getting Started LCD Guide 1. Repeater Channel Indicator 8. Priority Channel Indicator 2. Bandwidth Indicator (Wide/Narrow) 9. Menu Setting Mode Indicator 3. DTMF Mute 10. TX Power Indicator (L/M/H) 4. AM Mode Indicator 11. Repeater Mode Indicator (RX/TX) 5. -
Page 32: Back Panel
Getting Started Back Panel DC Power Connector DC13.8V Antenna Connector Warning 3.5mm Audio Output Ports Fan has moving parts. Keep fin- gers and other body parts away. Side Panels PC Programming Port / Repeater Mode Connection Port... -
Page 33: Hand Microphone
Getting Started Getting Started Hand Microphone TX indicator light (Red) RX indicator light (Green) Hand microphone keypad lock switch Hand microphone backlight switch Down key Up key Microphone (MIC) A/B area switch/Single tone pulse key Exit/Cancel key (See Menu 43) Band switch hot key Frequency or channel input key Scan key... -
Page 34: Basic Operation
NOAA weather mode is available at the touch of a button, as well an FM radio. Read this chapter to learn the basics of using your new KG-1000G Plus radio, such as selecting a channel, transmitting and receiving, using the dual display, scanning, and us- ing frequency mode. -
Page 35: Power On/Off And Adjusting Volume
Your First Transmit Selecting a Channel When you power on your KG-1000G Plus for the first time, the display will likely show “GMRS-01” on the left area. GMRS-01 is the name of the currently selected channel. Turn the Frequency / Channel Knob on the right side of the display to navi-... - Page 36 Transmitting on channels 8-14 is limited to a half watt of output power. The KG-1000G Plus is not capable of transmitting on these channels, as it is prohibited by the FCC for mobile radios to do so (although you can listen).
-
Page 37: Dual Display: Using Areas "A" And "B
PTT when finished. Dual Display: Using Areas “A” and “B” The KG-1000G Plus is two radios in one! The dual display function allows you to monitor two channels at the same time. While this may sound complex, the KG-1000G Plus is designed to make this powerful feature easy to use. - Page 38 Turning the Dual Display On and Off The dual display is off by default on the KG-1000G Plus. By default, the text “KG- 1000G+” will be displayed in the inactive area when the dual display is off. This text can also be customized with up to 8 characters using the programming software.
-
Page 39: Channel And Frequency Modes
Primary side. Channel and Frequency Modes The KG-1000G Plus supports tuning frequencies via two methods: channel and fre- quency modes. In channel mode, frequencies that have been saved can be selected from the channel list. - Page 40 To enter a frequency directly, press the number 2 key on the hand microphone (labeled MHZ) and type the frequency using the keypad. The KG-1000G Plus supports the following frequency bands: KG-1000G Plus Frequency Bands 50.000 - 53.995 MHz 108.000 - 179.995 MHz...
-
Page 41: Channels And Privacy Codes
Channels and Privacy Codes The KG-1000G Plus supports 30 built-in GMRS channels and 155 privacy tones and codes.To successfully communicate between your stations or members of your group, all the connecting radios must be using the same channel and privacy (CTCSS or DCS) code. -
Page 42: Using The Repeater Channels
Advanced Operations section (page 87). Using the Repeater Channels The KG-1000G Plus is pre-configured with 8 GMRS repeater channels. The channels are numbered 23-30 and named RPT-15 through RPT-22. What is a Repeater? In basic terms, a repeater is a device that is commonly used to increase the range of two way radios. - Page 43 Basic Operation Basic Operation a fixed location and connected to an antenna that is mounted at a higher elevation to provide better range than is normally available with radio-to-radio (simplex) communi- cations. Locating a Repeater Using GMRS repeaters can significantly increase the range of your radio, but just tun- ing to one of the repeater channels isn’t necessarily going to work.
- Page 44 Basic Operation As a licensed GMRS user you can also operate your own repeater. The KG-1000G Plus can operate as a repeater when paired with a second unit and connected with a data cable. For more information, read the section on Repeater Mode on page 90.
-
Page 45: Channel Scan
Basic Operation Basic Operation Number Channel Receive Frequency Transmit Frequency RPT-20 462.6750 467.6750 RPT-21 462.7000 467.7000 RPT-22 462.7250 467.7250 Channel Scan The [*SCAN] key controls the scan function. To activate Channel Scan, press the [*SCAN] key. The radio will scan each channel for activity, starting from the current channel. - Page 46 Basic Operation Simultaneous Scanning on the A and B Areas The A and B areas can perform a scan at the same time. To do this, press [SCAN] to activate the scan on the A Area , press [AREA] to go to the B area, then press [SCAN] to activate the scan on B area.
- Page 47 Priority Channel Scan When the Priority Channel Scan function is activated using the PRI-SCAN menu op- tion (page 66), the KG-1000G Plus will check the priority channel every 3 seconds for activity during normal operation. The PRI-SCAN menu item has options ON-STBY and ON-ALWYS. If activity is detected on the priority channel with ON-STBY selected, the priority channel activity will be heard only if the radio is not receiving a transmission on the current channel.
-
Page 48: Scanning Ctcss / Dcs Codes
Basic Operation Scanning CTCSS / DCS Codes The KG-1000G Plus is equipped with the ability to scan an incoming signal for a CTCSS or DCS tone and update the current channel’s tone settings once the tone is identified. To activate CTCSS / DCS scan, press the [MENU] key and navigate to the TONE- SCAN menu item. -
Page 49: Noaa Weather Mode
Basic Operation Basic Operation NOAA Weather Mode NOAA Weather Mode allows you to quickly access weather information from a local NOAA broadcast station. To activate NOAA Weather Mode, press and hold the AREA key on the front panel for 2 seconds or press the number 1 [WX] key on the hand microphone. The display will change to show a NOAA broadcast station frequency starting with 162 MHz. - Page 50 Basic Operation hold the AREA key on the transceiver for 2 seconds to enter and exit Weather Mode. (2) [MHZ] Frequency or Channel Selection Hotkey When the transceiver is in frequency mode, press the [MHZ] key to enter a specific frequency.
- Page 51 Basic Operation (3) [BAND] Band Switching Hotkey The KG-1000G Plus can receive signals on multiple bands and frequency ranges. In frequency mode, press the [BAND] key on the hand microphone to switch the current band. Area A (left side) supports all available bands. Area B (right side) has 2 selectable bands: 136-174.995 MHz and 400-479.995 MHz.
- Page 52 Basic Operation mit CTCSS setting, press [UP] / [DOWN] to select the 67.0 tone, and then press [MENU] to confirm. 2. Press [7] on the hand microphone until a “+” appears on the display. This activates the GMRS repeater offset, indicating a 5 MHz offset will be added to the RX frequency to determine the TX frequency.
- Page 53 Frequency Mode. If you are tuned to a GMRS receive frequency that is valid for repeater use and turn the REPEATER menu option ON, the KG-1000G Plus will transmit to the repeater input frequency when the PTT is pressed. The REPEATER menu option is ignored when the radio is not tuned to one of the 8 GMRS repeater transmit frequencies.
- Page 54 (1-8), or OFF to disable the descrambler. Please note, GMRS rules do not allow for frequency scrambling. Activating this feature is only useful when using the KG-1000G Plus to listen to scrambled transmissions on non-GMRS frequencies. (*) [SCAN] Scanning Hotkey...
- Page 55 Basic Operation Basic Operation In standby, press the [SCAN] key on the hand microphone to initiate a channel or frequency scan. In Frequency (VFO) mode, the radio will scan by the step frequency. In Channel (MR) mode, the radio will scan the channels programmed into it, starting from the current channel.
- Page 56 Basic Operation In channel mode, press the [UP] key to go to the next higher channel. [ARROW DOWN] Down key In frequency mode, press the [DOWN] key to go to a lower frequency in the next lower frequency step. In channel mode, press the [DOWN] key to go to the next lower channel. [MENU] Confirmation key Pressing this key enters the menu, selects menu options and saves them to the radio.
-
Page 57: Menu Functions
The squelch adjustment can be heard while the setting is being changed. Options: 0-9 Default: 5 [02: W/N] Bandwidth Function: Adjusts the bandwidth settings. The KG-1000G Plus can operate on Wide (25KHz) or Narrow (12.5KHz) bandwidth. Options: WIDE/NARR Default: WIDE... -
Page 58: [04: Repeater] Repeater Offset
Function: Sets the offset frequency for a repeater channel. When this option is activat- ed the KG-1000G Plus will transmit to the repeater input frequency when the radio is tuned to a frequency that has a valid GMRS repeater offset. This option is only available in frequency mode and will be ignored on frequencies that do not have a GMRS repeater offset. -
Page 59: [06: Tdr] Dual Display
Low power only. The transmit power of channels 15-22 and RPT15-22 can be used on High power. The KG-1000G Plus will automati- cally adjust the power to the FCC limits. Note: Medium Power has two lev- els, 20-WATTS and 10-WATTS. -
Page 60: [08: Fm-Radio] Fm Radio
CH-NAME: Channel Mode. Displays the channel name (Example: GMRS-01) FREQ: Frequency Mode. Allows directly tuning any frequency in the wide receive range of the KG-1000G Plus. The radio transmits on GMRS frequencies only. CH-NUM: Channel Mode. Displays the channel number (Example: CH-001) CH-FREQ: Channel Mode. -
Page 61: [09: Rx-Ctcss] Receive Ctcss Tone
Menu Functions Menu Functions press [MENU] to confirm. [09: RX-CTCSS] Receive CTCSS Tone Function: Sets the receiving CTCSS tone for each channel. Use the arrow keys to select, or keypad to enter the tone. 50 standard tones are supported as well as non-standard tones. -
Page 62: [12: Tx-Dcs] Transmit Dcs Code
Menu Functions your preferred code and then MENU to confirm. See page 85 to learn how to enter non-standard DCS codes. Options: OFF/Standard negative & positive DCS/Non-standard DCS Default: OFF [12: TX-DCS] Transmit DCS Code Function: Sets the transmit DCS code for each channel. Use the arrow keys to select your preferred code and then MENU to confirm. -
Page 63: [14: Scan-Grp] Scan Group
Menu Functions Menu Functions CO: When a signal is detected, scanning stops and resumes 3 seconds after the signal is lost. SE: When a signal is detected, scanning stops. [14: SCAN-GRP] Scan Group Function: Categorizes the programmed channels into different scan groups. You can choose to scan one specific group or all groups. -
Page 64: [17: Scan-Dcs] Scan Dcs
Menu Functions Function: Scans the incoming signal for CTCSS tones to identify or confirm the cor- rect tone. This can be useful when your CTCSS tone does not match the tone used by other members of your group, or to determine which tone they are using. -
Page 65: [18: Tonesave] Ctcss/Dcs Tone Save Options
Menu Functions Menu Functions [UP]/[DOWN] arrow keys or channel knob to make it scan in a different direction. [18: TONESAVE] CTCSS/DCS Tone Save Options Function: This item determines how a CTCSS or DCS tone is saved after a CTCSS/ DCS scan. There are three save options. Note: Not available in Repeater Mode. -
Page 66: [20: Pri-Scan] Priority Scan
Menu Functions Default: ON [20: PRI-SCAN] Priority Scan Function: Allows you to turn the priority channel function on or off. When enabled, the radio will scan the channel every 3 seconds. Read the “Priority Channel Scan” section on page 47 to learn more. Options: OFF/ON-STBY/ON-ALWYS Default: OFF ON-STBY: Detects priority channel activity while the area is not receiving a signal. -
Page 67: [22: Pri-Sel] Priority Channel Select
Menu Functions Menu Functions [22: PRI-SEL] Priority Channel Select Function: Switches the active channel to the priority channel. Options: 999 channels Default: None [23: STEP] Frequency Step Function: Allows you to adjust the steps between frequencies. Available only in Fre- quency mode. -
Page 68: [25: Tot] Transmit Overtime Timer
Menu Functions BOTH: Sets the roger beep at the beginning and end of transmission [25: TOT] Transmit Overtime Timer Function: When the transmission time exceeds the time set by the Timeout Timer, the unit will emit an error tone and stop transmitting within 10 seconds. The ra- dio will not be able to transmit if the [PTT] is pressed, and will emit an error prompt. -
Page 69: [28: Beep] Button Beeps
Menu Functions Menu Functions Function: Enables or disables voice prompts. Selectable: ON/OFF Default: ON [28: BEEP] Button Beeps Function: Enables an audio prompt to alert the operator of a key press, input or fault. Selectable: ON/OFF Default: ON [29: BUSYLOCK] Busy Channel Lockout Function: Enabling Busy Channel Lockout prevents the transceiver from transmitting on a selected channel or frequency while another station or group is transmit- ting on it. -
Page 70: [31: Ch-Add] Add Memory Channel
Menu Functions name, press the [UP] key to choose each character, press [DOWN] key to edit the next character, and press the [*] to clear the character you are cur- rently editing. Pressing the # key switches between special characters, num- bers, upper, and lowercase letters. -
Page 71: [33: Descramb] Descrambler
Menu Functions Menu Functions Priority Channels are fixed channels and cannot be deleted. Options: 999 channels Default: CH-001 [33: DESCRAMB] Descrambler Function: Activating this function will descramble incoming signals that are scrambled using one of 8 supported protocols. Options: OFF/SCRAM 1-8 Default: OFF [34: COMPAND] Compander Function: The compander minimizes noise. -
Page 72: [36: Id-Edit] Edit Radio Id
Menu Functions Options: QT/QT+DTMF/QT*DTMF Default: QT QT: Only signals with a CTCSS tone/DCS code matching the selected channel will be heard through the speaker. QT+DTMF: Transmissions will be filtered by either CTCSS/DCS tones OR a DTMF tone of the current radio ID (followed by a # sign). QT*DTMF: Transmissions will be filtered by both CTCSS/DCS tones AND a DTMF tone of the current radio ID (followed by a # sign). -
Page 73: [38: Dtmf-Dly] Dtmf Delay
Menu Functions Menu Functions Options: OFF/BOT/EOT/BOTH Default: OFF BOT: Beginning of transmission EOT: End of transmission BOTH: Beginning and end of transmission [38: DTMF-DLY] DTMF Delay Function: Determines the amount of time in milliseconds to wait before sending the DTMF-ID. This only applies to the ID that is sent at the beginning of the transmission. -
Page 74: [40: Dtmf-Dur] Dtmf Duration
Menu Functions Default: 80ms [40: DTMF-DUR] DTMF Duration Function: Sets the duration of each tone in an automated DTMF sequence, such as the radio ID. Options: 80~500ms Default: 80ms [41: SIDETONE] Sidetone Setting Function: Determines when DTMF tones transmitted by the radio are heard from the speaker. -
Page 75: [42: Ring] Ring Time
Menu Functions Menu Functions from the keypad will not be heard. DTMF+ID: All tones transmitted will be heard from the speaker. [42: RING] Ring Time Function: Sets the amount of time a ring alert is emitted after receiving a DTMF tone that matches the radio ID. -
Page 76: [44: Rem-Ctrl] Remote Control
[45: AM-MODE] AM Mode Function: Enables or disables the reception of signals in AM mode. Only available on “Area A”. Options: ON/OFF Default: OFF [46: AM-AUTO] Auto Detect AM Function: When activated, the KG-1000G Plus will automatically recognize AM fre-... -
Page 77: [47: Autolock] Auto Lock
Menu Functions Menu Functions quencies. Only available on “Area A”. Options: ON/OFF Default: ON [47: AUTOLOCK] Auto Lock Function: Automatically locks the buttons on the radio and hand microphone after 15 seconds. Options: ON/OFF Default: OFF [48: AUTO-OFF] Auto Power Off Function: The Automatic Power Off function automatically turns the radio off if it remains idle for a specified period of time. -
Page 78: [50: Volt-Alt] Low Voltage Alert
(9.5V-10.5V) and disable transmission if the voltage is too high. Note: It is advisable to enable this function when the KG-1000G Plus is installed in a car or connected to an unstable power source such as a vehicle battery. -
Page 79: [52: Speaker] Speaker Setting
ALWAYS: The fan is always on. [52: SPEAKER] Speaker Setting Function: Selects the active speaker for the radio. The KG-1000G Plus has three speak- ers. One is built into the hand microphone and two are built into the body of the radio. -
Page 80: [54: Rpt-Mode] Repeater Mode
RPT-TX: Sets the unit to operate as a repeater in two-way receive/transmit mode [55: RPT-SPK] Repeater Speaker Setting Function: When paired with another KG-1000G Plus and configured as a repeater, enabling this option will unmute the speaker. This will allow you to hear any repeater activity. -
Page 81: [56: Rpt-Ptt] Repeater Ptt Setting
Menu Functions Menu Functions [56: RPT-PTT] Repeater PTT Setting Function: When paired with another KG-1000G Plus and configured as a repeater, enabling this option will allow you to use the radio’s Push-To-Talk button to transmit. Selectable: ON/OFF Default: OFF [57: RPT-DLY] Repeater Hold Timer... -
Page 82: [59: Rx-Led] Receive Led Color
Menu Functions Default: ORG [59: RX-LED] Receive LED Color Function: Selects the color of the LED indicator light while receiving a signal. Options: OFF/RED/ORG/GREEN Default: GREEN [60: TX-LED] Transmit LED Color Function: Selects the color of the LED indicator light during transmit. Options: OFF/RED/ORG/GREEN Default: RED [61: KEY-PF1] PF1 Side Key Assignment... -
Page 83: [62: Key-A] Key A Assignment
Menu Functions Menu Functions Default: MONITOR [62: KEY-A] Key A Assignment Function: Assigns a function to the A key on the display panel Options: OFF/REVERSE/PRI-SEL/SQUELCH/TX-POWER/SCAN/SCAN- CTC/SCAN-DCS/FM-RADIO/WEATHER/CH-ADD/W-N/TDR/ WORKMODE/BAND/REPEATER/LOCK/MONITOR Default: FM RADIO [63: KEY-B] Key B Assignment Function: Assigns a function to the B key on the display panel Options: OFF/REVERSE/PRI-SEL/SQUELCH/TX-POWER/SCAN/SCAN- CTC/SCAN-DCS/FM-RADIO/WEATHER/CH-ADD/W-N/TDR/ WORKMODE/BAND/REPEATER/LOCK/MONITOR... -
Page 84: [65: Key-D] Key D Assignment
Menu Functions Options: OFF/REVERSE/PRI-SEL/SQUELCH/TX-POWER/SCAN/SCAN- CTC/SCAN-DCS/FM-RADIO/WEATHER/CH-ADD/W-N/TDR/ WORKMODE/BAND/REPEATER/LOCK/MONITOR Default: TDR [65: KEY-D] Key D Assignment Function: Assigns a function to the D key on the display panel Options: OFF/REVERSE/PRI-SEL/SQUELCH/TX-POWER/SCAN/SCAN- CTC/SCAN-DCS/FM-RADIO/WEATHER/CH-ADD/W-N/TDR/ WORKMODE/BAND/REPEATER/LOCK/MONITOR Default: LOCK [66: RESET] Factory Reset Function: Resets the transceiver to factory defaults. Options: VFO/ALL Default: VFO VFO: Resets only function settings to factory defaults. -
Page 85: Advanced Operation
Setting Non-Standard CTCSS or DCS How to Set Non-Standard CTCSS The KG-1000G Plus supports non-standard CTCSS codes in the range of 65.0- 255.0Hz with a minimum spacing of 0.1Hz. After selecting the CTCSS menu setting (RX-CTCSS or TX-CTCSS), enter the desired CTCSS code via the keyboard and then press [MENU] to confirm. - Page 86 Advanced Operation DCS code. After setting a non-standard DCS code, press the [LOCK] key to set it as a Positive or Negative code, or press the [SCAN] key to select OFF. After selecting the DCS menu setting (RX-DCS or TX-DCS), enter the desired DCS code from the keypad on the hand microphone, press [LOCK] to select the Positive or Negative code, and then press MENU to confirm.
-
Page 87: Adding And Removing Channels
Adding and Removing Channels The KG-1000G Plus allows you to add and delete channels directly from the keypad of the radio using the CH-ADD and CH-DEL options in the menu. New channels can be created from scratch in Frequency mode or cloned from existing channels in Chan- nel mode. - Page 88 Advanced Operation 3. Press [MENU] + [3] + [1] to enter the CH-ADD function. 4. Turn the channel knob or press the [UP] and [DOWN] keys to select an available channel number, then press [MENU] to save it and return to standby mode. Channels that are unassigned or available to program will have the letter N next to the channel name.
- Page 89 Advanced Operation Advanced Operation 3. Update any settings that you would like applied to the channel by updating the menu options. 4. Once the frequency is working as desired, save the new channel by pressing [MENU] + [3] + [1] to enter the CH-ADD function. 5.
-
Page 90: Repeater Mode Operation
N next to the channel name. Repeater Mode Operation In addition to its capabilities as a powerful mobile GMRS transceiver, two Wouxun KG-1000G Plus radios can be physically connected together to create a fully functional GMRS repeater. - Page 91 Advanced Operation Advanced Operation How to Configure Two Radios Into a Repeater Through the RPT-MODE function [MENU 54, p 80], you can set up the two indi- vidual units to communicate between each other to operate in tandem as one repeater transceiver.
- Page 92 Advanced Operation The two radios can now operate together as one repeater. When the KG-1000G Plus is operating in repeater mode, the screen will display the repeater icon. Additional Repeater Settings When the radios are in repeater mode, selected features can be enabled or disabled. You can turn the speaker on or off by configuring the RPT- SPK option [MENU 55].
- Page 93 Advanced Operation Advanced Operation the [UP] / [DOWN] keys to activate (ON) or deactivate (OFF) the speaker, press the [MENU] key to confirm, and press the [EXIT] key to return to standby. Repeater PTT Switch (RPT-PTT) - Menu 56 When the transceiver is in standby, press the [MENU] + [5] + [6] keys and the screen will display RPT-PTT.
- Page 94 Advanced Operation [MENU] key to confirm, and press the [EXIT] key to return to standby. Repeater Hold Time (RPT-DLY) – Menu 57 The Repeater Hold Timer is used to prevent the PTT from being used to transmit too frequently. When the PTT on the radio is released after transmitting in repeater mode, the hold time prevents the unit from transmitting for a predermined interval while waiting for a response.
-
Page 95: Dtmf Encoding
Using the DTMF Keypad The speaker microphone for the KG-1000G Plus has a full function DTMF keypad. While pressing the [PTT] key to transmit, press the key on the keypad that corre- sponds to the DTMF tone that you wish to send. - Page 96 DTMF tone that you wish to send. Sending a Radio ID The KG-1000G Plus is capable of automatically sending a radio ID number using DTMF functionality. When activated, the radio ID will be sent during a transmis- sion.
- Page 97 (page 73). This delay time can be set to one of 30 levels in 100ms increments. Calling a specific radio using an ID The KG-1000G Plus also supports the ability to call another radio directly, using its Radio ID. To enable this function, you must activate and configure all radios in your fleet to transmit the Radio ID (see Sending a Radio ID on page 96) and select either the QT+DTMF or QT*DTMF filter option in SP-MUTE (page 71).
-
Page 98: Remote Control
Advanced Operation Once a KG-1000G Plus receives a DTMF signal matching its radio ID, it will play a ring sound and then open the speaker to allow the incoming transmission to be heard. The length of the ring sound can be set using the RING option (page 75). - Page 99 Advanced Operation Advanced Operation Programming Software Settings Open the Wouxun PC programming software and select the Remote Settings tab. You will see the following configuration information: The RC POWER section determines if the radio will allow a remote power on/off request.
- Page 100 Advanced Operation control function and can be changed via the radio menu also (see DTMF-ID, page 72). Generally when using radio IDs, each radio in your group should have a unique value. MCC-EDIT: If the radio will have the au- thority to control other radios, enter a con- trol code in this field.
- Page 101 Advanced Operation Advanced Operation CTRL-EDIT: If the radio will accept requests to have settings changed remotely, enter a control code in this field. The controlling radio must have the same code entered into its MCC-EDIT field. In the example configuration in the graphic above, the radio is configured to allow all remote control functions and to perform remote control, as the control code is set to the same valid value (654321) for all three fields.
- Page 102 Advanced Operation To activate the stun function on a remote radio, perform the following steps. From the controlling radio, transmit a DTMF sequence matching the following: MCC + CB (DTMF stun code) +DTMF ID. Using our example, the transmitted sequence would be: 654321 CB 123456.
- Page 103 Advanced Operation Advanced Operation Monitor Monitor opens the microphone on a remote radio, forcing the radio to transmit for 15 seconds. No input is needed on the remote radio. To activate the monitor function on a remote radio, perform the following steps. From the controlling radio, transmit a DTMF sequence matching the following: MCC + DA (DTMF monitor code) +DTMF ID.
- Page 104 SCC and the DTMF ID matches, the inspect function will be activated. Remote Power On/Off The KG-1000G Plus can be powered on and off using remote control. To enable the transceiver to be powered on and off remotely, the RC OPEN setting must be selected in the programming software, a control code entered into the SCC-EDIT field and a DTMF ID must be configured.
- Page 105 DTMF ID were 123, the following would need to be sent instead: 654# BB 123#. Remote Setting Changes The KG-1000G Plus provides the ability to change several settings remotely including the frequency or channel number of the non-active area, the transmit power, and the RX CTCSS tone or DCS code.
- Page 106 Advanced Operation must be activated through the radio menu (see REM-CTRL, p. 76), a control code entered into the CTRL-EDIT field of the programming software and a DTMF ID must be configured. In the following examples, assume a CTRL code of 654321 and a DTMF ID of 123456 have been configured in the programming software.
- Page 107 9+9. Changing the frequency remotely The KG-1000G Plus will allow the frequency of the non-active area to be changed re- motely, provided the new frequency is not in the same band as the active area frequency.
- Page 108 If no beep was heard, the command failed. Changing the channel remotely The KG-1000G Plus will allow the channel of the non-active area to be changed re- motely, provided the new channel is not in the same band as the active area frequency.
- Page 109 Advanced Operation Changing the transmit power remotely The KG-1000G Plus will allow the transmit power of both areas to be changed re- motely. The power change is only temporary. After the radio is rebooted the power will return to the original setting.
- Page 110 Advanced Operation Changing the CTCSS tone remotely The KG-1000G Plus will allow the RX CTCSS tone of both areas to be changed remotely. The tone change is only temporary. After the radio is rebooted the tone will return to the original setting.
- Page 111 Advanced Operation Changing the DCS code remotely The KG-1000G Plus will allow the RX DCS code of both areas to be changed remote- ly. The code change is only temporary. After the radio is rebooted the code will return to the original setting.
-
Page 112: Wire Clone
Wire Clone Settings can be cloned from one KG-1000G Plus to another using wire clone mode. Cloning settings from one KG-1000G Plus to another 1. Connect one end of the SCO-002 interface cable (included) into the PC program- ming port of each KG-1000G Plus. - Page 113 Advanced Operation Advanced Operation Warning! When using wire clone mode, the settings of the non-source radio will be overwritten. It is recommended to always make a backup of your settings using the programming software before cloning the radio.
-
Page 114: Troubleshooting
Troubleshooting Troubleshooting Before assuming your KG-1000G Plus is defective, please check the following list of possible problems and solutions. Using the RESET option provided in the menu can also be used to reset the transceiver back to factory standard settings and programming. - Page 115 Troubleshooting Troubleshooting Problem Solution Cannot activate Scan Check if the scan group channel or Scan Add function is turned on. ▪ Transceiver automatically Check if your power source is below 11.5 volts. ▪ shuts off Check if APO menu setting is activated. Transceiver does not trans- Check if transceiver has been stunned or killed.
-
Page 116: Technical Information
Technical Information Technical Information Specifications Frequency Range for US: ≤ ≤ RX: 50.000-53.995MHz & 108.000-179.995MHz 320.000-349.995MHz & 400.000-479.995MHz ≤ ≤ 700-985MHz ≤ ≤ TX: 462.550-462.725MHz (GMRS Frequencies) 467.550-467.725MHz (GMRS Repeater Frequencies) 400.000-479.995MHz:0.25uV(13dB SINAD) 136.000-174.995MHz:0.25uV(13dB SINAD) 50.000-53.995MHz:0.25uV(13dB SINAD) 320.000-349.995MHz:0.25uV(13dB SINAD) 700.000-985.995MHz:-97.0dBm(13dB SINAD) -
Page 117: Standard Ctcss And Dcs Tones
The following is a list of the standard CTCSS and DCS tones supported by the KG-1000G Plus. Many FRS or GMRS radios display a number instead of a specific tone. The number to the left of the tone matches what is used by most manufacturers. - Page 118 Technical Information DCS (positive code) D165N D261N D356N D023N D074N D462N D627N D025N D114N D172N D263N D364N D464N D631N D026N D115N D174N D265N D365N D465N D632N D031N D116N D205N D266N D371N D466N D645N D032N D122N D212N D271N D411N D503N D654N D036N D125N D223N...
-
Page 119: Default Gmrs Channels And Frequencies
Technical Information Technical Information Default GMRS Channels and Frequencies Simplex Channels Frequency Max Power Ch. Frequency Max Power 462.5625 5 Watts 467.6625 RX Only 462.5875 5 Watts 467.6875 RX Only 462.6125 5 Watts 467.7125 RX Only 462.6375 5 Watts 462.5500 50 Watts 462.6625 5 Watts... - Page 120 Technical Information Repeater Channels Name Receive Frequency Transmit Frequency Max Power RPT-15 462.5500 467.5500 50 Watts RPT-16 462.5750 467.5750 50 Watts RPT-17 462.6000 467.6000 50 Watts RPT-18 462.6250 467.6250 50 Watts RPT-19 462.6500 467.6500 50 Watts RPT-20 462.6750 467.6750 50 Watts RPT-21 462.7000 467.7000...
- Page 121 Technical Information Technical Information NOAA Weather Channels Ch. Frequency Ch. Frequency 162.4000 162.5000 162.4250 162.5250 162.4500 162.5500 162.4750...
-
Page 122: Optional Accessories
Optional Accessories Optional Accessories Switching Power USB Programming Mobile Omni-antenna Omni-antenna Supply (30A) Cable Speaker / Mic Directional-Antenna Clamps Install Connection Cable Strong Magnetic Mount Mount Shop Wouxun Accessories: www.buytwowayradios.com/accessories/by-radio-brand/wouxun-radio-accessories.html... -
Page 123: Limited Warranty
Limited Warranty Limited Warranty Limited Warranty Limited Warranty We warrant this product against defects in material and workmanship as follows: Radio and its original primary components for a period of one (1) year from date of purchase. Accessories (including battery, charger, belt clip, antenna and adapter) for a period of six (6) months from date of purchase. - Page 124 Limited Warranty transferable. THIS LIMITED WARRANTY IS THE ENTIRE WARRANTY FOR THIS PRODUCT AND IS IN LIEU OF ALL OTHER WARRANTIES, EITHER EX- PRESSED OR IMPLIED, INCLUDING ANY WARRANTY OF MERCHANT- ABILITY AND FITNESS FOR A PARTICULAR PURPOSE. THIS WARRAN- TY DOES NOT COVER OR PROVIDE FOR THE REIMBURSEMENT OR PAYMENT OF ANY DAMAGES, INCLUDING INCIDENTAL OR CONSE- QUENTIAL DAMAGES RELATED TO THE USE OF THIS PRODUCT.
Need help?
Do you have a question about the KG-1000G Plus and is the answer not in the manual?
Questions and answers
Power up Radio and RC comes up on the left hand display. Have not found a way to unlock the radio. Cannot get into menu.
Attempt to operate radio and it displays RC lock. How do you unlock this mode.