Table of Contents
Advertisement
Available languages
Available languages
Fabricado e importado por Baccus Global LLC,
621 NW 53rd St., Suite 450, Boca Raton, FL 33487
www.dewalt12volt.com 1-888-394-3392
Hecho en China
Derechos Reservados © 2020 Baccus Global, LLC. D
e
el logotipo son marcas comerciales de D
WALT el D
e
e
Industrial Tool Co., o una filial de la misma y se utilizan bajo
licencia. El esquema de color amarillo y negro es una marca
comerciale de herramientas y accesorios de D
WALT. 33487
e
www.dewalt.com
DXAEC801B_DXAEC801BCA_ManualENFRSP_080320.indd 60-1
WALT
y
®
WALT
If you have questions or comments, contact us.
Pour toute question ou tout commentaire, nous contacter.
Si tiene dudas o comentarios, contáctenos.
1-888-394-3392
INSTRUCTION MANUAL
GUIDE D'UTILISATION
MANUAL DE INSTRUCCIONES
DXAEC801B/DXAEC801BCA
30A Bench Battery Charger with 80A Engine Start
30A banc chargeur de batterie avec 80A démarrage moteur
30A cargador de batería banco con 80A arranque del motor
BC
RD110420
11/04/20
10:29 AM
Advertisement
Table of Contents

Related Manuals for DeWalt DXAEC801B


Summary of Contents for DeWalt DXAEC801B
- Page 1 D WALT. 33487 www.dewalt.com MANUAL DE INSTRUCCIONES DXAEC801B/DXAEC801BCA 30A Bench Battery Charger with 80A Engine Start 30A banc chargeur de batterie avec 80A démarrage moteur 30A cargador de batería banco con 80A arranque del motor RD110420 DXAEC801B_DXAEC801BCA_ManualENFRSP_080320.indd 60-1...
-
Page 2: Important Safety Instructions
10. Only use attachments/accessories specified by Engine Start the manufacturer. The DXAEC801B/DXAEC801BCA 30A Bench Battery Charger with 11. Use only on a flat, level surface. If a cart is used, ADVERTENCIA: Lea todas las instrucciones antes de utilizar 80A Engine Start is a D... - Page 3 Specific Safety Instructions for Power Cords 13. Apparatus shall not be exposed to dripping or splashing and no objects filled with liquids, shall be placed on the apparatus. Recommended Minimum AWG Size for Extension Cords • Don’t abuse the cord. Protect the power cord from being walked for Battery Chargers This Class B digital apparatus complies with Canadian ICES-003.
-
Page 4: First Aid
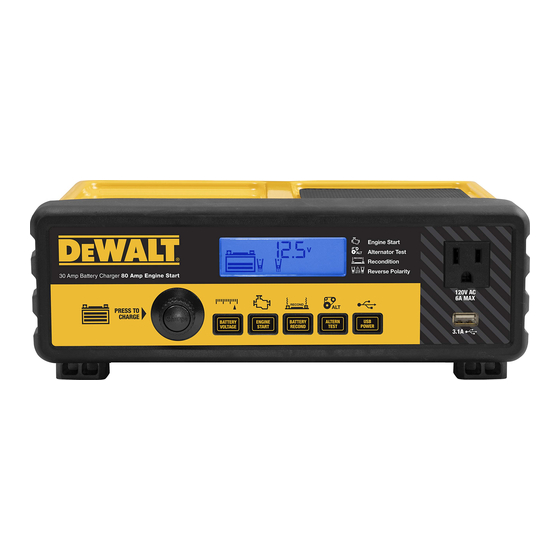
SAVE THESE Specific Safety Instructions for the reason, it is of the utmost importance that each time before using the • If battery acid contacts skin or clothing, wash immediately with battery charger you read this manual and follow instructions exactly. soap and water for at least 10 minutes and get medical attention USB Port INSTRUCTIONS... - Page 5 Front Panel Components (Fig. 1) LCD Screen (Fig. 3) Back Panel Components (Fig. 2) A. LCD Screen G Alternator Check Button K. Padded Storage Tray P. AC Power Cord (bottom of A. Battery Reconditioning D. Low Temperature G. USB Icon L.
-
Page 6: Preparing To Charge
Preparing to Charge Charging the Battery • A marine (boat) battery must be removed and charged on shore. carburetor, fuel lines, or sheet-metal body parts. Connect to heavy To charge it on board requires equipment specifically designed for gauge metal part of the frame or engine block. 1. - Page 7 Button once to show the charge status of the battery as a B. The charging process will start automatically approximately to show the charge status of the battery as a percentage (%) of percentage (%) of full. Pressing the Voltage Button cycles through one minute after the unit is properly connected to a battery if full.
-
Page 8: Reconditioning The Battery
Reconditioning the Battery Checking the Alternator 4. If the unit detects that the selected alternator is out of typical voltage 3. If the unit detects that the selected alternator is good, the LCD range, the LCD Screen shows the following: Screen shows the following: Periodic reconditioning is recommended to maintain a battery’s PART 1... -
Page 9: Starting The Engine
Starting the Engine The Pump Engine Icon will light solid and the Digital Display In any of these cases, the LCD screen will continuously display the The (empty) Battery Icon will light solid to indicate the built-in shows “0 SEC” to indicate the vehicle is ready to start. The following: Battery Clamps are not yet connected to the battery. -
Page 10: Troubleshooting
Troubleshooting Service Information CLEANING AND STORAGE Problem Possible Solution • Store the unit in a clean, dry, cool place when not in use. Whether need technical advice, repair, genuine Problem Possible Solution USB Port will not Make sure the USB Power Button has •... -
Page 11: Directives De Sécurité Importantes
80A démarrage moteur chariot, faites attention lorsque vous déplacez l’ensemble chariot/ appareil pour éviter les blessures causées par renversement du Le DXAEC801B/DXAEC801BCA 30A banc chargeur de batterie avec chariot. 80A démarrage moteur est un chargeur de batterie de D WALT 30A qui comporte le démarrage du moteur 80A, les fonctions vérification... - Page 12 par fabricant, sauf indication contraire ailleurs • Brancher l’équipement à une prise située sur un circuit différent cas échéant. Une rallonge de calibre insuffisant provoquera une chute DANGER : Avant d’utiliser un adaptateur comme dans l’illustration, dans ce manuel d’instructions, avant utilisation. de celui sur lequel le récepteur est connecté ;...
- Page 13 • N’utilisez pas le chargeur de batterie près de liquides inflammables, • Rester loin de pales de ventilateur, courroies, poulies et autres pièces • Ne pas mettre de l’acide de batterie en contact avec l’unité. • Respectez toutes les consignes de sécurité dans les «Consignes de dans un milieu déflagrant ou en présence de gaz.
- Page 14 Composants du panneau avant (Fig. 1) Écran ACL (Fig. 3) Composants du panneau arrière (Fig. 2) A. Écran ACL G. Bouton de contrôle A. Icônes de reconditionnement D. Icône de compensation de K. Plateau de stockage O. Pince positif (rouge) G.
- Page 15 Préparation pour chargement • Ne laissez jamais l’acide de la batterie s’égoutter sur le chargeur en 5. Déterminez quelle borne de la batterie est mise à la terre 2. Fixer un 24 pouces (longueur minimum) AWG #6 isolé câble de lisant la pesanteur ou en remplissant batterie.
-
Page 16: Chargement De La Batterie
Chargement de la batterie REMARQUE : En mode veille, l’affichage numérique indique la REMARQUES : est connecté à la batterie et branché à une prise secteur qui tension (V) de la batterie raccordée par défaut. Appuyez sur le fonctionne. L’écran LCD affiche les suivantes : A. - Page 17 Indications et défauts Reconditionnement de la batterie batterie suivant la dernière étape de la section « Préparation pour chargement » de ce manuel d’instructions. Il est recommandé régulièrement reconditionner la batterie pour Écran LCD affiche : Indication | Solution: IMPORTANT : Si le rendement de la batterie ne s’améliore pas avec optimiser son rendement.
-
Page 18: Démarrage Du Moteur
3. Si l’unité détecte que l’alternateur est bon, l’écran ACL affiche les 2. Appuyez sur le bouton de contrôle d’alternateur pour commencer 6. Lors du débranchement de la batterie chargeur, débranchez le REMARQUES : suivantes : le contrôle. L’écran ACL affiche les suivantes pour indiquer que cordon d’alimentation, puis débranchez le chargeur de la batterie La fonction de démarrage du moteur ne peut pas être l’appareil est vérifiant l’alternateur :... -
Page 19: Soin Et Entretien
Port USB d. Si un périphérique USB individuel est conforme aux spécifications 3. Branchez le périphérique USB alimenté dans le port USB et REMPLACEMENT DU FUSIBLE DE LE PASSENT À TRAVERS et que le problème survient, avoir le périphérique USB vérifié fonctionne normalement. -
Page 20: Enregistrement Du Produit
Information de service technique Baccus remplacera, sans frais, tout défaut dû à des matériaux Problème Solution Possible Problème Solution Possible défectueux ou à la fabrication pendant un an à compter de la date Que vous ayez besoin de conseil technique, d’une réparation, ou L’unité... - Page 21 El DXAEC801B / DXAEC801BCA 30A cargador de batería banco con para evitar daños por sobresalir la punta. 80A arranque del motor es un cargador de batería 30A DeWALT que 12. Desconecte este aparato cuando no vaya a usarlo. cuenta con el arranque del motor de 80A, comprobación del alternador, 13.
- Page 22 DeWALT Cuanto menor es el número de calibre, más grueso es el cable.
-
Page 23: Primeros Auxilios
• Cuando se trabaja con baterías de ácido de plomo, siempre asegúrese • Opere la unidad solamente como se describe en este manual de se presenta enrojecimiento, dolor o irritación, busque asistencia ADVERTENCIA – Riesgo de gases explosivos: de que alguien es suficientemente cerca como para proporcionar instrucciones. - Page 24 Componentes del panel frontal Componentes del panel posterior Pantalla LCD (Fig. 3) A. Iconos de D. Icono de compensación de G Icono de USB M. Icono de alarma (Fig. 1) (Fig. 2) reacondicionamiento de la temperatura baja H. Icono del falla N.
- Page 25 Preparación para cargar • Nunca opere el cargador en un área cerrada ni restrinja la ventilación del vehículo o al bloque del motor, lejos de la batería. No conecte 5. Conecte cuidadosamente la pinza negativa (negra) del cargador al de manera alguna. la pinza al carburador, las cañerías de combustible o a las partes extremo libre del cable de la batería conectado al terminal negativo.
- Page 26 Cargando de la batería batería conectada. Los iconos de pinzas y el icono de la batería barras sobre el icono de la batería cambian de vacío a sólido (abajo está conectado a la batería y enchufado a una toma de CA. La iluminar sólida.
- Page 27 Indicaciones y fallas Reacondicionamiento de la batería siguiente el último paso en la sección “Preparación de la carga” en la parte delantera de este manual. El reacondicionamiento periódico se recomienda para mantener un Pantalla LCD muestra: Indicación | Solución: IMPORTANTE: Si 5 ciclos de reacondicionamiento no mejoran el rendimiento óptimo de una batería.
-
Page 28: Arranque Del Motor
3. Si la unidad detecta que el alternador es bueno, la pantalla LCD 2. Pulse el botón de comprobación del alternador para iniciar la 6. Al desconectar el cargador de batería, pulse el interruptor de está en modo de arranque del motor. Las barras en el icono de la muestra el siguiente: comprobación. -
Page 29: Puerto Usb
IMPORTANTE: La función de arranque del motor requiere un El icono del falla parpadeará. El puerto USB se apagará del puerto USB se ilumina en azul y la pantalla LCD se mostrará LIMPIEZA Y ALMACENAMIENTO período de descanso/enfriamiento entre intentos. Espere 4 a 5 automáticamente. -
Page 30: Información De Servicio
(2) Devuelva el producto a la tienda donde Salida de paso de CA: 700W) producto otros accesorios que no sean los que ofrece DeWALT, el Verificar que el fusible en el portafusibles en la el producto fue comprado para un intercambio (siempre y cuando se uso de dichos accesorios con esta herramienta podría ser peligroso.
Need help?
Do you have a question about the DXAEC801B and is the answer not in the manual?
Questions and answers