Table of Contents
Advertisement
Quick Links
Advertisement
Table of Contents

Subscribe to Our Youtube Channel
Related Manuals for THOMSON THT712


Summary of Contents for THOMSON THT712
- Page 1 Digital Terrestrial HD Receiver THT712 User Manual Návod k obsluze Bedienungsanleitung Manual del usuario Manuel d’utilisation Korisnički priručnik Felhasználói kézikönyv Manuale utente Instrukcja obsługi Bruksanvisning Používateľská príručka...
- Page 4 This product has been manufactured and sold under the responsibility of STRONG Group. THOMSON and the THOMSON logo are trademarks of Technicolor (S.A.) or its affiliates and are used under license by STRONG Group. Represented by STRONG Ges.m.b.H. Franz-Josefs-Kai 1 1010 Vienna, Austria E-Mail: support_at@thomsonstb.net...
- Page 5 STRONG declares that this item complies with the basic requirements and other relevant regulations of directives 2004/108/EC and 73/23/EC, RoHS 2002/95/EC THOMSON and the THOMSON logo are trademarks of Technicolor (S.A.) or its affiliates and are used under license by STRONG Group.
-
Page 6: Table Of Contents
TABLE OF CONTENT 1.0 INTRODUCTION 1.1 Safety Instructions 1.2 Storage 1.3 Equipment Set-up 1.4 Accessories 1.5 Usage of external USB devices 2.0 YOUR RECEIVER 2.1 DEFAULT PIN: 0000 2.2 Front Panel 2.3 Rear Panel 2.4 Remote control 2.5 Installing the batteries 2.6 Using the remote control 3.0 CONNECTION 3.1 Connecting to a terrestrial antenna... -
Page 7: Introduction
1.0 INTRODUCTION 1.1 Safety Instructions DO NOT INSTALL YOUR RECEIVER: - In a closed or poorly ventilated cabinet; directly on top of or under any other equipment; on a surface which might obstruct the ventilation slots. DO NOT EXPOSE THE RECEIVER OR ITS ACCESSORIES: - To direct sunlight or any other equipment that generates heat;... -
Page 8: Equipment Set-Up
1.3 Equipment Set-up We recommend you to consult a professional installer to set up your equipment. Otherwise, please follow the instructions below: - Refer to the user manual of your TV and, if applicable, your antenna. - Make sure that the HDMI cable and, if applicable, outdoor components are in a good condition. -
Page 9: Your Receiver
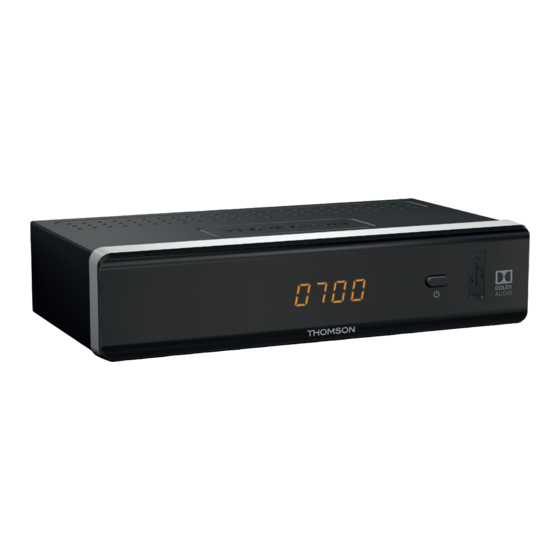
2.0 YOUR RECEIVER 2.1 DEFAULT PIN: 0000 2.2 Front Panel Fig. 1 IR Sensor Receives commands from the remote control LED Display Shows channel number and time in standby Mode Indicator LED RED indicates that the receiver is in STANDBY mode. Standby/ON button Switches the receiver ON or into Standby To connect your USB storage device. -
Page 10: Installing The Batteries
10. pq Change channel to next/previous. Menu: Moves the cursor up/down. 11. t u Decreases/increases the volume level. Menu: Change settings for specific menus. 12. OK Opens the current channel list in menu: for confirmation 13. MENU Opens the main menu, in a menu you will get one step back. -
Page 11: Connection
NOTE: Managing the receiver will be limited or not possible if there are obstacles between the remote control sensor (at the front panel of the receiver) and the remote control. Direct sunlight or very bright light can reduce or disturb the reception of the remote control signals. -
Page 12: Connecting To Ethernet For Rss Feeds And Weather Forecasts
3.5 Connecting to Ethernet for RSS feeds and weather forecasts Fig. 7 To use this option of your receiver it must be connected to your router. Connect the Ethernet (RJ-45) connector with a class CAT5E (or higher) cable to your router. 3.6 Connection to main power supply Fig. - Page 13 in Logical Channel numbering (LCN). This means that it is operator defined which channel will be stored on position 1 and so on. Sorting of channels afterwards is not possible. If you like to sort the channels yourself, set the region to Other. The selection Other will store channels in the found order.
-
Page 14: Quick Guide To Using Your Receiver
NOTE: If the Welcome menu does not appear after switching on the receiver for the first time, reset the receiver to factory settings by pressing the MENU button and selecting Load Factory Setting in the menu Installation. (DEFAULT PIN: 0000). 5.0 QUICK GUIDE TO USING YOUR RECEIVER We at STRONG understand that you can’t wait to enjoy your new high definition digital terrestrial receiver. -
Page 15: Info Banner
6.1.3 Using p switches to the next channel. q switches to the previous channel. 6.2 Info Banner While watching TV, you can press INFO at any time to access information about the current channel and event*. Press INFO twice for extended EPG details about the current channel. Press INFO three times for EPG details of the next programme. -
Page 16: Record, Timeshift And Format
6.7 Record, Timeshift and Format To use these functions you must connect a USB memory device to the USB port at the rear panel. For best performance, especially of HD content, we advice to use Hard Disk drives USB 2.0 or higher. These must be formatted in FAT32 format, otherwise Record and Timeshift function will not work. -
Page 17: Main Menu
6.7.4 Playback After a recording has been made you will find a new folder Records created on your external USB storage device. By pressing u in viewing mode you can access this folder directly. Inside the Records menu the following functions are supported: To select a record event. -
Page 18: Channel Editing And Programme Information
7.1.2 Auto Search This menu allows you to search for channels from all available frequencies for your selected region automatically. Be aware that all previous installed channels and favourite list(s) will be deleted. The new found channels will be installed in the channel list and afterwards you can create a new favourite list if you like. - Page 19 NOTE: Later sorting of favourite lists is not possible. Always start by selecting the channel you’d like to have at position 1 in the favourite list, then the next one. Use pq to select the favourite list you wish to add the channel to and press OK. Press to finalize the process.
-
Page 20: Settings
7.2.3 EPG Information This menu item opens the Electronic Programme Guide (EPG). 7.3 Settings Use t u to select Settings in the main menu. Use pq to highlight the submenu of choice and press OK to select. 7.3.1 Language This menu allows you to set up your language preferences. Use t u to select the language for the On Screen Display. - Page 21 listen or transfer Dolby® Digital/Dolby® Digital Plus* audio to the TV via HDMI or to a home cinema set. SPDIF Audio Output: Toggles between PCM and Bitstream output. When PCM is selected, all digital audio will be converted to stereo audio. Bitstream enables you to listen or transfer Dolby®...
- Page 22 Press OK to enter the menu. PIN Code Change: Enter your current PIN code (4 digits). Old PIN Code: Enter your new PIN code (4 digits) you’d like to use. New PIN Code: (Make a note of it.) Re-enter your new PIN code to confirm. Press OK to end and save the Confirm: change.
-
Page 23: Multimedia
When all settings are according to your wishes, use pq to move the highlight to Save and press OK to confirm. To quit the timer without saving your settings press 9. 7.4 Multimedia The Multimedia menu consists of the following submenus: Records, Movies, Music, Pictures, Record Setup and Storage Device Setup. - Page 24 Pictures: Enter the folder with picture files. Use pq to select a picture. If the format is supported it shows the picture in the small picture-in-picture screen. Press OK to watch it in full screen mode. RED Option: Before the playback of a picture in full screen, you can setup a slideshow/ diashow.
-
Page 25: Network
7.4.3 Storage Device Setup This option shows relevant information about the connected USB device. In this menu you can also format your USB storage device and safely remove. Select Storage Device Setup in the Multimedia menu and press OK to enter. Now you will see all details as free and used space sizes and used file system. -
Page 26: Upgrade By Usb
to Off. Then manually enter your IP, Gateway and DNS values by using the 0 ~ 9 buttons. Select after entering these values the item SET and press OK to store and to check. 7.5.2 RSS Feed (Really Simple Syndication) This menu allows you to choose an RSS news link to read the latest news from different sources. -
Page 27: Troubleshooting
8.0 TROUBLESHOOTING There may be various reasons for abnormal operation of the receiver. Check the receiver according to the procedures shown below. If the receiver does not work properly after checking it, please contact your dealer, the local service hotline or send e-mail to our support via www. thomsonstb.net. -
Page 28: Technical Specifications
Problem Possible cause What to do Press INFO on the remote control to keep the signal bars on screen and After moving the The antenna signals are too adjust the antenna for (maximum) receiver to another weak reception. Alternatively, do a rescan room/area you The signal strength/quality of the channels. - Page 29 Aspect Conversion: Pan & Scan, Letterbox and Combined Audio Decoder Audio support: MPEG-4 Profile Level 4 Dolby Digital Plus*/AC3+/PCM MPEG MusiCam Layer II Sampling rate: 32, 44.1, 48 KHz Audio mode: Stereo, Mono L/R * Dolby Digital Plus and the double-D symbol are registered trademarks of Dolby Laboratories Multimedia Video playback: MPEG-1 and MPEG-2 encoded (mpg), MKV,...
Need help?
Do you have a question about the THT712 and is the answer not in the manual?
Questions and answers