
Related Manuals for Manhattan Comfort BR 54


Summary of Contents for Manhattan Comfort BR 54
- Page 1 ASSEMBLY INSTRUCTIONS NOTICE DE MONTAGE INSTRUCCIONES DE MONTAJE COD BR: BR 54 191AMC160...
-
Page 2: Table Of Contents
Summary Résumé Resumen Introduction Introduction Introducción QR Code guide Guide de QR Code Guía de códigos QR Before starting Avant de commencer Antes de comenzar Avoid accidents Éviter les accidents Evitar accidentes Dimensions and tools Dimensions et outils Dimensiones y herramientas Identifying parts Identification des pièces Identificación de las piezas... -
Page 3: Introduction
Introduction Introduction Introducción Important Important Importante Read this manual and follow the steps in order to keep the guarantee and also for the perfect fit. Lisez ce manuel et suivez les étapes afin de conserver la garantie et aussi pour un ajustement parfait. -
Page 4: Before Starting
Before starting Avant de commencer Antes de comenzar Prepare the room before starting the assembly, leaving it completely clean and the area in good condition to start the work. Avant de commencer l'assemblage, préparez l'environnement en le laissant complètement propre et avec un bon espace pour commencer le travail. Antes de comenzar el montaje preparar el ambiente, dejándolo completamente limpio y con bueno espacio para comenzar el trabajo. -
Page 5: Dimensions And Tools
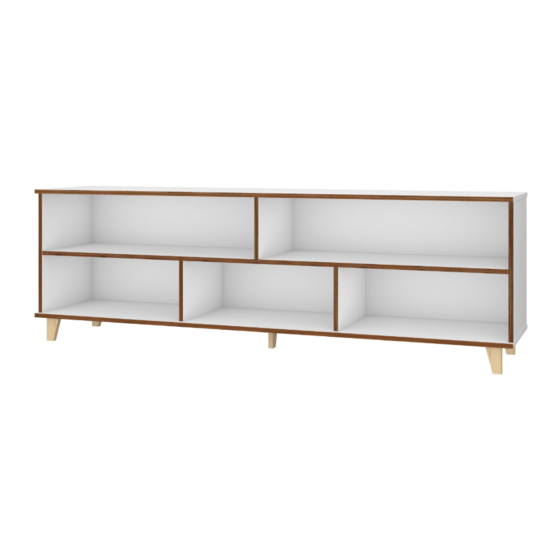
Dimensions and tools Dimensions et outils Dimensiones y herramientas Dimensions: W: 70.86 H: 22.63 D: 14.96 inches Dimensions / Dimensiones: L: 1800 A: 575 P: 380 mm Cleaning Vettoyage Limpieza You can clean the product with slightly dampened cloth followed by a dry cloth. Do not use chemicals or abrasives. - Page 6 COD BR: BR 54 191AMC160 PART DESCRIPTION PIEZA DESCRIPCIÓN CANTIDAD PIÈCE DESCRIPTION QUANT. Base Base Base Plateau Tapa Left side Côté gauche Lateral izquierda Right side Côté droit Lateral derecha Shelf Étagère Repisa Partition Partition Partición Back Revés Pies Pieds...
-
Page 7: Hardware Included In Box Accessoires Inclus Dans La Boîte
Hardware included in box SCAN TO WATCH THE VIDEO Accessoires inclus dans la boîte Scannez pour regarder la vidéo Accesorios incluidos en la caja Scanea para ver el vídeo STICKER x 18 EF 000132 x 10 EF 000033 x 24 EF 000216 X 14 ADHÉSIF x 18 TAPAS PLÁSTICAS x 18... - Page 8 = 23 KG - 50.70LB = 10 KG - 22.04 LB = 7 KG - 15.43LB 50" STEP 1 / ÉTAPE 1 / PASO 1 Insert hardware EF 000094 into piece 02. Insérez le matériel EF 000094 dans le pièce 02. Añade el herraje EF 000094 en la pieza 02.
- Page 9 STEP 2 / ÉTAPE 2 / PASO 2 Insert hardware EF 000033 into pieces 06. Insérez le matériel EF 000033 dans les pièces 06. Añade el herraje EF 000033 en las piezas 06. EF 000033 STEP 3 / ÉTAPE 3 / PASO 3 Fix hardware EF 000094 and EF 000033 into pieces 03, 04 and 05.
- Page 10 STEP 5 / ÉTAPE 5 / PASO 5 Connect pieces 03, 04 and 06, insert hardware EF 000216 and turn to tighten. Connectez les pièces 03, 04 et 06, insérez le matériel EF 000216 et tournez pour serrer. Junte las piezas 03, 04 y 06 utilizando, añade el herraje EF 000216 y gire para apretar.
- Page 11 STEP 8 / ÉTAPE 8 / PASO 8 STEP 8 / ÉTAPE 8 / PASO 8 Join the parts assembled in step 6 and 7 using hardware EF 000132. Joignez les pièces assemblées aux étapes 6 et 7 à l'aide du matériel EF 000132. Junte las partes armadas en los pasos 6 y 7 utilizando el herraje EF 000132.
Need help?
Do you have a question about the BR 54 and is the answer not in the manual?
Questions and answers