Table of Contents
Advertisement
Available languages
Available languages
Quick Links
Coffee Maker EKF955
Operating instructions ....................1
GB
Instructions d'utilisation.................7
FR
Handleiding ...................................13
NL
CZ
Návod k obsluze ............................19
Pokyny k obsluhe ........................25
SK
Istruzioni per il funzionamento ...32
IT
Manual de instrucciones ..............38
ES
Advertisement
Table of Contents

Related Manuals for Electrolux EKF955


Summary of Contents for Electrolux EKF955
- Page 1 Coffee Maker EKF955 Operating instructions ....1 Pokyny k obsluhe ......25 Instructions d’utilisation....7 Istruzioni per il funzionamento ...32 Handleiding ........13 Manual de instrucciones ....38 Návod k obsluze ......19...
-
Page 2: Important Safeguards
IMPORTANT SAFEGUARDS To reduce the risk of fire, electric shock and/or injury to persons, basic safety precautions should always be followed when using electrical appliances, including the following: 1. READ ALL INSTRUCTIONS BEFORE USING THE COFFEEMAKER. 2. Do not touch the coffeemaker’s hot surfaces. Use handles or knobs and do not open the lid or cover while brewing. -
Page 3: Diagram Of Parts
WARNINGS: If the supply cord is damaged, it must be replaced by the manufacturer, its service agent or similarly qualified persons in order to avoid a hazard. This appliance is not intended for use by persons (including children) with reduced physical, sensory or mental capabilities, or lack of experience and knowledge, unless they have been given supervision or instruction concerning use of the appliance by a person responsible for their safety. -
Page 4: Control Panel Layout
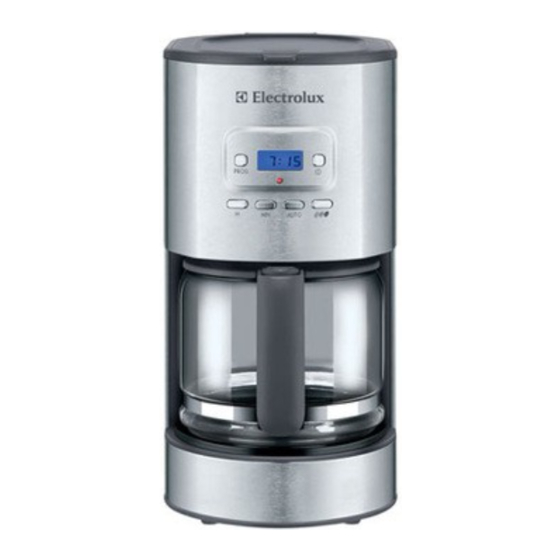
1. Water Tank / Filter Basket Lid 2. Control Panel(see detail below) 3. Glass Decanter 4. Warming Plate Control Panel Layout Button & indicating light function Start / stop Button (when on, then AUTO is locked) AUTO: Auto Button, (when AUTO on, then is locked) PROG: Delay start time set-up Button... -
Page 5: Sound Prompt
BREW: Indicating the interface is in immediately brewing status When starting delay start time, “AUTO” turns on, “BREW” goes out; once the delay start time is reached, start brewing, at this time, “AUTO” turns off, “BREW” turns on, after finishing brewing, “BREW” turns off. The display shows the actual time, when pressing the program button to adjust the delay start time, it shows the delay start time, three seconds after adjustment, it resumes showing the current time. -
Page 6: Using For The First Time
5.“H” Button Press “H” one time, the hour add one; when pressing without stop, the first second add one, then one second add four times. 6. “MIN” Button Press “MIN” once, this adds one minute to the time, pressing and holding adds four seconds. -
Page 7: Specifications
SPECIFICATIONS EKF955C: 220-240V, 50/60Hz, 1400W, VDE plug EKF955U: 220-240V, 50/60Hz, 1400W, BS plug IMPORTANT DISPOSAL INSTRUCTIONS As a responsible retailer we care about the environment. As such we urge you to follow the correct disposal procedure for your product and packaging materials. This will help conserve natural recourses and ensure that it is recycled in a manner that protects health and the environment. - Page 8 PRECAUTIONS IMPORTANTES DE SECURITE Lors de l’utilisation d’appareils électriques, les précautions de sécurité suivantes doivent être prises en compte afin d’éviter tout risque d’incendie, de choc électrique et/ou de blessure corporelle : 1. LISEZ TOUTES LES INSTRUCTIONS AVANT D’UTILISER LA CAFETIERE. 2.
- Page 9 19. Ne faites jamais fonctionner la cafetière s’il n’y a pas d’eau dans le réservoir. 20. Cette machine n’est pas conçue pour être utilisée par de jeunes enfants ; gardez la machine hors de portée des enfants. MISE EN GARDE : Si le câble d’alimentation est endommagé, il doit être remplacé...
- Page 10 SCHEMA DES PIECES 1. Réservoir d’eau / Couvercle du panier à filtre 2. Panneau de contrôle (voir détails ci-dessous) 3. Carafe en verre 4. Plaque de chauffage Schéma du panneau de contrôle...
-
Page 11: Avertissements Sonores
Boutons de fonctions et indicateurs lumineux Bouton de démarrage / arrêt (lorsque est en marche, le mode AUTO est bloqué) AUTO Bouton Auto (lorsque AUTO est en marche, est bloqué) PROG Bouton de mise en marche à retardement Bouton de contrôle d’arôme (s’il est activé après avoir appuyé ou sur le bouton AUTO) Bouton de réglage des heures Bouton de réglage des minutes... -
Page 12: Première Utilisation
Avant de faire fonctionner votre nouvelle cafetière, vous devez régler l’heure en cours en appuyant sur les boutons H et MIN. 1. Bouton Appuyez une fois sur le bouton pour démarrer immédiatement l’infusion. L’indicateur « BREW » s’affiche et l’indicateur lumineux s’allume en rouge. Appuyez de nouveau sur le bouton pour arrêter l’infusion, le maintien au chaud ou le contrôle d’arôme ;... - Page 13 3. Ouvrez le panier à filtre ; placez-y un filtre en papier. 4. Versez dans le filtre la quantité de café moulu désiré, selon votre goût. 5. Replacez le panier à filtre en position. 6. Placez la carafe sur la plaque chauffante. 7.
-
Page 14: Belangrijke Veiligheidsinstructies
BELANGRIJKE VEILIGHEIDSINSTRUCTIES Bij het gebruik van elektrische apparaten moet men steeds een basis aan veiligheidsvoorzorgen in acht nemen om gevaar op brand, elektrocutie en / of verwondingen aan personen te voorkomen, waaronder de volgende: 1. LEES ALLE INSTRUCTIES ALVORENS DE KOFFIEZET TE GEBRUIKEN 2. - Page 15 21. Dit toestel is niet bedoeld voor gebruik door heel jonge kinderen. Houd ze uit de buurt. 22. Dit apparaat is niet geschikt voor gebruik door personen (inclusief kinderen) met een verzwakt lichamelijk, zintuiglijk of geestelijk vermogen of een gebrek aan ervaring of kennis, tenzij zij onder toezicht staan en instructies over het gebruik van dit apparaat hebben ontvangen van een persoon die instaat voor hun veiligheid.
- Page 16 1. Watertank / Deksel van de Filterhouder 2. Bedieningspaneel (zie onderstaande details) 3. Glazen Koffiekan 4. Verwarmingsplaat Layout van het Bedieningspaneel Functie van de toetsen & indicatielampje Start / Stop Toets (Wanneer verschijnt dan is AUTO vergrendeld) AUTO: Auto-Toets, (Wanneer AUTO is ingeschakeld dan is vergrendeld) PROG: Instellingtoets van de geprogrammeerde inschakeltijd Toets voor...
- Page 17 Indicatiefunctie van de LCD symbolen 0: 00 Geeft de huidige tijd of vertraagde starttijd weer (24 uren-formaat) AUTO: Geeft aan dat de interface de geprogrammeerde inschakeltijd heeft gestart of de geprogrammeerde inschakeltijd aan het veranderen is BREW: Geeft aan dat de interface koffie aan het zetten is Wanneer de geprogrammeerde inschakeltijd wordt gestart zal “AUTO”...
- Page 18 3. "PROG" Toets Druk eenmaal op de “PROG” toets om de geprogrammeerde inschakeltijd op te roepen. Het scherm zal 6:00 weergeven. Het LED lampje met twee kleuren zal groen oplichten en knipperen; Druk herhaaldelijk op de “H” & “MIN” toetsen om de vereiste inschakeltijd in te stellen.
- Page 19 7. Druk op de “ ” toets. Het lampje zal rood oplichten en “brew” zal op de display verschijnen. Wanneer het koffiezetten is voltooid zal U drie pieptonen horen. 8. Nadat het koffiezetten is voltooid zal het toestel automatisch in verwarmingmodus gaan gedurende 2 uur en zichzelf vervolgens uitschakelen.
-
Page 20: Důležité Bezpečnostní Informace
DŮLEŽITÉ BEZPEČNOSTNÍ INFORMACE Abyste snížili riziko nebezpečí požáru, zásahu elektrickým proudem a/nebo poranění osob, vždy při používání tohoto spotřebiče dodržujte základní bezpečnostní opatření, včetně těchto: 1. PŘED POUŽITÍM KÁVOVARU SI PŘEČTĚTE VŠECHNY POKYNY V NÁVODU. 2. Nedotýkejte se horkých ploch kávovaru. Používejte držáky a úchytky a víko nebo kryt neotevírejte, dokud se káva vaří. -
Page 21: Popis Částí
POUŽÍVÁNÍ A PÉČE O KONVICI 1. Konvice je určena pouze pro použití s tímto spotřebičem, nepoužívejte ji pro jiné účely. 2. Horkou konvici nepokládejte na mokrý nebo studený povrch, dochází k nebezpečí rozbití. 3. Nepoužívejte prasklou konvici nebo konvici s volným nebo slabým držadlem. 4. -
Page 22: Popis Ovládacího Panelu
Popis ovládacího panelu Funkce tlačítek a světelných kontrolek Tlačítko Start / Stop (když je zapnuto, AUTO je zablokováno) AUTO: Tlačítko Auto, (když je AUTO zapnuto, je zablokováno) PROG: Tlačítko nastavení času spuštění Tlačítko nastavení vůně (aktivuje se po stisknutí tlačítka nebo AUTO) Tlačítko nastavení... - Page 23 Pokud je zapnuta zpožděná doba spuštění, zapne se „AUTO”, „BREW” se vypne. Jakmile je dosaženo doby spuštěného startu, zapne se vaření kávy, symbol „AUTO” se vypne a zapne se „BREW”. Jakmile je vaření kávy dokončeno, „BREW” se vypne. Displej ukazuje aktuální čas, když stisknete tlačítko programování pro nastavení zpožděného času spuštění, pak tři sekundy po nastavení...
-
Page 24: První Použití
5.Tlačítko „H” Stiskněte tlačítko „H” krátce a přičte se jedna hodina. Stisknutím a přidržením tlačítka se přidají čtyři hodiny. 6.Tlačítko „MIN” Stiskněte tlačítko „MIN” krátce a přičte se jedna minuta. Stisknutím a přidržením tlačítka se přidají čtyři minuty. První použití Před prvním použitím vám doporučujeme nechat třikrát proběhnout cyklus vaření... -
Page 25: Technické Údaje
TECHNICKÉ ÚDAJE EKF955C: 220-240V, 50/60Hz, 1400W, evropská zástrčka EKF955U: 220-240V, 50/60Hz, 1400W, britská zástrčka DŮLEŽITÉ POKYNY K LIVIDACI Jako zodpovědný prodejce se staráme o životní prostředí. Proto vás žádáme o dodržení správného postupu likvidace vašeho výrobku, baterií a obalových materiálů. Pomůže to zachovat přírodní... -
Page 26: Dôležité Bezpečnostné Informácie
DÔLEŽITÉ BEZPEČNOSTNÉ INFORMÁCIE Pri používaní elektrických zariadení, musia byť vždy dodržané základné bezpečnostné opatrenia, vrátane nasledovných upozornení, aby sa zamedzilo riziku vzniku požiaru, zásahu elektrickým prúdom a/alebo poraneniu osôb: 1. Pred používaním zariadenia si prečítajte všetky pokyny. 2. Nedotýkajte sa horúcich povrchov zariadenia. Používajte rukoväte a ovládače a počas varenia neotvárajte veko ani kryt. - Page 27 20. Nikdy nezapínajte zariadenie ak v ňom nie je voda. 21. Zariadenie nie je určené na používanie veľmi malými deťmi, udržiavajte ich mimo zariadenia. 22. Tento spotrebič nie je určený na používanie osobami (vrátane detí), ktorým fyzická, zmyslová alebo mentálna neschopnosť či nedostatok skúseností a znalostí...
-
Page 28: Popis Jednotlivých Častí
Popis jednotlivých častí 1. Nádoba na vodu / veko filtračného košíka 2. Ovládací panel (pozri detaily nižšie) 3. Sklenená karafa 4. Ohrievacia platňa Ovládací panel... - Page 29 Tlačidlá a indikátory funkcií Tlačidlo Start/Stop (Štart/Stop) (keď je zapnuté , tlačidlo AUTO je zamknuté) AUTO: Tlačidlo Auto (keď je zapnuté AUTO, tlačidlo je zamknuté) PROG: Tlačidlo pre nastavenie oneskoreného spustenia. Ovládacie tlačidlo vône (je aktivovaná po stlačení tlačidla alebo AUTO) Tlačidlo pre nastavenie hodín MIN:...
-
Page 30: Prvé Použitie
1. Tlačidlo „ “ Pre okamžité varenie stlačte tlačidlo „ “, na displeji sa zobrazí „BREW“ (Varenie), dvojfarebný indikátor sa rozsvieti načerveno. Stlačte znova tlačidlo „ “ pre zastavenie varenia, ohrievania alebo ovládanie vône, LED indikátor zhasne, funkcia udržiavania tepla sa zastaví. 2. - Page 31 Používanie kávovaru 1. Otvorte nádobu na vodu / veko filtračného košíka. 2. Naplňte nádobu na vodu čerstvou, čistou vodou po úroveň, ktorá zodpovedá požadovanému počtu šálok kávy. Nádobu nepreplňujte, hrozí riziko vyvretia vody. 3. Otvorte podperu na košíku; umiestnite papierový filter do filtračného košíka. 4.
- Page 32 DÔLEŽITÉ POKYNY NA LIKVIDÁCIU Ako zodpovedný predajca dbáme na životné prostredie. Preto vám zdôrazňujeme, aby ste dodržiavali správny postup pri likvidácii tohto produktu a obalových materiálov. Pomôžete tak zachovávať prírodné zdroje a zaistíte, že bude recyklovaný spôsobom, ktorý chráni zdravie a životné prostredie.
- Page 33 INFORMAZIONI IMPORTANTI RELATIVE ALLA SICUREZZA Per ridurre il rischio d’incendi, scosse elettriche e/o lesioni a persone, occorre sempre prendere alcune precauzioni di base quando si usano apparecchi elettrici, compreso quanto segue: 1. LEGGERE TUTTE LE ISTRUZIONI PRIMA DI USARE LA MACCHINA PER CAFFÈ.
-
Page 34: Diagramma Delle Parti
20. Non accendere mai la macchina per caffè senza acqua all’interno. 21. L’uso dell’apparecchio da parte di bambini piccoli non è previsto, tenerli a distanza. 22. L’uso di questo apparecchio non è destinato a persone (compresi bambini) con ridotte capacità fisiche, sensoriali o mentali, o mancanza di esperienza e conoscenza, a meno che non siano sotto la supervisione o seguano le istruzioni sull'uso dell'apparecchio fornite da una persona responsabile della loro sicurezza. - Page 35 1. Vaschetta per l’acqua /Coperchio del cestello del filtro 2. Pannello dei comandi (vedere dettagli che seguono) 3. Decanter di vetro 4. Piastra scaldante Layout del pannello dei comandi Funzione dei tasti e degli indicatori luminosi “ ” Tasto avvio/stop (quando “ ”...
-
Page 36: Descrizione Del Funzionamento
Quando si avvia la partenza differita, “AUTO” si accende, “BREW” si spegne; una volta raggiunta l’ora programmata per la partenza differita e la preparazione si avvia “AUTO” si spegne e “BREW” si accende, alla fine della preparazione “BREW” si spegne. Il display mostra l’ora corrente e quando si preme il tasto di programma per regolare la partenza differita mostra l’ora della partenza differita, tre secondi dopo avere ultimato la regolazione torna a mostrare l’ora corrente. -
Page 37: Primo Utilizzo
5. Tasto “H” Premendo una volta “H” si aggiunge un’ora al tempo, se si preme e si tiene premuto ne vengono aggiunte 4. 6. Tasto “MIN” Premendo una volta “MIN” si aggiunge un minuto al tempo, se si preme e si tiene premuto ne vengono aggiunti 4. -
Page 38: Caratteristiche Tecniche
CARATTERISTICHE TECNICHE EKF955C 220-240V, 50/60Hz, 1400W, spina VDE EKF955U 220-240V, 50/60Hz, 1400W, spina BS IMPORTANTI ISTRUZIONI PER LO SMALTIMENTO La nostra azienda si sente direttamente responsabile della tutela dell’ambiente. Pertanto, sollecitiamo i nostri clienti ad attenersi a una corretta procedura di smaltimento del prodotto, delle batterie e dei materiali da imballaggio. - Page 39 IMPORTANTE INFORMACIÓN SOBRE SEGURIDAD Para evitar que se produzca un incendio, descarga eléctrica y/o daños personales, siempre se deben seguir unas precauciones básicas de seguridad durante el uso de electrodomésticos, incluidas las siguientes: 1. LEER TODAS LAS INSTRUCCIONES ANTES DE UTILIZAR LA CAFETERA.
- Page 40 16. No utilizar la cafetera para otra aplicación distinta a la indicada. 17. No tocar el aparato mientras se utiliza porque alguna superficie se calienta. 18. Las superficies accesibles se calientan, utilice las asas y mangos en todo momento. 19. No abrir la tapa cuando el aparato está funcionando, podría producirse una salida de vapor caliente que podría quemarle.
-
Page 41: Diagrama De Los Componentes
DIAGRAMA DE LOS COMPONENTES 1. Depósito de Agua / Tapa del Cesto para el Filtro 2. Panel de Control (ver la información siguiente) 3. Jarra de Cristal 4. Placa Térmica Descripción del Panel de Control... - Page 42 Funcionamiento de los botones y luces indicadoras Botón de inicio / stop (cuando está encendido, la función AUTO está bloqueada) AUTO: Botón Auto, (cuando la función AUTO es activada, está bloqueado) PROG: Botón para programar un inicio retardado Botón de control de aroma (se activa después de pulsar el Botón AUTO) Botón de ajuste de las horas MIN:...
-
Page 43: Descripción Del Funcionamiento
Descripción del funcionamiento Antes de poner la cafetera en funcionamiento deberá ajustar la hora pulsando repetidamente los botones H y MIN. 1.Botón “ ” Pulse el Botón “ ” una vez para activar inmediatamente la elaboración de café, el visualizador indicará “BREW”, la luz de doble color se iluminará en rojo. Pulse el Botón “... -
Page 44: Uso Por Primera Vez
6. Botón “MIN” Pulse “MIN” una vez, la hora incrementará en un minuto, pero si lo mantiene pulsado se incrementará en cuatro minutos. Uso por primera vez Antes de utilizar la cafetera por primera vez, recomendamos poner la cafetera en funcionamiento durante tres ciclos de elaboración de café... -
Page 45: Especificaciones
Este producto y sus baterías deberían llevarse a su punto local de recogida para reciclaje. Algunos puntos de recogida aceptan productos de forma gratuita. Pedimos disculpas por cualquier problema ocasionado por pequeñas inconsistencias en estas instrucciones, que pueden ocurrir como consecuencia de las mejoras y desarrollo del producto. Electrolux 21/07/2009... - Page 46 Share more of our thinking at www.electrolux.com...
Need help?
Do you have a question about the EKF955 and is the answer not in the manual?
Questions and answers