
Subscribe to Our Youtube Channel
Related Manuals for HOMCOM 820-144V01BN


Summary of Contents for HOMCOM 820-144V01BN
- Page 1 INcja067_US_CA 820-144V01BN 820-144V01WT Electric Fireplace OWNER'S MANUAL IMPORTANT, RETAIN FOR FUTURE REFERENCE: READ CAREFULLY USER'S MANUAL...
-
Page 2: Important Instructions
WARNING: INDOOR USE ONLY IMPORTANT: Please read this manual carefully before running this heater and save it for future. NOTE: This manual contains important safety and operating instructions. Read all instructions and follow them with use of this product. Thank you for choosing our fireplace heater. This owner’s manual will provide you with valuable information necessary for the proper care and maintenance of your new product. -
Page 3: Specifications
17. Use only for intended household use as described in this manual. Any other use not recommended by the manufacturer may cause fire, electric shock, or injury to persons. The use of attachments not recommended or sold by unauthorized dealers may cause hazards. 18. -
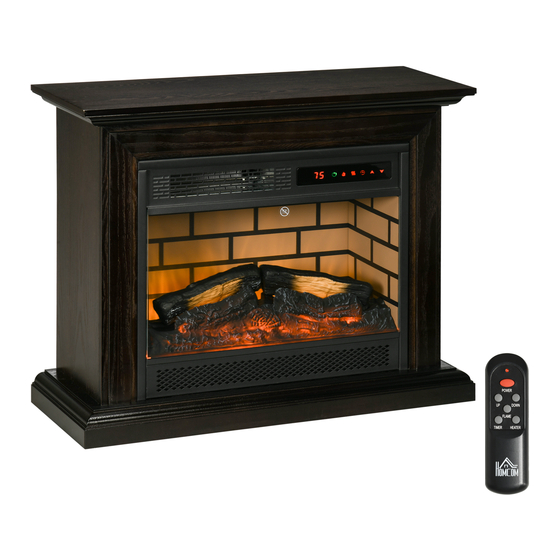
Page 4: Product Diagram
PRODUCT DIAGRAM Mantel Air oulet Control panel Remote panel Ember Control panel 1.Digital display: Display temperature and timing and countdown time 2.Power button: Control product startup and shutdown functions 3.Flame button: Adjust the flame brightness and turn off the flame 4.Heater button: Set heating mode (high heat, low heat, CEO, off) 5.Timer button: Set the product startup or shutdown time 6.Up button: Increase temperature value... - Page 5 Remote Control Power button: Control product startup Up button: Increase temperature value Down button:Decrease temperature value Flame light button: Adjust the flame brightness Heater button: Set heating mode (high heat, low heat, CEO, off) Timer button: Set the product startup or shutdown time...
-
Page 6: Operating Your Heater
PREPARATION Place the heater on a firm, level surface and plug into a 120V~ 60Hz power outlet. And turn on the power switch in the rear of the unit. Insert 2 AAA batteries into the remote control before using (Batteries Not Included) OPERATING YOUR HEATER Once the Electric fireplace has been properly assembled and connected to a electrical outlet. -
Page 7: Maintenance
3. Setting flame Adjust the brightness of the flame and turn off FLAME 4. Setting timer-power- off Caution! ONLY under power-on mode you can set timer-power-off function. When starting the unit, press the timer button on the control panel. TIMER Adjust the time by pressing the arrows on the control panel or remote control. -
Page 8: Troubleshooting
2. Cleaning * To clean the unit, first turn off controls on unit and unplug unit from power source. * To clean the glass door: remove dust with clean dry cloth or to remove finger prints and other marks clean glass with clean damp cloth. Do not use abrasive cleaners or spray liquids on glass door surfaces. -
Page 9: Manuel D'instruction
820-144V01BN 820-144V01WT CHEMINÉE ÉLECTRIQUE MANUEL D'INSTRUCTIONS IMPORTANT : A LIRE ATTENTIVEMENT ET À CONSERVER POUR CONSULTATION ULTÉRIEURE MANUEL D'INSTRUCTION... -
Page 10: Consignes Importantes
AVERTISSEMENT: À USAGE INTÉRIEUR UNIQUEMENT IMPORTANT: Veuillez lire attentivement ce manuel avant d'utiliser cet appareil de chauffage et conservez-le pour le consulter ultérieurement. REMARQUE :Ce manuel contient d'importantes consignes de sécurité et d'utilisation. Lisez toutes les instructions et suivez-les lors de l'utilisation de ce produit. Nous vous remercions d'avoir choisi notre cheminée de chauffage. -
Page 11: Spécifications
12. Un appareil de chauffage contient des pièces chaudes et produisant des arcs ou des étincelles à l'intérieur. NE PAS utiliser dans des endroits où de l'essence, de la peinture, des liquides explosifs et/ou inflammables sont utilisés ou entreposés. Garder l'appareil à... -
Page 12: Schéma Du Produit
SCHÉMA DU PRODUIT Cheminée Panneau de Sortie d'air contrôle Télécommande Lit de braises Panneau de Contrôle 1. Écran numérique: Affichage de la température, du minutage et du compte à rebours. 2. Bouton d'alimentation: Contrôle des fonctions de démarrage et d'arrêt du produit. 3. - Page 13 Télécommande Bouton d'alimentation: Contrôle des fonctions de démarrage et d'arrêt du produit. Bouton " Haut " : Augmentation de la valeur de la température. Bouton " Bas " : Diminution de la valeur de la température Bouton d'allumage de la flamme : Réglage de la luminosité...
-
Page 14: Mise En Marche
MISE EN MARCHE Placez l'appareil sur une surface ferme et plane et branchez-le sur une prise de courant de 120V~ 60Hz. Actionnez le bouton d'alimentation situé à l'arrière de l'appareil. Insérez 2 piles AAA dans la télécommande avant de l'utiliser (Piles non incluses). FONCTIONNEMENT DE VOTRE CHEMINÉE Une fois que la cheminée électrique est correctement assemblée et branchée à... - Page 15 3. Réglage de la flamme Réglez la luminosité de la flamme et éteignez-la. FLAME 4. Réglage de la minuterie - allumer- arrêt Attention ! Vous pouvez régler la fonction de mise hors tension différée UNIQUEMENT en mode de mise en marche. Lors de la mise en marche de l'appareil, appuyez sur le bouton de la minuterie sur le panneau de commande.
-
Page 16: Dépannage
2.Nettoyage * Pour nettoyer l'appareil, éteignez d'abord les commandes de l'appareil et débranchez-le de la source d'alimentation. * Pour nettoyer la porte vitrée : enlevez la poussière à l'aide d'un chiffon propre et sec ou pour enlever les empreintes digitales et autres marques, nettoyez la vitre avec un chiffon propre et humide. - Page 17 ASSEMBLY INSTRUCTION ASSEMBLAGE D’INSTRUCTIONS Tools Recommended Outils recommandés...
- Page 19 CODE DESCRIPTION Top Panel/ Panneau du haut Base Panel/ Panneau de base Left Side Strip/ Bande latérale gauche Right Side Strip/ Bande latérale droite Middle Insert Baffle/ Baffle à insert central Left Side Panel/ Panneau latéral gauche Right Side Panel/ Panneau latéral droit...
- Page 20 1(spare) 1(spare) 1(spare) 1(spare)
- Page 23 C C C...
- Page 24 Back/Retour Electric Fireplace /Cheminée Électrique...
Need help?
Do you have a question about the 820-144V01BN and is the answer not in the manual?
Questions and answers