Table of Contents
Advertisement
Quick Links
Advertisement
Table of Contents

Related Manuals for IFM Electronic efector160 LI214 Series


Summary of Contents for IFM Electronic efector160 LI214 Series
- Page 1 Operating instructions Binary level sensor LI214x...
-
Page 2: Table Of Contents
Contents 1 Preliminary note � � � � � � � � � � � � � � � � � � � � � � � � � � � � � � � � � � � � � � � � � � � � � � � � � 3 1�1 Symbols used�... -
Page 3: Preliminary Note
1 Preliminary note 1.1 Symbols used ► Instructions > Reaction, result […] Designation of pushbuttons, buttons or indications → Cross-reference Important note Non-compliance can result in malfunction or interference� Information Supplementary note� 2 Safety instructions ● Please read the product description prior to set-up of the unit� Ensure that the product is suitable for your application without any restrictions�... -
Page 4: Functions And Features
3 Functions and features The unit monitors the level of liquids in tanks� 3.1 Applications ● Water, hydrous media, oils, coolant emulsions� 3.2 Restriction of the application area ● The unit is not suitable for acids, alkalis, granulates, bulk materials� ●... -
Page 5: 4�2 Features Of The Unit
The unit operates with radial detec- tion characteristics� Therefore media below the active zone are not detect- ed� Despite different electrical proper- ties media are only detected when the active zone (A) is covered� 4.2 Features of the unit ● Automatic adjustment function to the medium to be detected by programming buttons (→... -
Page 6: 5�2 Mounting
5.2 Mounting The unit is mounted using a mounting clamp or an adapter� The following standard mounting accessories are available: Order no� Material E43000 mounting clamp (for non-pressurised tanks) E43001 flange plate 73-90 with clamp adapter (pressure rating of 0�5 bar) E43002 welding adapter with clamp adapter (pressure rating of 0�5 bar) E43003... -
Page 7: Electrical Connection
6 Electrical connection The unit must be connected by a qualified electrician� The national and international regulations for the installation of electrical equipment must be adhered to� Voltage supply to EN 50178, SELV, PELV� ► Disconnect power� ► Connect the unit as follows: Pin1 = L+ Pin4 = switching output/ NC Pin3 = L-... -
Page 8: Settings
8 Settings Before the first set-up the empty adjustment must be carried out� 8.1 Set to the empty vessel This adjusts the unit to both the empty vessel and the installation conditions (e�g� the set installation depth)� Previous settings are deleted� ►... -
Page 9: 8�3 Lock / Unlock The Unit
8.3 Lock / unlock the unit The unit can be locked electronically to prevent unintentional settings� Locking ► Press both setting buttons simultaneously for 10 s in the operating mode� > The LED flashes green� > After the time (> 10 s) has elapsed, the colour of the LED changes from green to yellow (flashing) and the unit is locked�... -
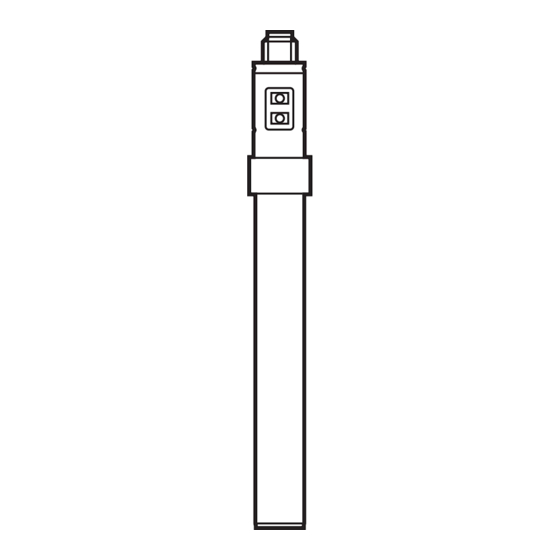
Page 10: Scale Drawing
11 Scale drawing 21,3 Dimensions in mm 1: programming buttons A: active zone (31 mm) L: probe length in mm: 132 (LI2141) 273 (LI2142) 481 (LI2143) 12 Technical data Operating voltage [V] ����������������������������������������������������������������������������������������������������������������������10 ��� 36 DC Current rating [mA] ��������������������������������������������������������������������������������������������������������������������������������������200 Short-circuit protection (pulsed);...
Need help?
Do you have a question about the efector160 LI214 Series and is the answer not in the manual?
Questions and answers