Table of Contents
Advertisement
Quick Links
Advertisement
Table of Contents

Summary of Contents for Snom PA1+
- Page 1 User Manual PA1+ Public Address System...
-
Page 2: Table Of Contents
TABLE OF CONTENTS Copyright, Trademarks, GPL, Legal Disclaimers ............4 Important information ......................5 Safety instructions ......................... 5 Standards conformance ......................6 Disposal of the device ......................6 Cleaning ............................ 6 Product specifications ......................7 Setting up ..........................8 Delivery Content ........................8 Wallmounting .......................... - Page 3 Troubleshooting ......................23 Reboot .............................23 Hard reboot ..........................23 Reset to factory values ......................23 Contacting Snom Support ....................24 Traces .............................24 Appendix 1 — Drilling template for wallmounting ............. 26 Appendix 2 — GNU General Public License ..............27...
-
Page 4: Copyright, Trademarks, Gpl, Legal Disclaimers
Snom therefore disclaims all warranties and liability for the accurateness, completeness, and currentness of the information published, except in the case of intention or gross negligence on the part of Snom or where liability arises due to binding legal provisions. -
Page 5: Important Information
Mount the device only at heights not exceeding 2m. • If the device is not supplied with power via an Ethernet cable, use only a power adapter expressly recommended by Snom technology. Other power supplies may damage or destroy the device, affect its behavior, or induce noise. •... -
Page 6: Standards Conformance
Standards conformance This device complies with the essential health, safety, and environmental requirements of all relevant European directives and UK legislation. The declaration of conformity can be downloaded at https://www.Snom .com/conformity. Important additional information for the USA FCC part 15 This device complies with Part 15 of the FCC rules. -
Page 7: Product Specifications
Power over Ethernet (PoE): IEEE 802.3af, Class 3. If PoE is not available, use the separately available power adapter (not included in delivery): ◦ EU, UK: Mass Power, model NBS12E050200UV, Snom PN 00004570 ◦ U.S.A., Canada: VTPL, model VT07EUS05200 Feature list •... -
Page 8: Setting Up
4 screws (Ø 8 mm, length 16 mm) + 4 expansion anchors for wall mounting ◦ Cable set (5 proprietary Snom cables for connecting periphery devices) ◦ 1 audio adapter 3-pin screw terminal < - > 3.5 mm jack plug ◦... -
Page 9: Connecting The Pa1
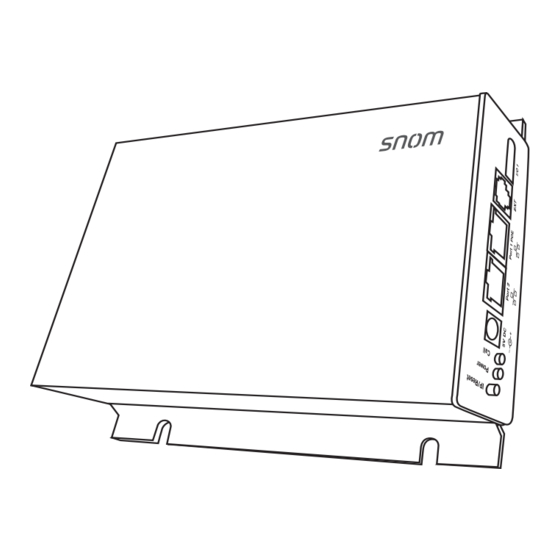
Setting Up 2. Drill the holes and insert the expansion anchors in the holes. 3. Place the Snom PA1+ on the wall with the cut-outs above the anchors as shown in Fig. 2. Fig. 2 4. Place the screws in the anchors and tighten them evenly.. -
Page 10: 600 Ohm Load Connection
RJ45 connector labelled "Port 2" is for daisy-chaining further Ethernet devices without the need for another Ethernet cable. If no PoE available: Connect a Snom-approved 5V 10W power supply to the power connector labelled "5V DC". 2. Connect the Snom cable to the "I/O 1"... -
Page 11: Initializing And Configuring
PA1+ User Manual Initializing and configuring Initializing and configuring Green Connect the device Sending DHCP request Blinking Network with DHCP Network without DHCP Press the "IP/Reset" button Application starts with Application starts the settings received from with the default IP adress... -
Page 12: Initializing
The PA1+ begins to boot. Initializing with DHCP The Snom PA1+ has a built-in DHCP client. When DHCP is available in the network, the PA1+ will initialize automatically. 1. The red LED begins to blink. The PA1+ is sending the DHCP request. - Page 13 PA1+ User Manual Initializing and configuring 7. In the Network section make the following changes: a. "DHCP" setting: Click on Off. b. "IP address" and "Netmask" settings: Replace default values with network values. c. Other settings: Replace if and as required.
-
Page 14: Security Settings
PA1+ User Manual Initializing and configuring Security settings When the web interface is opened for the first time upon initialization, you will see the Security page. When you register the first account, the SIP user name and password will be registered as the HTTP user name and password. -
Page 15: Configuring Accounts
PA1+ User Manual Initializing and configuring Configuring accounts The PA1+ supports up to four accounts (or identities, as they are called on Snom devices) that can be used to make announcements over the loudspeaker connected to the PA1+. Configuring identities automatically (recommended) by using the provisioning server. -
Page 16: Settings
PA1+ User Manual Initializing and configuring If the registration has been successful, the red Power LED will turn off. The green Call LED will stay on, indicating that the PA1+ is ready to receive announcements. Settings Normally, it is only necessary to set the time zone and the tone scheme. You can adjust the default settings for loudspeaker volume and automatically ending calls as necessary or desired. -
Page 17: Automatic Termination Of Calls
PA1+ User Manual Initializing and configuring 3. In the General Information section select your country from the drop-down list of Tone Scheme. 4. Click Apply at the bottom of the page. 5. The Save button appears at the top of the page. Click Save to save the changes permanently in case of power loss. -
Page 18: Using The Pa1
PA1+ User Manual Using the PA1+ Using the PA1+ Making announcements Dial the phone number of the PA1+ and, when your phone shows that you are connected, speak your announcement into its handset/headset/casing microphone. When you are done, terminate the call by hanging up or pressing the key. -
Page 19: Software Update
PA1+ User Manual Software Update Software update Software updates can be done through provisioning from the server whose setting URL is specified on the PA1+'s web interface or by means of a manual update. CAUTION: Cutting off the device's power during a firmware update (red LED on, green LED off) will damage the firmware and render the PA1+ inoperational. -
Page 20: Manual Software Update
PA1+ User Manual Software Update 4. Select Update automatically or Ask for update from the list box of Update policy. 5. Enter the settings server's URL in the text field of Setting URL. 6. Click the on radio button of PnP Config. -
Page 21: Updating Manually
2. Click on Software Update in the menu on the left side of the window page. The page Manual Software Update opens. 3. Go to https://service.snom.com/display/wiki/Firmware+Update+Center, scroll down to Public Announcement System, and find the latest firmware version for the device. - Page 22 PA1+ User Manual Software Update In such a case, the PA1+ will need to be returned to the vendor for resetting (special kit required). LED indications Green Do NOT remove the device's power supply (Ethernet cable when using PoE, power adapter when not using PoE) when the red light is on or blinking;...
-
Page 23: Troubleshooting
PA1+ User Manual Troubleshooting Troubleshooting Reboot 1. Open the PA1's web interface. 2. Click Advanced in the menu on the left side of the window page. The "Advanced Settings" page opens. 3. Click the Update tab. 4. Click "Reboot" and confirm with "Yes". The red LED lights up, and the green LED goes out. When the PA1+ has finished rebooting, the red LED goes out, the green LED lights up, and the web interface is available again. -
Page 24: Contacting Snom Support
2. Copy the settings list into the email, if Support has asked you to contact them by email. Traces Snom Support may ask you to submit a SIP Trace and/or a PCAP Trace to help them analyze your problem. Performing a SIP Trace 1. - Page 25 PA1+ User Manual Troubleshooting 4. Click Start to start recording network traffic. 5. Click Stop to end recording 6. Click Save to save the file to your Download folder. 7. Submit the file to Support in whatever way they requested you to use.
-
Page 26: Appendix 1 - Drilling Template For Wallmounting
PA1+ User Manual App. 1 - drilling template for wallmounting Appendix 1 — Drilling template for wallmounting 130,00 mm 121,00 mm 105,00 mm 8,50 mm PRINT FULL-SCALE 100% 121,00 mm min. 8,00 mm max. 6,00 mm Use screws and expansion... -
Page 27: Appendix 2 - Gnu General Public License
PA1+ User Manual App. 2 - GNU General Public License Appendix 2 — GNU General Public License restrictions translate to certain responsibilities for you if you distribute COPYRIGHT NOTICE AND WARRANTY copies of the software, or if you modify it. For example, if you distribute... - Page 28 PA1+ User Manual App. 2 - GNU General Public License You must cause any work that you distribute or publish, that source code, even though third parties are not compelled to copy the in whole or in part contains or is derived from the Program or any part source along with the object code.
- Page 29 If requested by you, the complete corresponding source code of the 11. BECAUSE THE PROGRAM IS LICENSED FREE OF CHARGE, THERE Software can be sent by Snom Technology GmbH on a standard data IS NO WARRANTY FOR THE PROGRAM, TO THE EXTENT PERMITTED BY storage medium against the reimbursement of the manufacturing APPLICABLE LAW.
- Page 30 VTech Telecommunications Ltd. 23/F, Tai Ping Industrial Centre, Block 1 57 Ting Kok Road, Tai Po Hong Kong Your specialist retailer - Ihr Fachhändler - Votre distributeur - Su distribuidor - Il tuo rivenditore: © 2023 Snom Technology GmbH v1.01...
Need help?
Do you have a question about the PA1+ and is the answer not in the manual?
Questions and answers