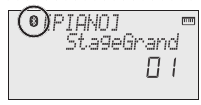
Advertisement
- 1 Main features
-
2
Operating Guide
- 2.1 Selecting a Tone
- 2.2 Adjusting the Overall Volume
- 2.3 Applying an Effect to the Performance
- 2.4 Playing Back / Recording
- 2.5 Using the Keyboard to Play Patterns (Loop Mix Function)
- 2.6 Display
- 2.7 Confirming an Operation / Changing a Value
- 2.8 Making Various Settings (Setting)
- 2.9 Clearing the Performance State
- 2.10 Sounding Patterns According to the Chord You Play (Interactive Chord)
- 2.11 Connecting Equipment
- 2.12 Turning the Power On/Off
- 3 Performing with the Loop Mix Function
- 4 Recording with the Loop Mix Function
- 5 Convenient Functions
- 6 Setting Various Functions (Setting)
- 7 Using the Bluetooth Functionality
- 8 Troubleshooting
- 9 Documents / Resources
Main features
- The Loop Mix function lets you perform great-sounding music simply by selecting a genre and pressing keys. You can perform easily, without paying attention to pitch or timing. In addition, you can use the performance pads to apply effects in real time.
- Bluetooth functionality allows interoperation with your smartphone or tablet.
Music or the audio from a music video on your smartphone or tablet can be played via this instrument while you perform along with the music. You can also use this instrument's keyboard to play a music app that supports Bluetooth MIDI (only for units equipped with Bluetooth). - The portable all-in-one design is compact and light-weight, featuring batterypowered operation, built-in high-quality speakers, and a stylish shape that's free of protrusions.
Provision of Bluetooth functionality
Please be aware that depending on the country in which you purchased the unit, Bluetooth functionality might not be included.
If Bluetooth functionality is included The Bluetooth logo appears when you turn on the power.
Before using this unit, carefully read "USING THE UNIT SAFELY" and "IMPORTANT NOTES" (the leaflet "USING THE UNIT SAFELY" and the Owner's Manual).
After reading, keep the document(s) where it will be available for immediate reference.
Operating Guide


Selecting a Tone
This instrument lets you enjoy performing with a variety of tones.
The tones are organized into eight groups, and are assigned to the corresponding tone buttons.
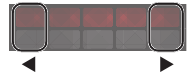
- Press a tone button such as [PIANO], and then use the [–] [+] buttons.
If a tone other than a drum tone is selected: "![]() " is lit
" is lit
If a drum tone is selected: "![]() " is lit
" is lit
Reference
For details on the tones, refer to "Tone List" at the end of this manual.
 " is lit
 " is lit
Tone groups
| Button | Explanation |
| [PIANO] button | Piano tones |
| [ORGAN] button | Organ tones |
| [STRINGS] button | Strings tones |
| [BRASS] button | Brass tones |
| [DRUM] button | Drum tones |
| [BASS] button | Bass tones |
| [SYNTH] button | Synthesizer tones |
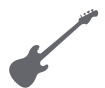
| [FX/GUITAR] button | Sound effects/Guitar tones |
Adjusting the Overall Volume
You can adjust the volume of the speakers if you're using the built-in speakers, or the volume of the headphones if headphones are connected.
| Adjusting the volume | 0–20 |
Applying an Effect to the Performance
While performing, you can vary the pitch or apply vibrato by touching your fingertip to the performance pad and moving it left or right.
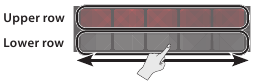
| Upper row | Vary the pitch or apply vibrato, etc. |
| Lower row | Pitch change |
Applying a roll or filter effect
The effect that's applied when you touch the performance pad can be switched between roll and filter.
- Press the [FUNC] button ("
![]() " is lit)
" is lit) Upper row Filter effect Lower row Roll effect
 " is lit)
 Playing Back / Recording
Here's how to play back or record a song.
| Play/Stop | Press the [ ] button. ] button. |
| Record-standby | While stopped, press the [ ] button. ] button. |
| Record | From record-standby, press the [] button. |
| Load a different song | Loading a saved song (Load). |
New recording
- Select the sound (part) that you want to record.
- Press the [
![]() ] button ("
] button ("![]() " blinks).
" blinks).
A count is heard in time with the tempo of the song. - Play the keyboard to start recording ("
![]() " is lit).
" is lit). - Press the [
![]() ] button to stop ("
] button to stop ("![]() " is unlit).
" is unlit).
A confirmation message appears. - To save, press the [ENTER] button.
If you decide to cancel, press the [EXIT] button.
Overdubbing
- Select a different sound (part) than you recorded in "New recording."
Alternatively, you can select the same sound and overdub it. - Press the [
![]() ] button ("
] button ("![]() " blinks).
" blinks). - Play the keyboard to start recording ("
![]() " is lit).
" is lit). - Press the [
![]() ] button to stop ("
] button to stop ("![]() " is unlit).
" is unlit).
A confirmation message appears. - To save, press the [ENTER] button.
If you decide to cancel, press the [EXIT] button.
About the recording function
This instrument lets you overdub, where a performance using one of the tone buttons is considered as one part.

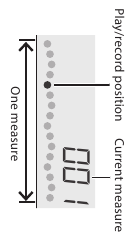
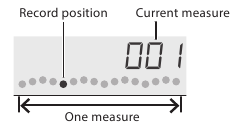
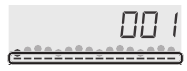
When playing back or recording, the screen shows the current measure, and the status of play/record progress within one measure.
Using the Keyboard to Play Patterns (Loop Mix Function)
You can play patterns (accompaniment tones or drum tones) by pressing notes on the keyboard (loop mix function). Patterns play repeatedly (as a loop) with a length of two measures. By recording with the loop mix function, you can easily create a song.
")
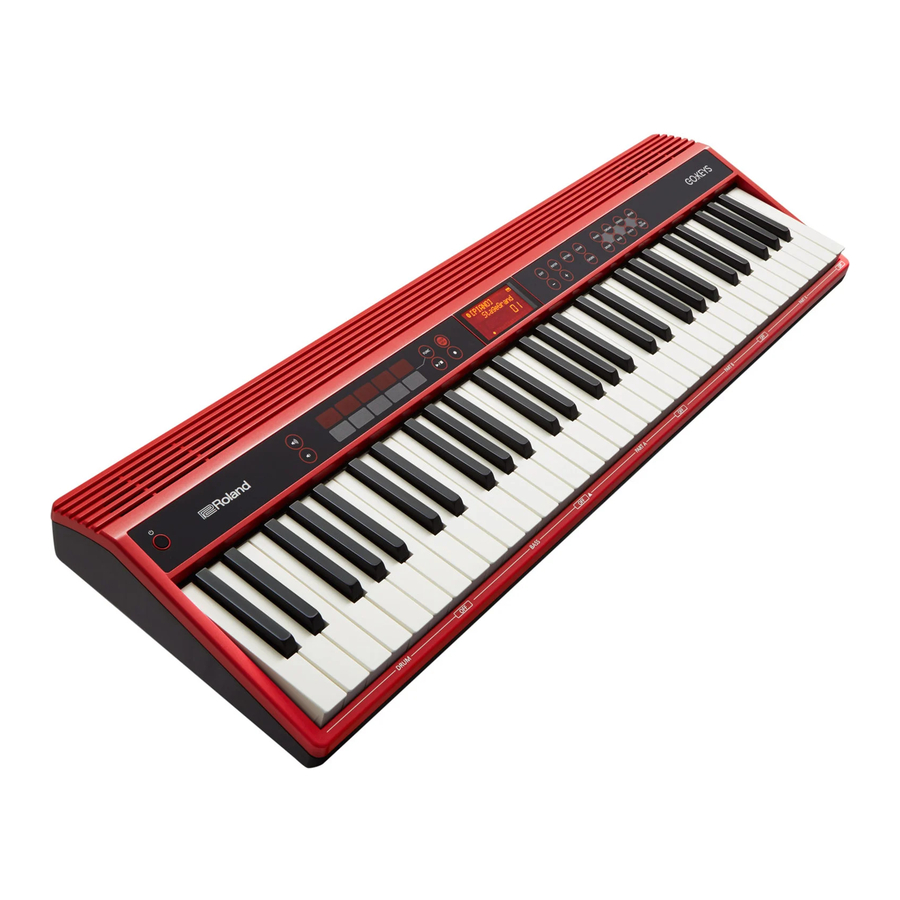
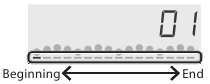
Display
This shows the sound group name, the sound name, and the functions that are currently enabled.
Screen at startup (the Play screen)
")
Confirming an Operation / Changing a Value
| Confirm an operation / Advance to the next screen | Press the [ENTER] button. |
| Cancel an operation / Return to the previous screen | Press the [EXIT] button. |
| Change a value | Use the [–] [+] buttons. |
Making Various Settings (Setting)
You can make various detailed settings for this instrument.
- Press the [SETTING] button to select an item ("
![]() " is lit).
" is lit).
The item switches each time you press the [SETTING] button. - Use the [–] [+] buttons to change the value of the setting.
Depending on the item that is selected, proceed with the operation by pressing a button such as [ENTER]. - Press the [EXIT] button when you're finished making settings ("
![]() " is unlit).
" is unlit).
MEMO
When you're making settings (while " " is lit), you can press the performance pad to select the setting item.
")
Clearing the Performance State
Here's how to clear (erase) the loaded song and reset the sound settings. This is convenient if the song or sound settings have gotten into a state that you did not intend. You can recall the cleared song by loading it again.
- Press the [CLEAR] button.
A confirmation message appears.
If you decide to cancel, press the [EXIT] button. - Press the [ENTER] button.
MEMO
- When the settings are reset, a piano tone (number 01) is selected.
- Pressing the [CLEAR] button also clears the pattern playback status of the loop mix function. If you press the [CLEAR] button during pattern playback, all patterns stop, and the playback status is cleared.
Sounding Patterns According to the Chord You Play (Interactive Chord)
While the loop mix function is playing patterns, you can switch patterns according to the chords you play (interactive chord function).
- Use the loop mix function to play back patterns.
- Press the [CHORD] button ("
![]() " blinks).
" blinks). - Play the keyboard in the left-most two-octave region.
The pattern changes according to the chord you play.
The screen shows the currently-played chord.
* For some patterns, the chords might not be displayed correctly, or the change might be difficult to understand.
![]()
- Press the [CHORD] button to exit the interactive chord function ("
![]() " is unlit).
" is unlit).

 " is unlit).
 MEMO
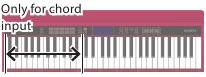
- While the chord function is on, the left-most two octaves of the keyboard are used only for inputting chords. Playing the keys in this region won't produce sound.
- If you want to change the volume of the sound that you're playing in the right-hand region, adjust the PART VOLUME.
Connecting Equipment
 USB COMPUTER port
You can connect this instrument to your computer, and back up this instrument's song data and settings to the computer.
Use a commercially available micro USB cable to make this connection.
* Do not use a micro USB cable that is designed only for charging a device. Charge-only cables cannot transmit data.
DC IN jack
Connect the included AC adaptor here.
PEDAL jack
You can connect a pedal switch (sold separately: DP series) and use it as a hold pedal.
If this is connected, " " is lit.
PHONES/OUTPUT jack
You can connect headphones (sold separately) or an amplified speaker here. If this is connected, "![]() " is lit.
" is lit.
AUX IN jack
You can connect an audio player (such as a smartphone) or other audio playback device here.
* To prevent malfunction and equipment failure, always turn down the volume, and turn off all the units before making any connections.
Installing Batteries
If six commercially available nickel-metal hydride or alkaline AA batteries are installed, you can perform without connecting an AC adaptor.
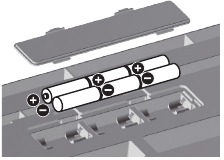
- Remove the battery cover.
- Install the batteries, making sure that they are oriented correctly.
- Close the battery cover.
* If you handle batteries improperly, you risk explosion and fluid leakage. Make sure that you carefully observe all of the items related to batteries that are listed in "USING THE UNIT SAFELY" and "IMPORTANT NOTES" (leaflet "USING THE UNIT SAFELY" and Owner's Manual).
* When the batteries run low, the display indicates "Battery Low!" When this occurs, install fresh batteries.
Turning the Power On/Off
- Press the [
![]() ] (power) button to turn on the power.
] (power) button to turn on the power. - Use the [
![]() ] [
] [![]() ] buttons to adjust the volume.
] buttons to adjust the volume. - To turn the power off, hold down the [
![]() ] (power) button for one second or longer.
] (power) button for one second or longer.
 ] buttons to adjust the volume.
 ] (power) button for one second or longer.
Concerning the Auto Off function
The power to this unit will be turned off automatically after a predetermined amount of time has passed since it was last used for playing music, or its buttons or controls were operated (Auto Off function).
If you do not want the power to be turned off automatically, disengage the Auto Off function.
NOTE
To restore power, turn the power on again.
Performing with the Loop Mix Function

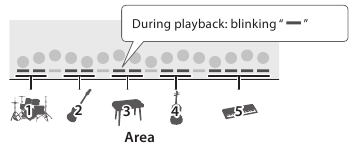
Loop mix is a function that lets you play patterns (accompaniment tones or drum tones) by pressing notes on the keyboard. Patterns for each tone part are assigned to five areas of the keyboard. These five areas are collectively called a "loop mix set. " One pattern can be played in each area; patterns are two measures long, and play back repeatedly (as a loop).
In every loop mix set, a drum pattern is assigned to area 1 and a bass pattern is assigned to area 2.
This instrument lets you enjoy performing with loop mix sets that cover a wide variety of musical genres.
* The song function and the loop mix function can't be used at the same time.
MEMO
- You can change the tempo of the pattern.
- Only in area 5, you can play patterns with multiple tone parameters. You can also press multiple keys at the same time to play them simultaneously.
- For details on the loop mix sets and patterns, refer to "Loop Mix Set List" at the end of this manual.
Here we explain the procedure for performing a bass tone while sounding a drum tone.
Selecting a loop mix set

- Press the [LOOP MIX] button to turn the loop mix function on ("
![]() " is lit).
" is lit).
If you press the [LOOP MIX] button while a song is loaded, the display indicates "CLEAR SONG?"
If you want to use the loop mix function, press the [ENTER] button to clear the song. You can recall the cleared song by loading it again. - Use the [–] [+] buttons to select the loop mix set that you want.
 " is lit).
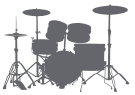
Playing a drum part pattern
- Press one of the keys in area 1.
A drum tone pattern sounds.
![]()
To stop the patterns
| To stop one pattern | Press the right-most key of the area whose pattern you want to stop. |
| To stop all patterns | Press the [] button. If you press the [ ] button once again, the patterns play in the previous state. |
Playing a bass part pattern
- Press keys in area 2 one at a time.
A bass tone pattern sounds.
If you want to add more parts to the playback, press keys in each of the other areas. - Press the [LOOP MIX] button to return to the normal performance state ("
![]() " is unlit).
" is unlit).
To stop the pattern, press the [![]() ] button.
] button.
Playing Patterns According to the Chord You Play (Interactive Chord)
While the loop mix function is playing patterns, you can use the interactive chord function to vary the patterns according to the chords that you play.
For more about the interactive chord function, refer to "Sounding Patterns According to the Chord You Play (Interactive Chord)".
Recording with the Loop Mix Function
You can easily create a song by recording with the loop mix function.
* If you want to record a new song, clear the song before you proceed.
Here we explain the procedure for recording the drum tone and bass tone.

Selecting a loop mix set
- Press the [LOOP MIX] button to turn the loop mix function on ("
![]() " is lit).
" is lit). - Use the [–] [+] buttons to select the loop mix set that you want.
Recording your performance
- Press the [
![]() ] button ("
] button ("![]() " blinks).
" blinks).
Now you're in the record-standby state. - Press a key in each area to start recording ("
![]() " is lit).
" is lit).
When you press a key, recording starts and the number of recorded measures is shown in the screen.
![]()
MEMO
Your performance using the interactive chord function (p. 3) is also recorded. - Press the [
![]() ] button to stop recording ("t
] button to stop recording ("t![]() is unlit).
is unlit).
A confirmation message appears. - To save, press the [ENTER] button.
If you decide to cancel, press the [EXIT] button. - When you once again press the [
![]() ] button, the recorded performance plays back.
] button, the recorded performance plays back.
Convenient Functions
Loading a Song (SONG LOAD)
Here's how to load a song that's saved in internal memory.
* When you load a song, the recorded data of the current song is lost. If you've created a song that you want to keep, you should save it.
- Press the [SETTING] button several times to make the display indicate SONG LOAD.
![]()
- Press the [ENTER] button.
- Use the [–] [+] buttons to select the song that you want to load.
![]()
- Press the [ENTER] button.
When a song is loaded, the indicator in the lower part of the screen is lit.
![]()


Deleting a Song (SONG DEL)
Here's how to delete a song that's saved in internal memory.
- Press the [SETTING] button several times to make the display indicate SONG DEL.
![]()
- Press the [ENTER] button.
- Use the [–] [+] buttons to select the song that you want to delete.
![]()
- Press the [ENTER] button.
A confirmation message appears.
![]()
If you decide to cancel, press the [EXIT] button. - Press the [ENTER] button.
The song is deleted.


Backing-Up or Restoring Songs and Settings
Songs (SMF format) and settings that you've saved in this instrument can be backed-up to your computer. Songs and settings that you've backed-up on your computer can also be restored to this instrument.
* Before you execute backup or restore, use a micro USB cable to connect this instrument to your computer.
MEMO
Since songs are in SMF format, you can use them in your DAW or other music software.
Backing Up (BACKUP)
- Press the [SETTING] button several times to make the display indicate BACKUP.
![]()
- Press the [ENTER] button.
The BACKUP drive appears in the screen of your computer. - Copy the GO-61 folder of the BACKUP drive to your computer.
* Copy this entire "GO-61" folder to your computer. Similarly when executing restore, copy the entire "GO-61" folder. Backup or restore won't occur correctly if you copy just the folder that's inside the "GO-61" folder, or if you copy only some of the files. - On your computer, perform the appropriate steps to end (unmount) the connection with this instrument.
The normal screen of this instrument reappears.
MEMO
When backing up or restoring data, there might be cases in which backup or restore does not proceed even if you end (unmount) the connection on your computer. If so, end the connection on your computer, and then press the [EXIT] button of this instrument.
If you're using a Mac, end the connection; then when you're finished, press this instrument's [EXIT] button.

Restoring (RESTORE)
- Press the [SETTING] button several times to make the display indicate RESTORE.
![]()
- Press the [ENTER] button.
The RESTORE drive appears in the screen of your computer. - Copy the GO-61 folder into the RESTORE drive.
- On your computer, perform the appropriate steps to end (unmount) the connection with this instrument.
When the connection is ended, restore begins.
When restore is completed, the screen indicates "Completed. TurnOffPower. " - Turn the power of this instrument off and on again.

Restoring the Factory Settings (FACTORY RST)
Here's how the settings of this instrument can be returned to their factory-set state. This operation is called factory reset.
NOTE
When you execute this operation, all songs and settings saved in this instrument are lost. If there are songs that you want to keep, back them up to your computer.
- Press the [SETTING] button several times to make the display indicate FACTORY RST.
![]()
- Press the [ENTER] button.
A confirmation message appears.
![]()
If you decide to cancel, press the [EXIT] button. - Press the [ENTER] button.
The factory reset is executed.


Setting Various Functions (Setting)
Basic Operations in Setting
- Press the [SETTING] button to select an item ("
![]() " is lit).
" is lit).
The item switches each time you press the [SETTING] button - Use the [–] [+] buttons to change the value of the setting.
- Press the [EXIT] button when you're finished making settings ("
![]() " is unlit).
" is unlit).
MEMO
- When you're making settings (while "
![]() " is lit), you can press the performance pad to select the setting item.
" is lit), you can press the performance pad to select the setting item.
![]()
- The lower part of the screen shows the position of the selected item.
![]()
- These settings can be backed up.


*1: Settings that can be preserved by KEEP SETTING
Using the Bluetooth® Functionality
Provision of Bluetooth functionality
Please be aware that depending on the country in which you purchased the unit, Bluetooth functionality might not be included.

Here's What You Can Do
Bluetooth functionality creates a wireless connection between a mobile device such as a smartphone or tablet (subsequently referred to as the "mobile device") and this unit, allowing you to do the following.
Bluetooth audio
You can use the speakers of this instrument to listen to music or music videos played on your mobile device.
MIDI data transmission and reception
MIDI data can be exchanged between this unit and the mobile device.
You can use the keyboard of this instrument to play a music app that supports Bluetooth MIDI.
Using Bluetooth Audio
* The volume of the Bluetooth audio cannot be adjusted from this unit. Adjust the volume on the mobile device.
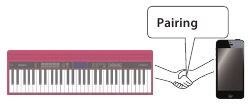
Registering a Mobile Device (Pairing)
"Pairing" is the procedure by which the mobile device that you want to use is registered on this unit (the two devices recognize each other). Make settings so that music data saved on the mobile device can be played wirelessly via this unit.
MEMO
- Once a mobile device has been paired with this unit, there is no need to perform pairing again. If you want to connect this unit with a mobile device that has already been paired, refer to "Connecting an Already-Paired Mobile Device".
- Pairing is required again if you execute a Factory Reset.
- The following explanation of the procedure is only one example. For details, refer to the owner's manual of your mobile device.
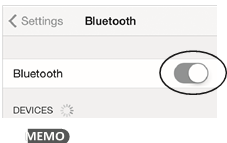
* Make sure that this unit's Bluetooth function is "On" (settings0"BLUETOOTH" turned "On").
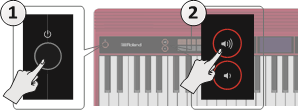
- Place the mobile device that you want to connect nearby this unit.
MEMO
If you have more than one unit of this model, power-on only the unit that you want to pair (power-off the other units). - Press the [SETTING] button several times to make the display indicate BT PAIRING.
- Press the [ENTER] button.
The display indicates "PAIRING...," and this unit waits for a response from the mobile device.
MEMO
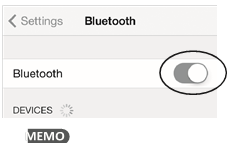
If you decide to cancel pairing, press the [Exit] button. - Turn on the Bluetooth function of the mobile device.
![]()
The explanation here uses the iPhone as an example. For details, refer to the owner's manual of your mobile device. - Tap "GO:KEYS Audio" that is shown in the Bluetooth device screen of your mobile device.
This unit is paired with the mobile device. When pairing succeeds, "GO:KEYS Audio" is added to the list of "Paired Devices" on your mobile device. - Press the [EXIT] button when you're finished making settings.
Specifying the Bluetooth ID
You can specify a number that is added following the device name of this unit when it is displayed by a Bluetooth connected application.
If you own multiple units of the same instrument, this is a convenient way to distinguish them.
- Press the [SETTING] button several times to make the display indicate BLUETOOTH ID.
- Use the [–] [+] buttons to edit the value of the setting.
| Parameter | Explanation |
| Off, 1–9 | Set to "Off": " GO:KEYS Audio, " "GO:KEYS MIDI" (default value) Set to "1": "GO:KEYS Audio 1, " "GO:KEYS MIDI 1" |
Connecting an Already-Paired Mobile Device
- Turn on the Bluetooth function of the mobile device.
MEMO- If you were unable to establish a connection using the procedure above, tap "GO:KEYS Audio" that is displayed in the Bluetooth device screen of the mobile device.
- To disconnect, either turn this unit's Bluetooth Audio function "Off" (Setting
![]() turn "BLUETOOTH" Off) or turn the mobile device's Bluetooth function off.
turn "BLUETOOTH" Off) or turn the mobile device's Bluetooth function off.
Transferring MIDI Data
Here's how to make settings for transmitting and receiving MIDI data between this unit and the mobile device.
Note when using an already-paired iOS device
The following operation is required after each time that you execute a factory reset.

For details, refer to the owner's manual of your iOS device.
* Make sure that this unit's Bluetooth function is "On" (settings "BLUETOOTH" turned "On").
- Place the mobile device that you want to connect nearby this unit.
MEMO
If you have more than one unit of this model, power-on only the unit that you want to pair (poweroff the other units). - Turn on the Bluetooth function of the mobile device.
![]()
The explanation here uses the iPhone as an example. For details, refer to the owner's manual of your mobile device. - In the mobile device's app (e.g., GarageBand), establish a connection with this unit.
NOTE
Do not tap the "GO:KEYS MIDI" that is shown in the Bluetooth settings of the mobile device.
Disabling the Bluetooth Functionality
Disable the Bluetooth functionality if you don't want this unit to be connected via Bluetooth with your mobile device.
- Press the [SETTING] button several times to make the display indicate BLUETOOTH.
- Use the [–] [+] buttons to turn the setting "Off."
- Press the [EXIT] button when you're finished making settings.
Troubleshooting
| Problem | Items to check | Action |
Power turns off on its own | Could the auto-off setting be something other than "Off"? | If you don't need the power to turn off automatically, turn the Auto Off setting "Off. " |
Power turns on unexpectedly | Is the AC adaptor connected correctly? | |
| Could the batteries be exhausted? | Install fresh batteries. | |
| If you connect the AC adaptor and turn on the power when batteries are installed, the AC adaptor will be used preferentially. Even if batteries are installed, the power will not turn on unless the AC adaptor is connected to an AC outlet. If you're using batteries, disconnect the AC adaptor from this unit. If batteries are installed, connecting or disconnecting the power cord from the outlet or connecting or disconnecting the DC plug of the AC adaptor while this unit is turned on will cause the power to turn off. | ||
Pedal does not work, or is "stuck" | Is the pedal connected correctly? | |
| The volume level of the unit connected to AUX IN jack is too low | Could the volume of the connected device be turned down? | |
No sound | Are your amp, speakers, headphones, etc., connected correctly? | |
| Is the volume turned down? | ||
| Could the interactive chord function be turned on? | Turn off the interactive chord function. While the chord function is on, the left-most two octaves of the keyboard are used only for inputting chords. Playing the keys in this region won't produce sound. | |
Notes don't sound right | ||
| The notes you play on the keyboard don't sound | Could the loop mix function be turned on? | Turn off the loop mix function. |
| The notes have the wrong pitch | Could you have changed the transpose setting? | |
Problems with Bluetooth functionality

MEMO
If checking these points does not solve the problem, please refer to the Roland support website.
http://www.roland.com/support/

Documents / Resources
References
Download manual
Here you can download full pdf version of manual, it may contain additional safety instructions, warranty information, FCC rules, etc.
Advertisement


Need help?
Do you have a question about the GO KEYS and is the answer not in the manual?
Questions and answers