Table of Contents
Advertisement
Quick Links
F012TH Wireless Indoor Thermo-Hygrometer User Manual
1. Introduction
Thank you for your purchase of the F012TH Wireless Indoor Thermo-Hygrometer. The following user
guide provides step by step instructions for installation, operation and troubleshooting.
2. Getting Started
Note: The power up sequence must be performed in the order shown in this section (insert batteries
in the remote transmitter(s) first, Display Console second).
Indoor Thermo-Hygrometer Sensor Set Up
1. Remove the battery door on the back of the display, as shown in Figure 1. Insert two AAA
(alkaline or lithium, avoid rechargeable) batteries in the back of the indoor sensor.
After inserting the batteries, All of the LCD segments will light up for a few seconds to verify all seg-
ments are operating properly. and then
the sensor is transmitting data.
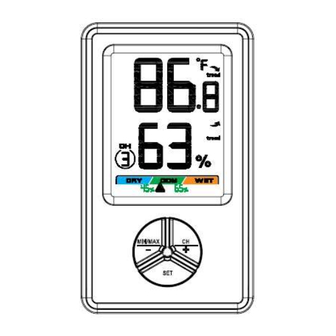
2. Verify the correct channel number (CH) and temperature units of measure (°F vs. °C) are on
the display, as shown in Figure 2.
Page 1
Figure 1
icon flash once per 60 seconds thereafter. Each time it flashes,
Advertisement
Table of Contents

Related Manuals for Ambient Weather F012TH


Summary of Contents for Ambient Weather F012TH
- Page 1 F012TH Wireless Indoor Thermo-Hygrometer User Manual 1. Introduction Thank you for your purchase of the F012TH Wireless Indoor Thermo-Hygrometer. The following user guide provides step by step instructions for installation, operation and troubleshooting. 2. Getting Started Note: The power up sequence must be performed in the order shown in this section (insert batteries in the remote transmitter(s) first, Display Console second).
- Page 2 Figure 2 1. Temperature 8. Low power indicator 2. Temperature units (°F or °C) 9. Humidity Calibrated Icon (when the calibration is 3. Temperature, Rate of Change indicator displayed ) 4. Temperature Calibrated Icon (when the cali- 10. Humidity Comfort Colorful Icon bration is displayed ) 11.
- Page 3 Comfortable Figure 3 3.2 Rate of Change Icon The rate of change icon detects rapid changes in temperature and humidity. If the arrow points upward, the temperature is increasing at a rate of +4°F per 30 minutes (or greater), or humidity is in- creasing at a rate of +5% per 30 minutes (or greater).
- Page 4 When you manually clear the minimum and maximum, the Clears 24h function will clear every 0:00 hours from the time you clear it. 4.4 Temperature Units of Measure The default temperature units of measure are degrees Fahrenheit. To toggle between degrees Celsius and degrees Fahrenheit, press and hold the MIN/MAX button for 3 seconds in normal mode.
- Page 5 Once the displayed temperature equals the calibrated source, press and hold the SET button for three seconds, or wait 15 seconds for timeout, and the temperature value will stop flashing. Discussion: Temperature errors can occur when a sensor is placed too close to a heat source (such building structure, ground...
- Page 6 phones. Avoid transmitting through solid metal barriers. as shown in Figure 5 Figure 5 8. Best Practices for Wireless Communication Wireless communication is susceptible to interference, distance, walls and metal barriers. We recom- mend the following best practices for trouble free wireless communication. 1.
- Page 7 9.1 Wireless Specifications Line of sight wireless transmission (in open air): 150 feet, 100 feet under most conditions. Frequency: 433 MHz Update Rate: 60 seconds 9.2 Measurement Specifications The following table provides specifications for the measured parameters. Measurement Range Accuracy...
Need help?
Do you have a question about the F012TH and is the answer not in the manual?
Questions and answers