
Related Manuals for Chefman BOILS FASTER RJ11-17-CTI-RL-UK


Summary of Contents for Chefman BOILS FASTER RJ11-17-CTI-RL-UK
- Page 1 CUSTOM-TEMP 1.8L INFUSER KETTLE USER GUIDE • Safety Instructions • Features • Operating Instructions • Cleaning and Maintenance • Notes • Terms and Conditions • Warranty Registration RJ11-17-CTI-RL-UK * Boils faster than on the hob.
- Page 2 COOKING FORWARD Welcome! Whether this is your first Chefman® appliance or you’re already a part of our family, we’re happy to be in the kitchen with you. The Custom- Temp 1.8L Infuser Kettle features easy-to-use presets that heat water to the perfect temperature for your drink, whether that's green tea, black tea or even French press coffee.
-
Page 3: Table Of Contents
CONTENTS Safety Instructions Features Operating Instructions Cleaning and Maintenance Notes Terms and Conditions Warranty Registration... -
Page 4: Safety Instructions
Do not operate any appliance with a damaged cable or plug, or after the appliance malfunctions or has been damaged in any manner. If this should occur, contact Chefman Customer ® Support for examination, repair or adjustment. - Page 5 SAFETY INSTRUCTIONS IMPORTANT SAFEGUARDS Do not let the cable hang over the edge of a table or worktop or touch hot surfaces. 10. Do not place the unit near or on any type of heat source, such as a gas or electric burner, hob or oven, even if not on. Do not use near an open flame or flammable materials.
- Page 6 SAFETY INSTRUCTIONS IMPORTANT SAFEGUARDS WARNING: Please ensure that the electrical socket can accommodate the product’s standard plug. Do not attempt to alter the plug in any way. SHORT CABLE INSTRUCTIONS A short power-supply cable is provided to reduce the hazards of entanglement or tripping over a longer cable.
- Page 7 To disconnect the appliance, grasp the plug and remove it from the socket. Never use the product if the power cable shows signs of abrasion or excessive wear. Contact Chefman Customer ® Support for additional guidance and support. Never wrap the cable tightly around the appliance, as this could place undue stress on the cable where it enters the appliance and cause it to fray and break.
-
Page 8: Features
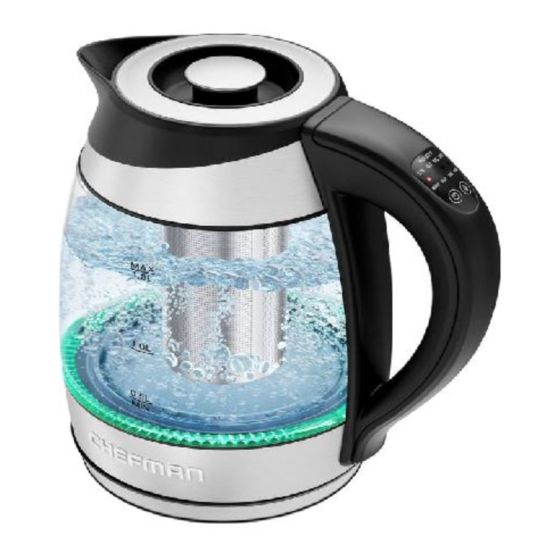
FEATURES... - Page 9 FEATURES Drip-Free Spout Borosilicate Glass Kettle (with water-level markings) Removable Tea Infuser (attaches to lid) LED Indicator Lights 360° Swivel Power Base Out-of-Sight Cable Storage Lift-Off Lid Control Panel (see inset for details, items 10–12) Stay-Cool Handle Temperature Presets (see chart below) POWER Button TEMPERATURE Selection Button TEMPERATURE PRESETS...
-
Page 10: Operating Instructions
OPERATING INSTRUCTIONS BEFORE FIRST USE Remove all packaging and materials. Be sure that all parts are included before discarding any packaging. Pull out the power cable from the compartment under the base, and place the base on a flat surface. (Make sure the power cable comes out of the opening in the base so the unit can sit level.) To rinse the pot of any manufacturing residue, “brew”... - Page 11 OPERATING INSTRUCTIONS HOW TO MAKE TEA WITH THE TEA INFUSER The kettle is perfect for all your hot water needs: hot or iced tea, French press or pour-over coffee, instant oatmeal and more. The kettle lifts easily from its base for convenient filling at the sink and cable-free serving;...
- Page 12 OPERATING INSTRUCTIONS Add the infuser to the kettle. When the set temperature is reached, the unit will beep, the LED light will turn off and the kettle will automatically power off. Carefully lift off the lid. Slide the tea-filled infuser onto the underside of the lid (a slight twist helps), insert it into the pot and press on the lid to close.
- Page 13 OPERATING INSTRUCTIONS TEA- AND COFFEE-BREWING CHART The guide below is intended as a starting point for brewing your perfect cup of tea or coffee. You may need to vary the amount of tea or coffee and steeping times based on personal preference. While tea can steep directly in the pot using the included strainer, for coffee we recommend heating the water in the kettle and then using a pour-over or French press-style coffee pot to brew.
- Page 14 OPERATING INSTRUCTIONS TEA-BREWING TIPS • Use good-tasting water, preferably filtered, for best results. • Add more or less tea leaves than suggested depending on how strong you like your “cuppa.” • Avoid steeping for too long, which can make tea taste bitter. •...
- Page 15 OPERATING INSTRUCTIONS SPECIAL FEATURES AND SAFETY FUNCTIONS Keep Warm Function The kettle comes equipped with an optional Keep Warm Function (available only for the Herbal/Black Tea setting) that keeps your water or tea hot for up to 2 hours. To activate Keep Warm, press and hold the POWER button for 2 seconds until the LED light blinks red.
-
Page 16: Cleaning And Maintenance
CLEANING AND MAINTENANCE Unplug the kettle and allow it to cool completely before cleaning. Clean the interior of the kettle as needed by removing the lid and infuser and carefully washing the inside with soapy water. Do not let the handle of the kettle get wet. Rinse the inside of the kettle thoroughly. - Page 17 CLEANING AND MAINTENANCE DESCALING Due to minerals in water, deposits may form on the base of the kettle and cause discolouration. To get the best performance from your kettle, descale it from time to time. Frequency will depend on the hardness of your water and how often you use the kettle. You can either follow the directions using a commercial descaler, or use vinegar and water and follow the directions below: Fill the kettle with enough white vinegar to cover the bottom by...
-
Page 18: Notes
NOTES... - Page 19 NOTES...
-
Page 20: Terms And Conditions
We encourage you to register your product. Registering can make the Warranty process easier and can keep you informed of any updates or recalls on your product. To register, follow the directions on the Chefman ® Warranty Registration page in the Chefman User Guide. - Page 21 2 years from the date of purchase when used in accordance with the directions listed in the Chefman User Guide. If your product does not work as it should, ® please contact Customer Support at support@chefman.co.uk so that we may assist you. THIS WARRANTY DOES NOT COVER •...
-
Page 22: Warranty Registration
AC ONLY/ AC SEULEMENT NOTE: Label depicted here is an example. How do I register my product? All you need to do is fill out a simple Chefman registration form. You can ® easily access the form in one of the two ways listed below: 1. - Page 23 WHETHER BASED ON CONTRACT, TORT OR OTHERWISE. Chefman is a registered trademark of RJ Brands, LLC. ® Chefman Boils Faster™ is a trademark of RJ Brands, LLC. Cooking Forward™ is a trademark of RJ Brands, LLC. Chefman UK Limited Victoria House, 50-58 Victoria Road...
- Page 24 C H E F M A N . C O M | @ M YC H E F M A N © C H E F M A N 2 0 2 3 RJ11-17-CTI-RL-UK_UG_FINAL_OTP_052423...
Need help?
Do you have a question about the BOILS FASTER RJ11-17-CTI-RL-UK and is the answer not in the manual?
Questions and answers