Table of Contents
Advertisement
Quick Links
Advertisement
Table of Contents

Related Manuals for VocoPro DAX-9900RV


Summary of Contents for VocoPro DAX-9900RV
- Page 1 DAX- 9900RV ’...
-
Page 2: Table Of Contents
Table of Contents Welcome . . . . . . . . . . . . . . . . . . . . . . . . . . . . . . . 3 Listening for a Lifetime . -
Page 3: Welcome
And while you're there don't forget to check out our Club VocoPro for Karaoke news and events, chat rooms, club directories and even a KJ Service directory! We look forward to hearing you sound like a PRO, with VocoPro, the singer’s ultimate choice. FOR YOUR RECORDS Please record the model number and serial number below, for easy reference, in case of loss or theft. -
Page 4: Listening For A Lifetime
Now itʼs time to consider how you can maximize the fun and excitement your equipment offers. VocoPro and the Electronic Industries Associationʼs Consumer Electronics Group want you to get the most out of your equipment by playing it at a safe level. One that lets the sound come through loud and clear without annoying blaring or distortion and, most importantly, without affecting your sensitive hearing. -
Page 5: Safety Information
Safety Information 8. Ventilation - The appliance should be situated so its location does not interfere with its proper ventilation. CAUTION For example, the appliance should not be situated on a bed, sofa, rug, or similar surface that may block the RISK OF SHOCK ventilation slots. -
Page 6: Fcc Information
1. To ensure the finest performance, please read this requirements. Modifications not expressly approved by manual carefully. Keep it in a safe place for future Vocopro may void your authority, granted by the FCC, to reference. use this product. 2. Install your unit in a cool, dry, clean place - away from 2. -
Page 7: Getting Connected
. Below are a few common connections: CONNECTING: A/V Source - The DAX-9900RV can support up to 4 AV sources when using these jacks: VOD, DVD, AUX, BGM . Most devices that use RCA output jacks would be compatible . - Page 8 Getting Connected CONNECTING: Subwoofer - A Self-powered subwoofer can be used when it is connected to the Sub Out jack . Use the controls labeled SUB on the back panel to alter the audible characteristics of the Bass: - The crossover frequency knob will dictate how “low” the bass will sound . The closer it is to 50Hz, the bass will be “rumbly’...
- Page 9 Getting Connected CONNECTING: Recording Devices - Most recording devices that use RCA input jacks can be connected to either the REC Out or Pre Out . - The REC Out has a constant music output volume; it is not affected by the Music Master Volume . The microphone audio can be selectively applied to the REC Out signal with the Mic Level located near the REC Out jacks .
- Page 10 Microphone audio is routed out through the Pre-Out into the external effects processor to be altered . Once altered, it is sent back into the DAX-9900RV through the Amp In jacks . 1 . Amp In jack will function like an Effect Loop In .
- Page 11 Caution • Before connecting the speakers, make sure that the DAX-9900RV is disconnected from the power source . • Do not let the bare speaker wires touch each other or another metal part of this unit . This could damage the DAX- 9900RV and/or the speakers .
- Page 12 Getting Connected PREPARING THE SPEAKER CABLE You can either used an exposed speaker wire or Banana Plug speaker cable . EXPOSED SPEAKER WIRE BANANA CONNECTOR 1 . Remove approximately 3/8” (10mm) of insulation Insert banana plug into speaker terminal . Banana Connector 10mm 2 .
- Page 13 Getting Connected POWERED SPEAKERS: A set of powered speakers can be connected to either the Pre-Out or the REC out jacks . The volume control will change depending on which output being used . - The REC Out has a constant music output volume; it is not affected by the Music Master Volume . The microphone audio can be selectively applied to the REC Out signal with the Mic Level located near the REC Out jacks .
-
Page 14: Operations
The microphone effect presets are available to add an extra layer to your performance and are accessed from the front of the DAX-9900RV . The four microphone presets levels can be adjusted in the Microphone Effect Set Up menu . - Page 15 The key control will help adjust the music to better match the current singers’ vocal range. If a song is too low or too high, use the key control buttons on the face of the DAX-9900RV, or the buttons on the remote control, to alter the key to better match the singer.
- Page 16 Operations USING THE MIC FREQUENCY CUT: The Mic frequency cut is intended to change the Bass cutoff frequency for the microphone audio . Any audio below the set frequency value will not be heard . This feature is useful for microphones with poor Bass response .
- Page 17 Description FRONT PANEL 1 . Pure Direct – This mode is for high fidelity music audio, with no sound enhancements . When selected, the music audio will bypass any settings that may be on . Access to the Set Up Meny will disabled as well . Use this mode for listening to music or to perform a track as it was originally released .
-
Page 18: Descriptions
Descriptions FRONT PANEL 11 . Microphone Effects – There are four types of mic effects available . The intensity of the effects can be altered in the Microphone Effect Setup . a . Echo b . Echo + Reverb c . Delay + Reverb d . - Page 19 Descriptions REAR PANEL 3 4 5 1 . Microphone Input – This jack accepts microphone audio via ¼” mono cable . 2 . Video Inputs: • VOD – This jack accepts video signal from a source such a DVD or CD+G player . •...
- Page 20 Descriptions REAR PANEL 9c 9d 11 12 13 9 . Audio Inputs: 9a . VOD – These jacks accept the audio signal from a source such a DVD or CD+G player . 9b . DVD – These jacks accept the audio signal from a source such a DVD or CD+G player . •DVD Input Level –...
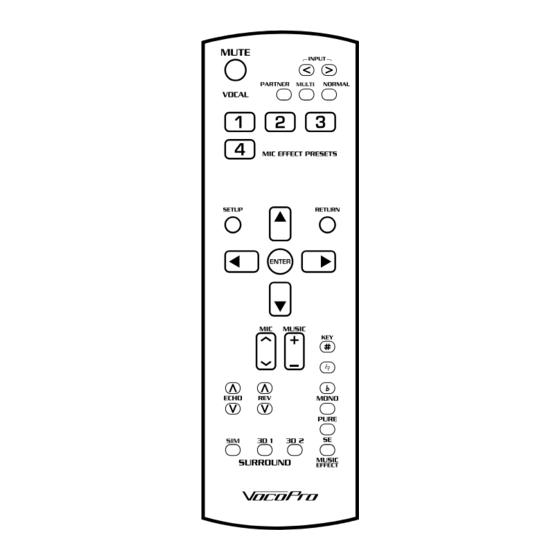
- Page 21 Descriptions REMOTE CONTROL 1 . Mute – This button silences all audio output from the DAX-9900RV 2 . Vocal Effects a . Partner - This mode will lower the volume of the main vocal track when the mic is in use . The main vocal track will automatically rise back to audible levels once the mic is no longer being used .
-
Page 22: Setup
3 . All microphone audio will be routed through the internal effects processor . e . Volume Limit Set – This sets the volume the DAX-9900RV will be set to when the machine is powered on and the maximum volume limit for both Microphone and Music . - Page 23 1 . Default setting is 60/60 2. Music Setup – These options change the way the DAX-9900RV handles audio signals . a . Input Level Adj – This alters the volume of the inputs respectively . Each input can have an adjustment of -6 to +6 dB independently .
-
Page 24: Specifications
Specifications POWER SUPPLY AMPLIFIER • Power supply: 110/120 VAC 50~60Hz • Audio Output Power: 150W+150W(8Ω) • Power Consumption: 500W • Total Harmonic Distortion: (1KHz, -3dB,8Ω) 0 .05% OTHER • Audio Input (Sensitivity / Impedance): • Dimensions (W x H x D): 16 .9 x 5 .35 x 16 .3 in . MIC 3 .5 mV/3 .3KΩ... -
Page 25: Commonly Asked Questions
Q: Why is there no music audio? A: Check that the: • Cables from the music source and the DAX-9900RV are properly secured. • Cables from the speaker terminals and speakers are properly connected. • Input select is set to an input with audio playback. - Page 26 Notes...
- Page 27 DAX-9900RV Owner’s Manual © VocoPro 2017 v1 .0503 www .vocopro .com...
Need help?
Do you have a question about the DAX-9900RV and is the answer not in the manual?
Questions and answers