Fishman Rare Earth - Banjo Pickup Installation Guide
- Manual (12 pages) ,
- Installation manual (2 pages) ,
- Manual (12 pages)
Advertisement
Introduction
It is our wish that you are completely satisfied with this product. If you have any questions or comments, we would like to hear from you. You may reach our customer service department at 978988-9665 or tech@fishman.com
With key input (and ears) from several top players, we spent over a year refining and dialing in this pickup's performance until we were confident that we got it right.
To achieve noise-free, microphone-like reproduction, this pickup takes full advantage of cutting-edge active transducer technology borrowed from our acclaimed Rare Earth™ magnetic soundhole acoustic guitar pickups.
Like its guitar-pickup cousin, this new banjo pickup features a quiet humbucking coil design that dutifully rejects noise and hum. A powerful neodymium magnet focuses the banjo's sound through a small steel shim that attaches to the head (not the player's head, the banjo's). Hidden in the pickup's case is a stealthy preamplifier, which strengthens the signal and preserves the natural sound of the instrument. The pickup can mount on either dual or single coordinator rod banjos (single rod instruments require a special fitting). With a battery life of well over 5,000 hours, you can expect years of use between battery changes.
Parts List
Banjo Pickup Jack Assembly with:
- Switchjack™
- Curved Bracket
- 3/8" Nut
- 3/8" Dress Washer
- 15/23" Dress Washer
- Plastic Spacer for Jack
- 2 Plastic Spacers
- 2 Off-center Washers
- 2 Flat Washers
- 2 10-32 x 3/4" Screws
- 2 Locknuts
- Blue Steel Shim (sensing element)
Tools Required
- 1/8" Hex Wrench
- 3/8" Wrench
- 1/2" Wrench
- Soldering Iron
Note:If you do not feel confident with a soldering iron, please have the pickup installed by a professional repair person.
Specifications
| Pickup Coil: | Stacked Humbucking |
| Preamp: | Low Noise, Discrete, 0 Feedback Circuit |
| Nominal Output: | -10dBu |
| Noise: | -94dBu, A Weighted |
| Output Impedance: | 3k Ohm |
| Minimum Recommended: | Load Impedance >10 k Ohm |
| Power: | 9 V Alkaline Battery |
| Battery Life: | Over 5000 Hours |
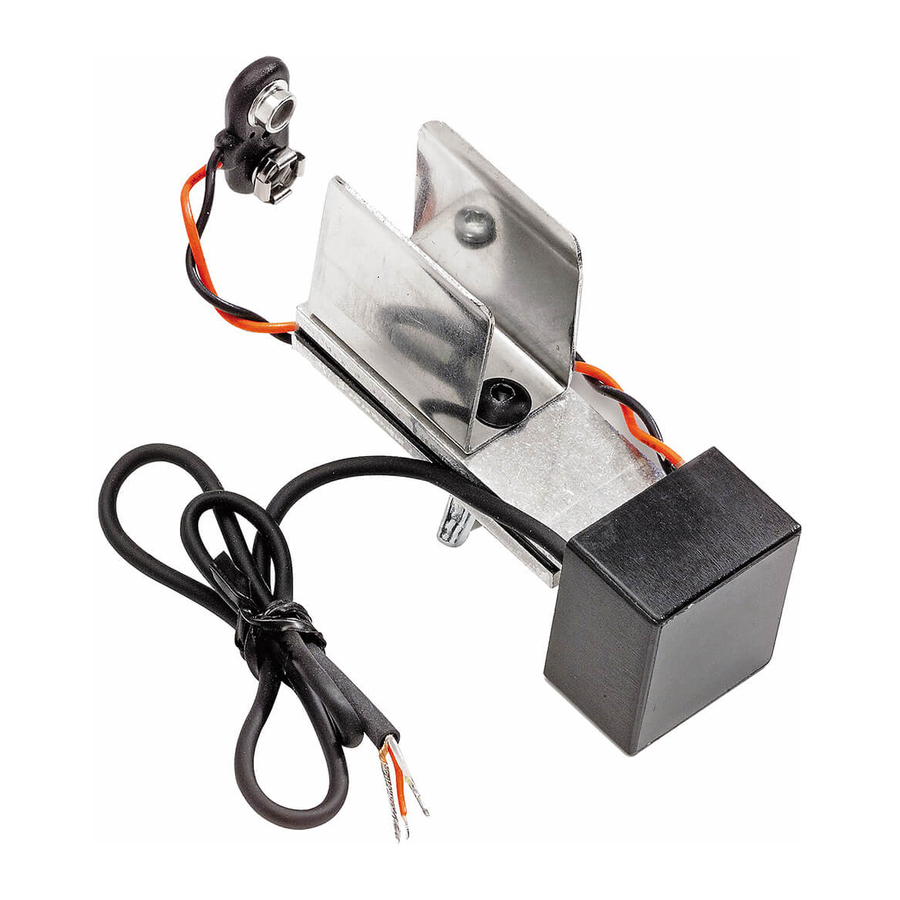
Mount the Pickup
- Remove the backing paper from the small rectangular blue shim to expose the sticky-back adhesive. Attach the shim to the head (inside the instrument) so that the shim is centered under the coordinator rods, perpendicular to the rods and about 1/2" (12.7 mm) from the edge of the middle bridge foot.

- Loosen the wing nut and position the pickup directly over the blue shim. The magnet will self-locate the pickup over the shim. For a darker response, leave the pickup positioned directly over the shim. For brighter response, move the pickup 1/4" away from the shim, towards the neck.
- Set the pickup about 1/16" from the surface of the head. You can make a 1/16" spacer cut from the box for this pickup and use it to set the gap between the head and the face of the pickup.

- After the pickup is secured to the coordinator rods, disassemble the jack then attach the curved bracket to the flange. To accommodate different styles of flanges, we provide two types of washers (a set of standard and off-center washers).

- Screws
- Plastic Spacers
- Off-Center Washers
OR - #10 Washers
- Locknuts


- Re-assemble the jack assembly. Wind the pickup wire several times around the coordinator rod, then route the wire through an opening in the flange.
Solder the Wire to the Jack

- 15/32" Dress Nut
- 15/32" Dress Washer
- Plastic Spacer
- Curved Bracket
- 3/8" Dress Washer
- 3/8" Dress Nut
Remove the shielding barrel from the jack, run the wire through it, then solder:
- Red wire to tip (shortest terminal)
- White wire to switch (longest terminal)
- Shield to ground (hooked terminal) Attach a 9 Volt Alkaline battery to the battery clip.
Slip the battery into the holder on the backside of the pickup.
Plug It In
Once everything is buttoned up, plug in the banjo and if necessary, adjust the position of the pickup along the rods for best sound. Make sure the pickup is spaced 1/16" from the underside of the head. Very small adjustments will make noticeable changes. Experiment until you find the Sweet Spot - the loudest and clearest position.
Adapter for Banjos with a Single Coordinator Rod
Two adapter blocks can be made to fit the pickup to a banjo with a single coordinator rod. A hard wood such as maple is suitable for the blocks.

- A split block can be made by first drilling a hole one drill size larger than the diameter of the coordinator rod through one of the blocks. Trim the block as thin as possible on the pickup side to minimize offset, and cut in half as per the illustration.
- To provide friction between the clamping surfaces and the rod, take a fine grit open mesh sanding sheet and wrap it around the rod's circumference. Fit the split block around the sanding sheet. If sanding sheet isn't available, glue pieces of 220 grit sandpaper to the drilled surfaces of the block, and fit it around the coordinator rods.
Now cut a solid block, equal in width to the split block fitted in place. This will fit in the other half of the clamp assembly. Note that the rubber strips should be removed from the inside of the clamps when fitting the pickup in this manner. There will now be a small offset between the ideal center of the pickup and the center of the middle foot of the bridge, but the pickup should still function properly. Follow the rest of the instructions for pickup installation.

Documents / ResourcesDownload manual
Here you can download full pdf version of manual, it may contain additional safety instructions, warranty information, FCC rules, etc.
Download Fishman Rare Earth - Banjo Pickup Installation Guide
Advertisement


Need help?
Do you have a question about the Rare Earth and is the answer not in the manual?
Questions and answers