Table of Contents
Advertisement
Quick Links
Advertisement
Table of Contents

Subscribe to Our Youtube Channel
Related Manuals for Abilize ranger


Summary of Contents for Abilize ranger
- Page 1 & Instruction Booklet Product Code: MS03077 & MS03079...
-
Page 2: Table Of Contents
Table of Contents Introduction Important Precautions Safety Warnings & Instruction Labels Identification of Parts Charging the Batteries Troubleshooting Disassembling your Scooter Functions Kondor Cabin Variation Safety Information and Electromagnetic Interference (EMI) Specifications Warranty... - Page 3 Thank you and congratulations on purchasing your new Abilize Mobility Scooter. It is designed to provide you with transportation ability indoors and outdoors. We pride ourselves on providing safe and comfortable products. Our goal is to ensure your complete satisfaction. We sincerely hope you enjoy your Abilize Mobility Scooter.
-
Page 4: Important Precautions
Important Precautions: • Only one person at a time can ride the Scooter. • Maximum load is 181KG / 400 lbs (Ranger), 200KG / 440lbs (Kondor). • Turn key off before getting on or off. • Always drive carefully and be aware of others using the same area. -
Page 5: Safety Warnings & Instruction Labels
Safety Warnings & Instruction Labels The following labels are positioned on your scooter, they communicate important warnings or instructions regarding the safe operation of your scooter. Please carefully read all labels before driving. Please read the instruction booklet carefully before using your scooter. Do not drive the scooter on slippery surfaces or on slopes over 8 degrees. - Page 6 Before attempting to drive this scooter on your own, it is important that you familiarise yourself with the controls and how to operate them. (Please refer to page 20 for Kondor Cabin Scooter’s parts) Wig Wag Captain Seat Hand Brake Angle Armrest Adjustment Tiller Angle Adjustment...
- Page 7 Function of parts: Main key switch (A) • Turn the key to the right to turn the scooter on. • Turn the key to the left to turn the scooter off. CAUTION: Always ensure that the scooter is switched off before getting on or off the scooter and before removing any items from the scooter.
- Page 8 Tiller Storage Compartment (K): Provides you spacious room for storage. Hand Brake (L). Hold brake (L), when immediate stop is required. CAUTION: If you have to brake in an emergency, simply release the Throttle and hold the hand brake which will bring you to a halt! Wigwag Lever Operation: Pull the left-hand drive lever (M) carefully to travel forwards.
- Page 9 Seat Swivel Adjustment: Pull the lever (T) upwards to disengage and rotate seat (P) to required angle, Let go of the lever (T) to lock the seat into its required position. Seat Back Angle Adjustment: Pull the lever (U) upwards to adjust Pull the lever (U) upwards to adjust backrest’s angle, then release the lever when adjusted to required...
-
Page 10: Charging The Batteries
Proportion Speed Reduction: 1. The scooter is equipped with proportional speed reduction. It will automatically reduce speed when encountering a corner, reducing speed corresponding to the angle of turn. 2. For safety reasons, when pushing the scooter by hand, if the pre-determined speed is exceeded, the controller automatically switches on and brakes the scooter. - Page 11 Flash Description Meaning Battery low or The batteries are running low. • Recharge the batteries for a minimum of 12 hours. low battery fault Battery voltage is too high. This may occur if overcharged &/or travelling down a long slope. High battery •...
-
Page 12: Troubleshooting
Troubleshooting: 1. If green indicator is off: • Check AC input. If it works normally, the battery charger may be defective. 2. If green indicator keeps flashing, and won’t give charging indication: • Check if the battery is connected correctly. •... - Page 13 Obstacle climbing: • Your scooter can climb obstacles and curbs of up to 60mm (Ranger) and 100mm (Kondor) in height. Never attempt to overcome an obstacle when on an uphill or downhill gradient. •...
- Page 14 Function Buttons and Indicators: 1. Control Buttons - Hazard Light, Horn, Right Indicator, Headlight, Left Indicator, Turtle(decelerate), H/L Speed, Rabbit(accelerate). 2. LED Indicators - Status Indicator (Green), Headlight Indicator (Green), Left / Right Indicators (Green), High/Low Speed Indicator (Green). 3. Connector - 20PIN. 4.
- Page 15 5. Quit Setup Mode - The user could quit the setup mode with the following conditions. (1) Leave buttons alone for 15 seconds. (2) Press any button of Parking light, Horn, Indicator or Headlight, the definitive settings will be stored and return to normal clock mode. Thermometer: 1.
- Page 16 4. Setup Mode (Unit Change) - Press together for 3 seconds to enter setup mode. While ‘km/h’ / ‘MPH’ is flashing, press to switch to ‘MPH’ / ‘km/h’. The user could quit the setup mode with the following conditions. (1) Leave buttons alone for 15 seconds.
- Page 17 2. Display II for Routine Maintenance - After the routine maintenance is finished, the user could setup the mileage for next maintenance. (Count down setting) Setup steps: 1. Press ‘Mode’ button and switch to ODO mode. 2. Key off to shut down the controller. 3.
- Page 18 Power Indicator 1. Discharge Capacity: 2. Operation Characters - The segments will not increase, only decrease. 3. Low Voltage Warning Tone - When the battery capacity is lower than 30%, the warning tone will sound with 3 short double beeps. 4.
- Page 19 Malfunction Messages 1. Operation Feature - Take the connector pin (KEY) of controller as determinant signal, then converts it into digital codes. 2. Usage Condition - When the controller sends out an error message, (LED) starts flashing and will display the ‘Error message code’ as follows: Battery needs charging soon.
-
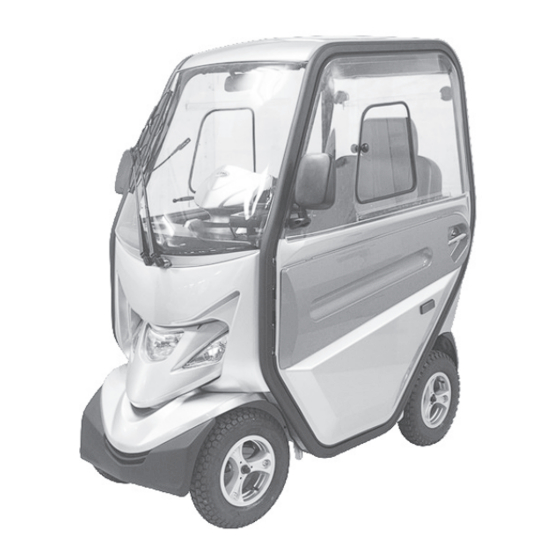
Page 20: Kondor Cabin Variation
Kondor Cabin Variation Before you take your first trip, you should familiarize yourself well with the operation of the scooter and with all operating elements. Take your time to test all functions and driving modes. Interior Rearview Mirror 22” Captain Seat Windshield Wiper Hand Brake Rear Mirror... - Page 21 Interior Rear View Mirror The mirror allows the driver to observe the rearview and eliminate blind spot. Control Windscreen Washer Button (1) Push the red button to spray washer fluid on the windscreen. Windscreen Wiper Knob (2) Turn the knob towards chosen direction to control the speed of the wiper. Turn the knob towards left for lower / towards right for higher speed.
- Page 22 CAUTION: It is very important that you read this information regarding the possible effects of electromagnetic interference on your motorised scooter. Powered wheelchairs and motorised scooters may be susceptible to electromagnetic interference (EMI), which is interfering electromagnetic energy (EM) emitted from sources such a radio stations, TV stations, amateur radio (HAM) transmitters, two-way radios, and mobile phones.
-
Page 23: Electromagnetic Interference (Emi)
Motorised scooter electromagnetic interference: Because EM energy rapidly becomes more intense as one move closer to the transmitting antenna (source), the EM fields from hand-held radio wave sources (transceivers) are of special concern. It is possible to unintentionally bring high levels of EM energy very close to the motorised scooter control system while using these devices. -
Page 24: Specifications
Mechanism & Back Angle Adjustment Seat width 559mm / 22” Motor size 800W, 3650rpm (Ranger) 1000W, 3200rpm (Kondor) Battery size 2 x 12V. 75Ah (Ranger) 2 x 12V. 100Ah Battery weight 68.5kg / 151lbs Travel range 50km/31miles (Ranger) 44km/27miles (Kondor) Battery charger... -
Page 25: Warranty
There is a comprehensive twelve-month warranty from the date on which your new scooter is delivered. The warranty covers the scooter for repairs or replacement during this period. For more details, please see the warranty conditions below. Warranty conditions: • Any work or replacement part installation must be carried out by an authorised service agent.
Need help?
Do you have a question about the ranger and is the answer not in the manual?
Questions and answers