Gree FLEXX24HP230V1AH Instruction Manual
Hide thumbs
Also See for FLEXX24HP230V1AH:
- Service manual (121 pages) ,
- Installation & owner's manual (29 pages) ,
- Installation manual (20 pages)
Advertisement
Quick Links
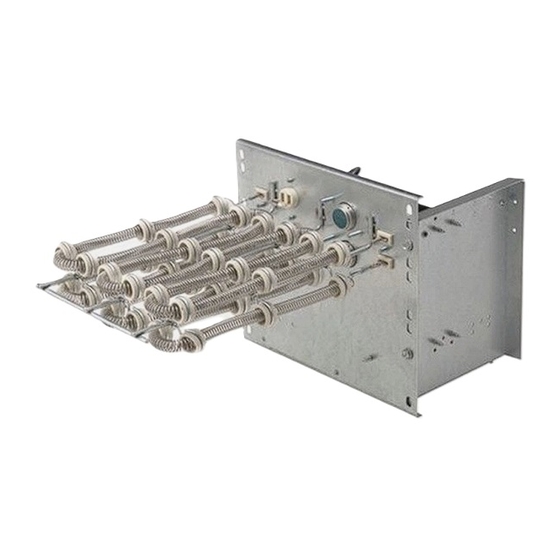
Electric Heater Kit
MODELS:
FLEXX24HP230V1AH&BH
FLEXX36HP230V1AH&BH
FLEXX48HP230V1AH&BH
FLEXX60HP230V1AH&BH
INSTALLATION
MANUAL
Thank you for choosing our product.
Please read this Installation & Owner's Manual carefully before
operation and retain it for future reference.
If you lose this Manual, please contact your local distributor
visit www.greecomcomfort.com/resources now to download an
file the electronic version.
Advertisement

Related Manuals for Gree FLEXX24HP230V1AH


Summary of Contents for Gree FLEXX24HP230V1AH
- Page 1 MODELS: Thank you for choosing our product. Please read this Installation & Owner’s Manual carefully before operation and retain it for future reference. FLEXX24HP230V1AH&BH FLEXX36HP230V1AH&BH If you lose this Manual, please contact your local distributor FLEXX48HP230V1AH&BH visit www.greecomcomfort.com/resources now to download an FLEXX60HP230V1AH&BH...
-
Page 2: Attention Installing Personnel
ATTENTION INSTALLING PERSONNEL Prior to installation, thoroughly familiarize yourself with this Installation Manual. Observe all safety warnings. During installation or repair, caution is to be observed. It is your responsibility to install the product safely and to educate the customer on its safe use. - Page 3 CAUTIONS ENSURE THAT ALL POWER IS DISCONNECTED PRIOR TO ATTEMPTING INSTALLATION OF THIS HEATER KIT. THERE MAY BE MORE THAN ONE DISCONNECT SERVICING THE UNIT. REMOVE LINE VOLTAGE FROM L1 and L2 TERMINALS IN THE CONTROL BOX. FAILURE TO DO SO CAN RESULT IN FIRE. ...
- Page 4 1. Remove the front panel and upper access panel from the air handler. 2. Disassemble the electrical box.
- Page 5 3. Remove the electrical box 4. Disassemble the metal plate at the mounting hole of the electric heater...
- Page 6 5. Install the electric heater to the metal plate position which disassembles in step 4. (Notes: There are two holes circled below which are used to fasten the electric heater bracket during installation)
- Page 7 6. Install breaker (Notes: When installation, you need to lift up the buckle first, hold the breaker bracket and then put down the buckle to fix the breaker) 7. Disconnect line voltage from L1 and L2 terminals if applicable. Connect the electric heater terminal.
- Page 8 8. After installation, the schematic diagram is as follows: 9. Install the electrical box back to the original position 10. Install the front panel and upper panel back to the air handler. Electric heater installation is completed.
- Page 9 Single Point Wiring Kit Installation Remove this middle partition...
- Page 10 Single Point Wiring Kit Installation Attach single point kit...
- Page 11 Single Point Wiring Kit Installation Connect properly sized wire to lugs as shown...
- Page 12 Single Point Wiring Kit Installation Reinstall safety cover Add field-supplied ground lug...
- Page 13 Electric Heater Kits Factory-Installed Breakers Although labeling displaying an amperage rating is present on the factory-installed breakers, they are intended to be used as a service disconnect only. The factory-installed breaker-style service disconnect is not intended to be used as an over-current protection device. The electrical information included on the data plate is used to properly size separate service breakers (i.e.
- Page 14 U.S. CONTACT INFORMATION TRADEWINDS, LLC E-mail: info@twclimate.com Contractor Support: 888-850-7928 | Mon-Fri 8 AM - 5 PM EDT G R E E C O M F O R T . C O M CAT NO: GREE_FLEXX_ELECTRIC_HEATER_KIT_INSTALL_05162023...
Need help?
Do you have a question about the FLEXX24HP230V1AH and is the answer not in the manual?
Questions and answers