Table of Contents
Advertisement
Available languages
Available languages
Quick Links
Advertisement
Table of Contents

Related Manuals for Camp Chef PG24MG


Summary of Contents for Camp Chef PG24MG
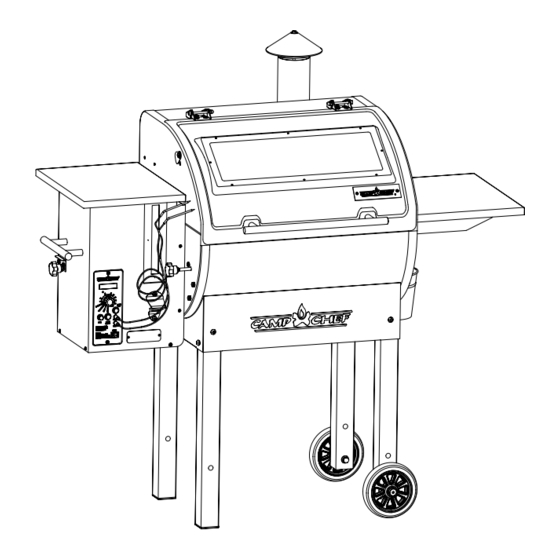
- Page 1 WARNING & INSTRUCTION BOOKLET MODEL NUMBER: PG24MG www.CampChef.com | 1.800.650.2433 • Camp Chef is a registered trademark of Logan Outdoor Products ©2018 • Patent Pending • 3985 N 75 W, Hyde Park, UT 84318, USA • Made in China 0818_PG24MG_Booklet...
-
Page 2: For Outdoor Use Only
Clean the grill by removing all internal Manufacturer. Do Not Use Pellet Fuel Labeled As parts and thoroughly scrape away all grease and Having Additives. Only use Camp Chef Premium creosote from all internal surfaces including the Pellets with the following specifications. 8,000- grease drain and remove debris from the grill. - Page 3 PG24ZG-12 (1) REAR RIGHT LEG PG24-17 (1) ASH CUP PG24ZG-13 (1) FRONT RIGHT LEG PG24ZG-11 (1) LEFT FRONT LEG PG24-66 (2) WHEEL AXLE PG24-69 (2) M10 ACORN NUT (2) LEG PLUG PG24-16 (2) M10 FLAT WASHER (2) WHEEL 0318 PG24MG PARTS...
- Page 5 1. Do NOT leave this appliance unattended while in use. to cook with the lid closed. The user must remain in the immediate area of the 18. Note that the cooking temperature displayed on the product and have a clear view of the product at all times digital readout is measured near the cooking surface on during operation.
-
Page 6: Install Handle
ASSEMBLY INSTRUCTIONS 4. The height of the chimney cap can be adjusted for Remove all loose parts from the inside of the grill and summer and winter. In the summer the gap should be hopper. Lay a blanket or piece of cardboard down to protect approximately 1-1/2”. -
Page 7: Grease Bucket
INSTALL SHELF WARMING RACK AND COOKING GRATE (Optional-Do not install if installing sear box) 1. Install the cooking grate as shown in Fig 10. 1. Install shelf as shown in Fig 6. PG24-1 (1) 2. Tighten all hardware UPPER RACK Fig. -
Page 8: Emptying The Hopper
HOPPER CLEAN-OUT KNOB ASSEMBLY INSTALLATION out of pellets you will need to fill the auger tube. This simply Hand tighten the hopper clean-out knob as shown in Fig 14. means you must fill the auger tube with pellets until pellets reach the burner. - Page 9 selected temperature. HIGH - This setting can be used to achieve temperatures up RAKE to 600F depending on ambient temperatures. DISPLAY “START” - The digital readout will display “START” each time the dial is changed from the OFF, SHUTDOWN, or FEED settings to any of the cook settings.
-
Page 10: Bypass Mode
readout will display the internal temperature of the grill. The turn off. At this point the main power switch should be switched to off. Before grill can be used, the power switch dial can be changed at any time during the startup cycle or must be turned off and back on. -
Page 11: Chimney Cleaning
cook oven chimney of a slow burning fire. As a result, CAUTION creosote residue accumulates on the chimney. When ignited, Do not use meat probes when grill temperature exceeds this creosote makes an extremely hot fire. The chimney 350˚F. Damage to the probes may occur. should be inspected every 50 hours of use, to determine Do not allow meat probe wires to lie in the direct heat when grease and or creosote buildup has occurred. -
Page 12: Limited Warranty
Camp Chef No-Hassle Warranty connected properly to the electronic board under the hopper. Here at Camp Chef we stand by our products and take pride in our 3. Call customer service for a replacement sensor. customer service. Because of this, your new Camp Chef product comes with a No-Hassle Warranty. - Page 13 RTD Sensor Controller White Black 4A 125V 4 amp 125V 5 x 20 MM Power Cord Fast Blow Fuse MOLEX Connector Hot Rod Burner Auger Motor Blower Fan...
- Page 14 CAUTION This device complies with Part 15 of the FCC rules. Operation is subject to the following two conditions: 1 this device may not cause harmful interference, and 2 this device must accept any interference received, including interference that may cause undesired operation. Note: This equipment has been tested and found to comply with the limits for a Class B digital device, pursuant to part 15 of the FCC Rules.
- Page 15 AVERTISSEMENT & INSTRUCTION BROCHURE NUMÉRO DE MODÈLE: PG24MG www.CampChef.com | 1.800.650.2433 • Camp Chef is a registered trademark of Logan Outdoor Products ©2018 • Patent Pending • 3985 N 75 W, Hyde Park, UT 84318, USA • Made in China 0818_PG24MG_Booklet...
- Page 16 NE PAS JETER LA PRÉSENTE NOTICE D’UTILISATION. d’additifs. Utiliser uniquement des granules de bois Camp Chef de première qualité répondant aux AVERTISSEMENT spécifications suivantes : 8 000 à 8 300 BTU/LB 1. Ne jamais faire fonctionner cet appareil sans Taux de cendre de 0,75 à...
- Page 17 PIED DROITE PG24-17 (1) RÉCIPIENT À CENDRES PG24ZG-13 (1) PIED DROITE PG24ZG-11 (1) PIED LA GAUCHE PG24-66 (2) AXE DE ROULETTE PG24-69 (2) M10 ACORN NUT (2) PRISE DE JAMBE PG24-16 (2) RONDELLE PLATE M10 (2) ROULETTE 0318 PG24MG PARTS...
- Page 19 1. NE PAS laisser l’appareil sans surveillance lorsqu’il 15. Ne pas laisser le réservoir à granules se vider fonctionne. L’utilisateur est tenu de rester à proximité du complètement de granules. Les granules peuvent être produit et de garder celui-ci dans son champ de vision ajoutés à...
-
Page 20: Consignes De Montage
inspecté au moins deux fois par an pour déterminer si la Fig. 4. S’assurer que le joint de la cheminée est placé une accumulation de graisse et/ou de créosote s’est entre le barbecue et la cheminée. produite. Si tel est le cas, cette accumulation doit être 2. - Page 21 Installer la poignée de trémie Ne jamais utiliser le barbecue sans y monter le récipient 1. Installez la poignée de la rémie comme indiqué sur la Fig. 4. à cendres. POIGNÉE DE TRÉMIE (1) SEAU DE COLLECTE PGC24-12 DES GRAISSES M6 RONDELLE EN CAOUTCHOUC (2) M6 RONDELLE DE FENDER (2) M6 SERRURE À...
-
Page 22: Nettoyage Du Brûleur
GRILLE SUPÉRIEURE PG24-70 (2) GRILLE DE CUISSON ainsi dans le récipient prévu à cet effet qui se trouve en dessous du barbecue. Il convient d’enlever ensuite PG24-9 (1) le récipient, de le vider et de le remonter avant chaque BURNER PULLOUT KNOB utilisation. - Page 23 et l’écran numérique affichera « FEED ». La vis sans fin EXPLICATION DU BOUTON DE COMMANDE INTERRUPTEUR restera allumée pendant 7 minutes maximum. Il s’agit d’un Celui-ci est utilisé pour raccorder l’alimentation principale temps largement suffisant pour permettre aux granules au barbecue à...
- Page 24 température sélectionnée. HIGH - Ce réglage permet d’atteindre des températures CUISSON pouvant atteindre 315°C (600°F) suivant la température Lorsque la cavité de la vis sans fin est bien remplie, vous ambiante. pouvez commencer à cuisiner en sélectionnant l’une des AFFICHAGE températures de cuisson.
- Page 25 la nourriture. Raccorder le connecteur dans le réceptacle Fig. 18 situé à l’avant du panneau de commande. Lorsque vous appuyez sur le bouton vert de la température de la sonde à l’avant du panneau de commande, l’écran numérique affichera la température de la nourriture. Enfoncer le bouton une deuxième fois permettra la température de de réafficher...
- Page 26 moins deux fois par an pour déterminer si une accumulation AVERTISSEMENT de graisse ou de créosote s’est produite. Si tel est le Une utilisation normale créera une accumulation de cas, cette accumulation doit être enlevée pour réduire cendres, de graisse et de créosote dans le gril. Le gril doit le risque d’incendie.
-
Page 27: Garantie Limitée
1. Appuyer sur la touche de la température de la sonde. Lorsque vous appuyez sur la touche de la température La responsabilité de Camp Chef prend fin au moment de l’expiration de la présente Garantie. Il n’existe aucune autre garantie expresse ou tacite. - Page 28 MISE EN GARDE Cet appareil est conforme à la partie 15 des règles FCC. Son fonctionnement est soumis aux deux conditions suivantes: 1 cet appareil ne doit pas provoquer d’interférences nuisibles et 2 cet appareil doit accepter toute interférence reçue, y compris les interférences pouvant entraîner un fonctionnement indésirable.
Need help?
Do you have a question about the PG24MG and is the answer not in the manual?
Questions and answers