Crestron UC-SB1 Quick Start Manual
Uc video conference smart soundbar
Hide thumbs
Also See for UC-SB1:
- Quick start (2 pages) ,
- Quick start manual (2 pages) ,
- Getting started (2 pages)
Advertisement
Quick Links
UC-SB1
UC Video Conference Smart Soundbar
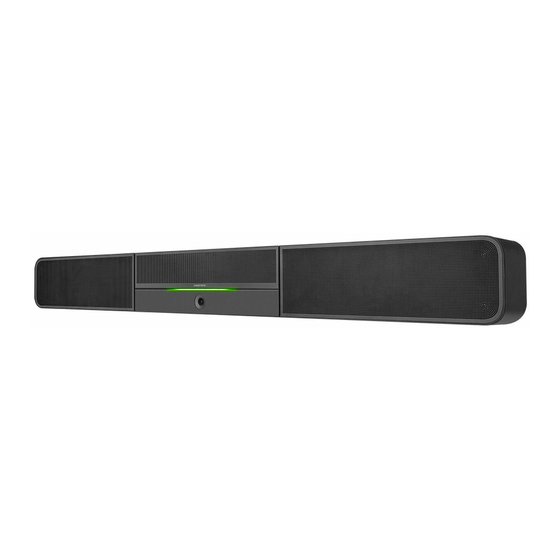
The Crestron®
UC-SB1
UC Video Conference Smart Soundbar is a
front-of-room device that eliminates the need to install additional
microphones or speakers in a conference space. It can be placed on a
credenza beneath the room display(s) or mounted on a wall.
In the Box
1
UC-SB1, UC Video Conference Smart Soundbar
Additional Items
4
Anchor, Drywall, Plastic, 3/8 in. x 1/2 in. (2052565)
1
Cable, USB 3.0, A - B, 6 ft (1.83 m) (2053077)
2
Foot, 2.3 in. x 0.96 in. x 0.15 in., Rubber (2052169)
1
Key, Anchor (4529654)
1
Power Cord, 5 ft 10 in. (1.78 m) (2042043)
1
Power Pack, 24 VDC, 2.5 A, 100-240 VAC (2045873)
4
Screw, 8-AB x 1-1/2 in., Pan Head, Combo (2052567)
1
Template, Overlay (4529513)
Quick Start
1
Advertisement

Related Manuals for Crestron UC-SB1


Summary of Contents for Crestron UC-SB1
- Page 1 It can be placed on a credenza beneath the room display(s) or mounted on a wall. In the Box UC-SB1, UC Video Conference Smart Soundbar Additional Items Anchor, Drywall, Plastic, 3/8 in. x 1/2 in. (2052565) Cable, USB 3.0, A - B, 6 ft (1.83 m) (2053077)
- Page 2 Quick Start UC-SB1 UC Video Conference Smart Soundbar Install The soundbar can be placed on a flat surface or mounted on a wall. The soundbar has the following dimensions. Place on a Flat Surface If the soundbar is to be placed on a flat surface, attach the included rubber feet to the bottom of the soundbar as shown.
-
Page 3: Mount On A Wall
Quick Start UC-SB1 UC Video Conference Smart Soundbar Mount on a Wall The soundbar includes anchors that are suitable for mounting it on sheetrock walls up to 1/2 in. (13 mm) thickness. Masonry and other materials may require additional installer-supplied mounting hardware. - Page 4 Quick Start UC-SB1 UC Video Conference Smart Soundbar 3. Use a drywall saw to make a cutout in the wall for the soundbar cables. NOTE: The cutout in the center of the template provides adequate access for all of the required cabling.
- Page 5 Quick Start UC-SB1 UC Video Conference Smart Soundbar 6. Place the wall bracket over the screws, and hand tighten the screws until the wall bracket is secured to the wall. 7. Route the cables through the cable cutout, and connect the cables as described in Connect.
- Page 6 Quick Start UC-SB1 UC Video Conference Smart Soundbar Connect Make the necessary connections as called out in the following diagram. Connect power last. PC: Connect the included USB cable to the PC port and to a USB port on the computer. For optimal results, use a USB 3.0 connection.
-
Page 7: Operation
Quick Start UC-SB1 UC Video Conference Smart Soundbar Complete Operation Once all connections are made, pivot the soundbar up to the wall bracket Status until the soundbar locks into place. The front panel status bar illuminates to provide operational information. A green status bar indicates the volume level. Raising the volume increases the status bar's illumination. -
Page 8: System Control
Quick Start UC-SB1 UC Video Conference Smart Soundbar Muting the microphone turns the center of the status bar red. Visit the Product Page Scan the QR code to visit the product page. UC-SB1 www.crestron.com/model/6511280 System Control The soundbar can be used in a BYOD scenario where the soundbar is connected to an end-user’s PC over USB. - Page 9 Crestron disclaims any proprietary interest in the marks and names of others. Crestron is not responsible for errors in typography or photography.
Need help?
Do you have a question about the UC-SB1 and is the answer not in the manual?
Questions and answers