Zircon StudSensor Pro SL-AC - Stud Finder Manual
- Manual (1 page) ,
- Quick start manual (3 pages)
Advertisement
- 1 INTRODUCTION
- 2 NAMES AND FUNCTIONS
- 3 INSTALLING THE BATTERY
- 4 CALIBRATION AND SCANNING IN STUD SCAN OR DEEPSCAN MODES
- 5 CONTINUOUS AC VOLTAGE DETECTION (WireWarning )
- 6 OPERATING CAUTIONS
- 7 WORKING WITH DIFFERENT MATERIALS
- 8 HELPFUL HINTS
- 9 FCC Part 15 Class B Registration Warning
- 10 Documents / Resources
INTRODUCTION
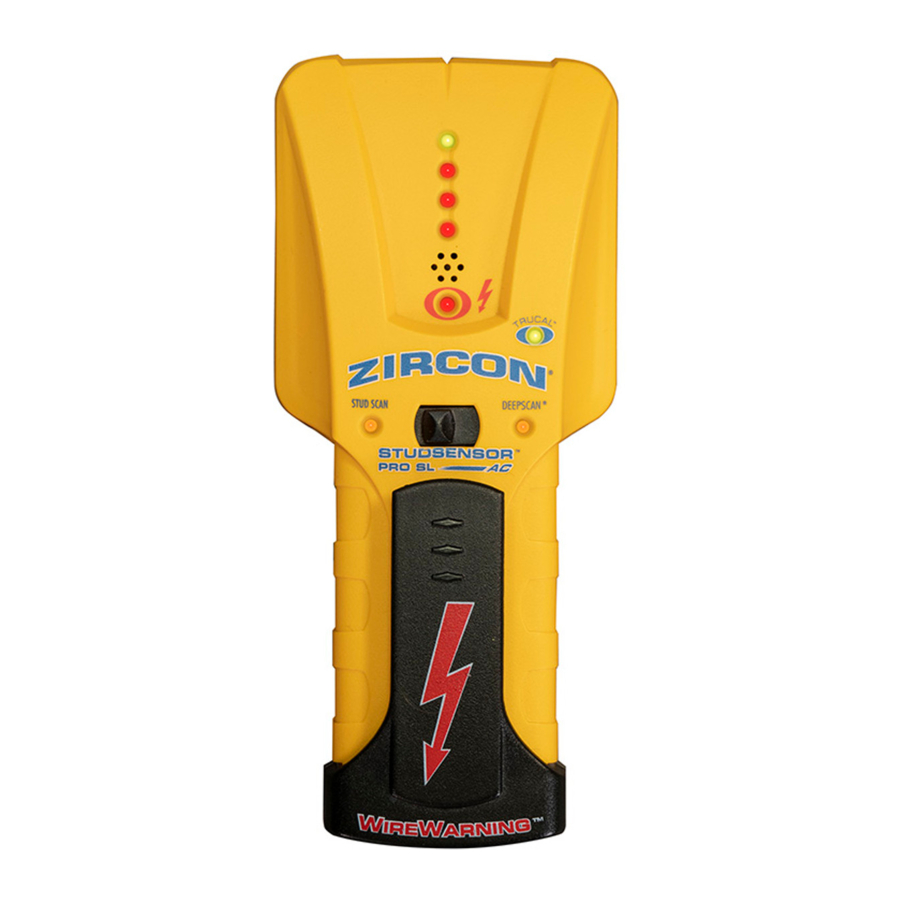
The Zircon StudSensor ™ Pro SL-AC detects wood and metal studs and joists in walls, floors, and ceilings. It features two scanning modes, recessed LEDs, a durable high-impact case, and the patented SpotLite ® Pointing System. It also has WireWarning ™ to continuously detect hot AC voltage in both modes.
NAMES AND FUNCTIONS

INSTALLING THE BATTERY
- Squeeze sides of 1 clip to help release clip end.
![]()
- Slide 9-V battery into compartment, terminal side first, matching (+) and (–) terminals from battery to case.
![]()
- Replace the clip. 3 Battery will last approximately two years under normal conditions.
![]()


CALIBRATION AND SCANNING IN STUD SCAN OR DEEPSCAN ® MODES
 Note: Unit calibrates on each use. Use Stud Scan Mode for depths to about ⁄ 3 4 in. (19 mm) and DeepScan for depths up to 1 1 ⁄ 2 in. (38 mm) or double layers.
Note: Keep unit flat against wall. Do not lift or tilt unit during calibration or scanning.
- Slide the Mode Selector switch to the desired scanning mode. The mode can be selected with the unit on or off.
- With StudSensor Pro SL-AC turned off, position the unit flat against the wall.
![]()
- Without moving unit, squeeze and hold On/Off button. TruCal® LED should be lit.
![]()
- Continue to hold in the On/Off button then slowly slide unit horizontally across the wall, right or left.
![]()
- As you begin to approach a stud, the red LEDs will light successively, from bottom to top.
- When the top green LED is lit, a steady tone sounds, and the SpotLite ® shines, you have located the edge of the stud. Mark this spot.
![]()
- Continue scanning beyond marked spot until green LED goes out. Slide unit in reverse direction to locate other edge of stud.
![]()
- Mark this second spot. Middle of stud is centered between the two marks.
![]()


CONTINUOUS AC VOLTAGE DETECTION (WireWarning ™ )
- The StudSensor Pro SL-AC detects from 90 to 250 V at 50 to 60 Hz AC in a hot electrical wire. The voltage detection feature works continuously in both Stud Scan and DeepScan modes. When sensing voltage, the small AC light comes on.
![]()


The StudSensor Pro SL-AC will not detect hot wires inside metal pipe or conduit, behind metallic wall covering, or behind some plywood or other dense materials. Use extra caution in these situations. Always turn the power off when nailing, cutting, or drilling near electrical wires.
OPERATING CAUTIONS
- Depending on the proximity of electrical wiring or pipes to the wall surface, the scanner may detect them in the same manner as studs. Caution should always be used when nailing, cutting, or drilling in walls, floors, and ceilings that may contain these items.
To avoid surprises, remember that studs or joists are normally spaced 16 in. (406 mm) or 24 in. (610 mm) apart and are 1 1 ⁄ 2 in. (38 mm) in width. Anything closer together or a different width may not be a stud, joist, or firebreak. Always turn off the power ar electrical wires.
WORKING WITH DIFFERENT MATERIALS
StudSensor Pro SL-AC is for use on dry, interior walls only. Although StudSensor Pro SL-AC can scan through up to 11⁄2 in. (38 mm) of common construction materials in DeepScan mode, three primary factors can affect sensing depth: thickness, density, and moisture content.
StudSensor Pro SL-AC can scan effectively through most sheet materials, including:
- Bare wood flooring (in DeepScan mode)
- Linoleum on wood base
- Gypsum drywall over plywood sheathing
- Wallpapered walls (if dry)
- Textured ceilings if uniform thickness (Place a thin piece of cardboard on ceiling and scan through it to avoid damage to texturing.)
StudSensor Pro SL-AC is not designed to scan materials with inconsistent density such as:
- Ceramic floor tile
- Carpeting and padding
- Wallpaper with metallic fibers
- Freshly painted walls that are still damp (must dry at least a week)
- Lath and plaster walls
- Foil covered insulation board
HELPFUL HINTS
| Situation | Probable Causes | Solutions |
| Lights start flashing and unit starts beeping. |
|
|
| Center green LED doesn't light in Stud Scan mode. |
|
|
| The green TruCal LED lights but, when scanning, unit doesn't do anything else. |
|
|
| All three red LEDs and green LED light at the same time and unit beeps continuously. |
|
|
| Working in DeepScan mode and can't detect studs. |
|
|
| Detects other objects besides studs. |
|
|
| You suspect electrical wires, but do not detect any. |
|
|
| Area of voltage detection is too large. | • Static charge may develop on drywall, spreading voltage detection as much as 12 in. (305 mm) from each side of an actual electrical wire. | • To narrow detection, turn unit off and on again at the edge of where wire was detected and scan again. |
| Questions? Check our Web site at www.zircon.com and click "Support." | ||
FCC Part 15 Class B Registration Warning
This equipment has been tested and found to comply with the limits for a Class B digital device, pursuant to Part 15 of FCC Rules. These limits are designed to provide reasonable protection against harmful interference when the equipment is operated in a residential installation.
This equipment generates, uses, and can radiate radio frequency energy and, if not installed and used in accordance with the instructions, may cause harmful interference to radio communications. However, there is no guarantee that interference will not occur in a particular installation. If this equipment does cause harmful interference to radio or television reception, which can be determined by turning the equipment off and on, the user is encouraged to try to correct the interference by one or more of the following measures:
- Reorient or relocate the receiving antenna.
- Increase the separation between the equipment and receiver.
- Connect the equipment into an outlet on a circuit, different from that which the receiver is connected (if applicable).
- Consult the dealer or an experienced radio/TV technician for help.

Documents / Resources
References
Download manual
Here you can download full pdf version of manual, it may contain additional safety instructions, warranty information, FCC rules, etc.
Advertisement


Need help?
Do you have a question about the StudSensor Pro SL-AC and is the answer not in the manual?
Questions and answers