
Subscribe to Our Youtube Channel
Related Manuals for Broyhill THORNWOOD


Summary of Contents for Broyhill THORNWOOD
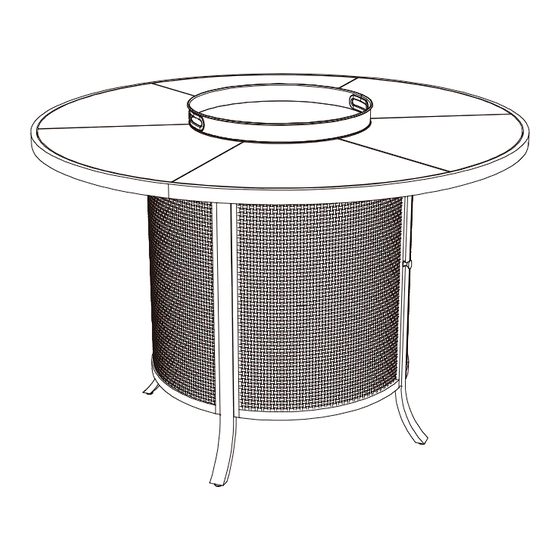
- Page 1 ASSEMBLY INSTRUCTIONS ITEM#: A208028302 SKU#: 810493509 THORNWOOD HIGH DINING FIRE PIT TABLE 1(866) 578-6569 Need help? We are here for you! Toll Free...
- Page 2 For Outdoor Use Only. WARNING: Leave this manual with the INSTALLER: Installation and service must be performed by a appliance. qualified installer, service agency, or the gas Retain this manual for future CONSUMER: supplier. reference. DANGER FIRE OR EXPLOSION HAZARD If you smell gas: 1.
-
Page 3: Table Of Contents
TABLE OF CONTENTS General information - - - - - - - - - - - - - - - - - - - - - - - - - - - - - - - - - - - - - - - - - - - - - - - - - - - - - - - - - - - - - - - - - - - - - - - - - - - 3 Specification - - - - - - - - - - - - - - - - - - - - - - - - - - - - - - - - - - - - - - - - - - - - - - - - - - - - - - - - - - - - - - - - - - - - - - - - - - - - - - - - - 4 Important safety information and precaution... -
Page 4: Specification
SPECIFICATION Product name THORNWOOD HIGH DINING FIRE PIT TABLE A208028302 Model NO. Rated Heat Output 38,000 BTU/HR Fuel Propane - LP Gas Supply 20 lb. LP - Gas cylinder Manifold Pressure 11 Inches W.C. Orifice Size (diameter) 1.9mm Gas Supply Pressure Max. - Page 5 • Open the door and inspect the hose assembly and burner prior to each use. If there is evidence of excessive abrasion or wear or if the hose or burner is damaged, it must be replaced by appropriate part from the manufacturer. •...
-
Page 6: Expanded View
EXPANDED VIEW 6/20... -
Page 7: Parts List
Parts List Label Part Number Description Part Image P003100109 P002100402 Table top P002500130 Fire bowl P004000269 Rear door P003800460 Side panel 1 P003800461 Side panel 2 P004100138 Door P006700063 Cylinder rack P006600048 Lava rock 7/20... - Page 8 Hardware Pack Label Part Number Description Part Image If you want to replace the parts listed, please contact Customer Service Center: 1(866) 578-6569. 8/20...
-
Page 9: Installation
STEP 1 Attached Side panel 1(E) to Rear door(D) with Bolt(AA) and Flat washer(BB),tighten the bolts to 80% depth with Wrench(CC). 9/20... - Page 10 STEP 2 Attached Side panel 2(F) to Rear door(D) with Bolt(AA) and Flat washer(BB), tighten the bolts to 80% depth with Wrench(CC). 10/20...
- Page 11 STEP 3 Attached Cylinder rack (H) to the assembled Side panel(E/F) with Bolt(AA) and Flat washer(BB), tighten the bolts to 80% depth with Wrench(CC). 11/20...
- Page 12 STEP 4 Attached Door(G) to the assembled Side panel(E/F) with Bolt(AA) and Flat washer(BB), tighten the bolts to 80% depth with Wrench(CC). 12/20...
- Page 13 STEP 5 Attached Fire bowl(C) to the Table top(B) with Bolt(AA) and Flat washer(BB), tighten with Wrench(CC). 13/20...
- Page 14 STEP 6 Attached the assembled table body(D/E/F/ G) to the assembled table top(B) with Bolt(AA) and Flat washer(BB), tighten the bolts to 100% depth with Wrench(CC) at last . Please note the control knob should face the door. 14/20...
- Page 15 STEP 7 Pour the Lava Rock(I) into the Bowl(C), put the Lid(A) on. 15/20...
-
Page 16: Location
LOCATION Your Gas appliance must be installed on a flat, stable surface, away from any combustible materials or construction. SET - UP Your Gas appliance comes assembled, ready for a Gas connection. 1 - Remove the appliance from container box and place it on any level, outdoor, non-combustible surface. -
Page 17: Operation
OPERATION: LEAK TEST !!!WARNING!!! ・ Do not use an open flame to check for leaks. ・ Do not amoke during testing. ・ Do not test indoors. ・ A leak check must be performed whenever the gas cylinder is replaced. 1 - Make sure the control knob is in the “OFF” position. 2 - Make sure the gas cylinder is correctly and securely connected to the pressure regulator, without over tightening. -
Page 18: Storage And Maintenance
NOTE: While in use, the burner flame should be mainly blue in appearance with a small amount of yellow. The flame can be identified by the following figure. Warning: Lighting the Fire Pit improperly could lead to an unsafe condition. 7 - Press in and turn the control valve knob clockwise to OFF to shut down fireplace. -
Page 19: Trouble Shooting
TROUBLE SHOOTING: PROBLEM OBSERVED POSSIBLE CAUSE CORRECTIVE MEASURES Gas odor Gas leak See “If you smell gas:” on front cover of manual Check all gas connections Delayed ignition Low gas pressure Check gas supply pressure Clean burner ports-see manual Clogged or dirty burner section ports Blocked orifice Check orifice opening... - Page 20 Parts List Label Part Number Description Part Image P003100103 Mesh screen Note: Remove the lid and put the protective mesh screen over your burner and lava rock when in use! CAUTION: Please be advised that this fire pit table uses natural lava rock that may crackle or pop when it is used.
Need help?
Do you have a question about the THORNWOOD and is the answer not in the manual?
Questions and answers
I'm not getting any spark to light the fire
The document does not provide a specific reason for no spark to light the fire on the Broyhill Thornwood. However, a possible cause could be a missing or dead 1.5V AA battery, which is required for ignition and not included.
This answer is automatically generated