Advertisement
- 1 MAIN FEATURES: WEATHER STATION
- 2 TRANSMITTER
- 3 MANUAL TIME SETTING
- 4 ALARM AND SNOOZE SETTING
- 5 USING ALARM & TEMPERATURE PRE-ALARM FUNCTIONS
- 6 READING INDOOR/OUTDOOR TEMPERATURE RECORDS
- 7 CHECKING AND DELETING MAX/MIN TEMPERATURE RECORDS
- 8 VIEWING THE CHANNEL
- 9 USING THE PROJECTOR
- 10 TEMPERATURE TREND
- 11 LOW BATTERY INDICATOR
- 12 SPECIFICATION
- 13 Documents / Resources
MAIN FEATURES: WEATHER STATION

- SNOOZE/LIGHT key:
- Turn on the projector and backlight for 5 seconds.
- Stop the current alarm when it is sounding and enter into snooze mode.
- TIME WINDOW:
- Displays normal time and day of the week.
- DATE AND TEMPERATURE WINDOW:
- Shows indoor/outdoor temperature, alarm time and the date
- TIME key:
- Press it to switch between Month/Date and alarm time mode.
- Press and hold it for 2 seconds to enter normal time setting.
- In normal time setting, press it to step the setting items.
- ALARM key
- In normal time display, press it to turn on/off ALM1 & ALM2.
- In ALM1 / ALM2 mode, press it to turn on/off alarm and pre-alarm function.
- Press it to stop the current alarm when the bell is ringing and turn off the alarm and snooze function.
- In alarm time mode, press and hold it for 2 seconds to enter alarm time setting.
- In alarm time setting, press it to step the setting items.
- UP key
- In setting mode, press it to increase the setting values.
- In normal time mode, press it to switch among Channel 1, 2 and 3.
- DOWN key
- In setting mode, press it to decrease the setting values.
- In normal time mode, press it to switch among 12/24 hour format.
- MAX/MIN key
- Press it to check the minimum and maximum temperature records.
- PROJECTOR
- Project the time and indoor/outdoor temperature (automatically switch between indoor and outdoor temperature in every 5 seconds. )
- REVERSE key
- Press it to reverse the projected date.
- FOCUS knob
- Adjust the quality of the projected date.
- DC JACK
- To power the unit.
- RECEIVE key
- Press it to receive the RC signal for reception testing.
- °C/°F key
- Press it to switch between Celsius and Fahrenheit.
- NIGHT LIGHT FUNCTION ON/OFF switch
- Slide it to turn on/off the night light function.
- NIGHT LIGHT SENSOR
- Turn on the function, the night light will turn on automatically in dark environment.
- RESET key
- Press it to reset all values to default values.
- In case of malfunction, the unit may be required to reset.
- BATTERY COMPARTMENT:
- Accommodates 3 x AA size batteries (alkaline batteries recommended).
TRANSMITTER

- LED indicator:
- Flashes when the remote unit transmits a reading.
- CHANNEL SLIDE SWITCH:
- Assign the transmitter to Channel 1, 2 or 3.
- RESET:
- Press it to restart the transmitter.
- BATTERY COMPARTMENT:
- Accommodates 2 x AA size batteries.
- BATTERY DOOR
- WALL-MOUNTING HOLDER:
- Use it to support the transmitter on the wall.
- TABLE STAND:
- Use it to stand the transmitter on the desktop.
BEFORE USING THE TRANSMITTER
- Remove the battery door.
- Insert 2 x AA size batteries into the battery compartment. Make sure you insert them the right way according to the polarity information marked on the battery compartment.
- Replace the battery door.
 NOTE:
NOTE:
- Once the channel is assigned to one transmitter, you can only change it by removing the batteries or resetting the unit.
- Avoid placing the transmitter in direct sunlight, rain or snow.
WEATHER STATION
- If using the DC Adaptor to power the clock, plug the adaptor into the DC jack. If using battery, remove the battery door and insert 3 x AA batteries into the battery compartment. Make sure you insert the batteries the right way according to the polarity information marked on the battery compartment.
- Replace the battery door.
- Press the "RESET" key to re-start the clock and it will synchronize the channels of transmitter automatically.
NOTE:
- The building material and the position of the receiver and transmitter affect the effective range. So try various locations to obtain the best result.
- Place the units away from metal objects and electrical appliances to minimize the interference. Position the receiver and transmitter within the effective transmission range: 80m in usual circumstances.
RECEPTION OF RADIO CONTROLLED TIME SIGNAL
The time and date are radio-controlled. The current time and date are automatically synchronized with the time signal transmitted from Germany (DCF 77)/U.K. (MSF)/ USA(WWVB).
When used for the first time (after inserting the batteries or pressing the "RESET" key), the clock will start to receive the RC signal in 5 minutes with the signal strength indicator flashing.
SIGNAL STRENGTH INDICATOR
The signal indicator displays signal strength in 4 levels. Wave segment flashing means time signals are being received. The signal quality could be classified into four types:

No signal quality

Weak signal quality

Acceptable signal quality

Excellent signal quality
NOTE:
- Everyday the unit will automatically search for the time signal at 2:00, 8:00, 14:00 and 20:00.
- Always place the unit away from interfering sources such as TV set, computer, etc.
- Avoid placing the unit on or next to metal plate.
- Closed area such as airport, basement, tower block or factory is not recommended.
- Do not start reception on a moving article such as vehicle or train.


MANUAL TIME SETTING
If you are out of the reach of the Radio Controlled Transmitter or if the reception is not reachable, the time can be set manually. As soon as the transmitter is received again, the clock will automatically synchronize with received time.
MSF/DCF Version:
- In normal time mode, press and hold "TIME" key for 2 seconds until the Year digit flashes.
- Press "UP" or "DOWN" key to change its value.
- Press "TIME" key again, Month digit flashes, press "UP" or "DOWN" key to change its value.
- Repeat the above operation to set the time in this order: Year > Month > Date > Hour > Minute > Second > Day Language.
- Press "TIME" key to save and exit the setting or let it exit automatically 30 seconds later without pressing any key.
WWVB Version:
- In normal time mode, press and hold "TIME" key for 2 seconds until the Time zone map flashes.
- Press "UP" or "DOWN" key to select the proper time zone.
- Press "TIME" key again, Year digit flashes, press "UP" or "DOWN" key to change its value.
- Repeat the above operation to set the time in this order: Time zone map > Year > Month > Date > DST ON/OFF > Hour > Minute > Second > Day Language.
- Press "TIME" key to save and exit the setting or let it exit automatically 30 seconds later without pressing any key.
ALARM AND SNOOZE SETTING
- In normal time mode, press "TIME" key to select the ALM1 or ALM2.
- In ALM1/ALM2 mode, press and hold "ALARM" key for 2 seconds until alarm Hour digit flashes.
- Press "UP" or "DOWN" key to change the value.
- Repeat the above operations to set time in this order: Hour > Minute
- Press "ALARM" key to save and exit the setting, or let it exit automatically 30 seconds later without pressing any key.
NOTE:
- The alarm will be automatically turned on when you set the alarm time with the icon "
![]() " or "
" or "![]() " displayed.
" displayed. - The dual-alarm (ALM1&ALM2) design of this unit will provide you with more convenience, and you can set two-alarm time if needed.
 " or "
 " displayed.
USING ALARM & TEMPERATURE PRE-ALARM FUNCTIONS
- Set the alarm time as described in the previous section.
- In normal time mode, press "ALARM " key once to turn on ALM1, press it twice to turn on ALM2, press it thrice to turn on both ALM1 and ALM2, with the bell icons display on the LCD. Press it again to turn off both ALM1 and ALM2, with the icons disappear.
- In ALM1/ALM2 mode, press alarm key once to turn on ALM1/ALM2, press it twice to turn on pre-alarm function, with the icon "
![]() " displays on the LCD. Press it again to turn off both alarm and pre-alarm functions, with the icons disappear.
" displays on the LCD. Press it again to turn off both alarm and pre-alarm functions, with the icons disappear.
NOTE:
- To turn on temperature pre-alarm, ALARM must be on.
- The temperature pre-alarm can sound 30 minutes earlier than the alarm only when the outdoor temperature is below -3°C (26°F).
- If no key is pressed during the alarm period, the alarm will turn off automatically. You can also press "SNOOZE/ LIGHT" key to stop the current alarm and enter the snooze mode. With the bell icon keep flashing.
- Once the snooze function is turned on, the 4-step crescendo alarm will sound in 5-minute interval. The alarm duration is 120 seconds.
- The snooze function won't stop unless you press "ALARM" key to turn off the alarm and snooze function.
READING INDOOR/OUTDOOR TEMPERATURE RECORDS
Change the temperature unit to °C for Celsius or °F for Fahrenheit by pressing "°C/°F" key.
NOTE:
- If no signals are received or the transmission is interfered, "—" will appear on the LCD.
- Relocated the clock or transmitter in other positions and make sure the transmission is within the effective range of 80m approx.
- After several trails in vain, please reset the clock thoroughly. Try out where your multifunctional alarm clock receives the signals best.
CHECKING AND DELETING MAX/MIN TEMPERATURE RECORDS
- Press "MAX/MIN" key once to check the maximum temperature records. Press it twice to check the minimum records. Press it again to exit.
- Press and hold "MAX/MIN" for 3 seconds to delete the maximum and minimum temperature records, with "beep" tone.
MAX temperature record:
 |  |
MIN temperature record:
 |  |
VIEWING THE CHANNEL
The default channel is Channel 1. In normal time mode, press "UP" key to view the channels from 1 to 3. Besides, the channels can automatically switch by pressing and holding the "UP" key for 2 seconds, with "beep" tone.
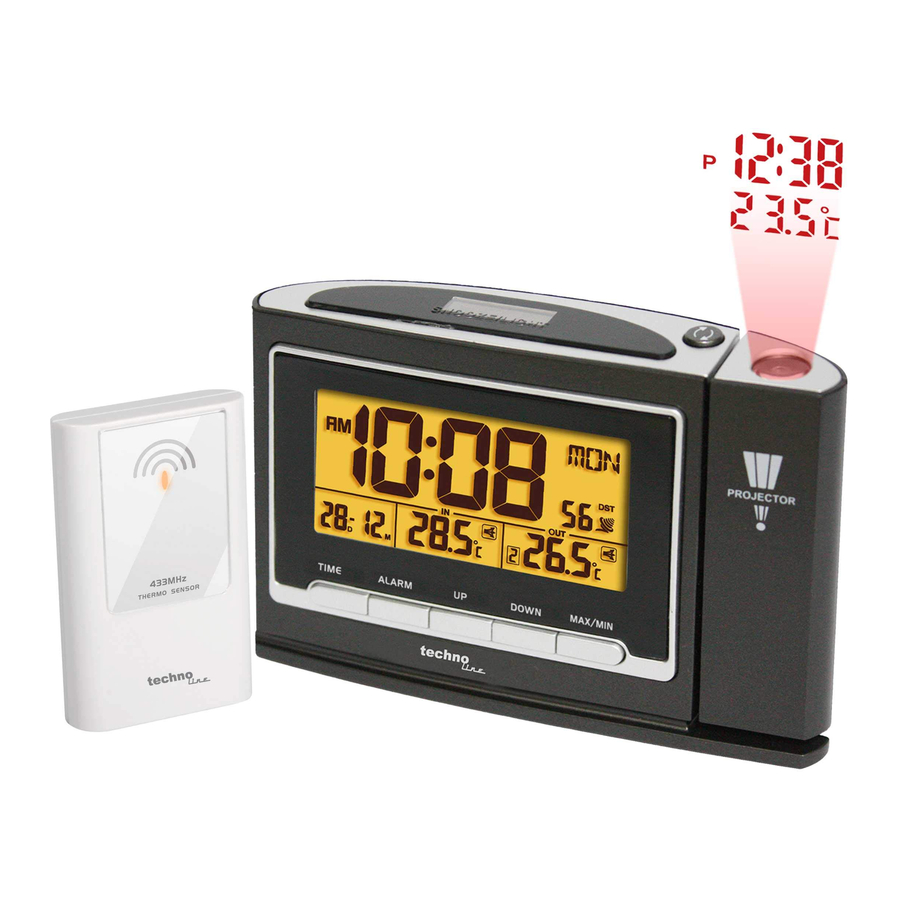
USING THE PROJECTOR
Press the SNOOZE/LIGHT key to turn the projector on, rotate the projector to project the light beam to a dark background within 1-4 meters, the projected data will be displayed on the dark background as following diagram.

Note:
- Press the SNOOZE/LIGHT key once, back light and the projection last for 5 seconds, then press the "
![]() " key will reverse the projected data.
" key will reverse the projected data. - If using DC power, the projected data will be always on.
- The rotate angle of the projector is ±90º.
- Adjust the quality of the projected data by adjusting the FOCUS knob.
TEMPERATURE TREND
The temperature-trend indicator shows the trends of changes in the forthcoming few minutes. Arrows indicate a rising, steady or falling trend.
| Arrow indicator |  |  |  |
| Pressure trend | Rising | Steady | Falling |
LOW BATTERY INDICATOR
When the LCD becomes dim, replace with 3 x AA size batteries at once; while if the low battery indicator "![]() " displays in the outdoor temperature window, it indicates that the battery power of the transmitter is not enough, and you should replace with 2 x AA size batteries at once.
" displays in the outdoor temperature window, it indicates that the battery power of the transmitter is not enough, and you should replace with 2 x AA size batteries at once.
NOTE:
Attention! Please dispose of used unit or batteries in an ecologically safe manner.
Transmitter's low battery indicator

SPECIFICATION
MAIN UNIT
| Operating range: | -5°C~50°C 23°F~122°F |
| Resolution: | 0.1°C/°F (above -10°C/32°F) 1°C/°F (below -10°C/32°F) |
| Radio controlled signal: | WWVB/DCF/MSF |
REMOTE SENSOR
| Operating range: | -20°C~60°C -4°F~140°F |
| Resolution: | 0.1°C/°F (above -10°C/32°F) 1°C/°F (below -10°C/32°F) |
| RF transmission frequency: | 433MHz |
| No. of remote sensor: | up to 3 units |
| RF transmission range: | maximum 50 meters |
| Temperature sensing cycle: | around 60-64 seconds |
POWER
| Main unit: | 4.5V, use 3 x AA 1.5V |
| Remote sensor: | 3V, use 2 x AA 1.5V |
DIMENSION
| Main unit: | 136(W) x 91(H) x 40(D) mm |
| Remote sensor: | 65(W) x 115(H) x 20(D) mm |

Documents / ResourcesDownload manual
Here you can download full pdf version of manual, it may contain additional safety instructions, warranty information, FCC rules, etc.
Download Techno Line WT 529 - Radio Controlled Alarm Clock Manual
Advertisement


Need help?
Do you have a question about the WT 529 and is the answer not in the manual?
Questions and answers