Table of Contents
Advertisement
Available languages
Available languages
Quick Links
Advertisement
Table of Contents

Related Manuals for Techno Line WQ 296


Summary of Contents for Techno Line WQ 296
- Page 1 Bedienungsanleitung WQ 296...
-
Page 2: Installation
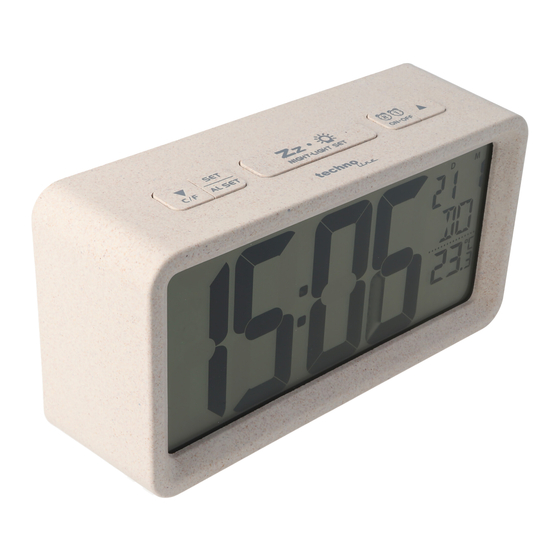
ÜBERSICHT A1 – PM Anzeige A2 – Nachtlicht An Symbol A3 – Uhrzeitanzeige A4 – Datum / Monat A5 – Wochentag A6 – Innentemperatur A7 – Alarm 2 Symbol A8 – Alarm 1 Symbol B1 – Down / °C/°F Taste B2 –... - Page 3 erneut, die Minutenanzeige “00” blinkt. Drücken 2. Drücken Sie oder um die Minuten einzustellen. Halten Sie die oder Taste will um die Einstellung zu beschleunigen. erneut, “24Hr” blinkt, drücken Sie 3. Drücken Sie oder zwischen dem 24Hr 12Hr Modus auszuwählen. Im 12Hr Modus wird PM nachmittags auf dem Display angezeigt.
- Page 4 Taste die Alarm 1 Stunde “6” blinkt. Drücken Sie 2. Halten Sie oder um die Alarmstunde einzustellen. Halten Sie die oder Taste will um die Einstellung zu beschleunigen erneut einmal, die Alarm 1-Minute “00” blinkt. 3. Drücken Sie Drücken Sie oder um die Alarmminuten einzustellen.
- Page 5 ALARM STOPPEN ZURÜCKSETZEN, DAMIT NÄCHSTEN TAG KLINGELT Wenn Alarm 1 oder 2 ertönt, blinkt das entsprechende Alarmsymbol.. Drücken Sie einmal um den Alarm zu stoppen und ihn auf den nächsten Tag zurückzusetzen.. Danach bleiben und/oder dem Display angezeigt. SCHLUMMERFUNKTION AKTIVIEREN Wenn der Alarm ertönt, drücken Sie einmal, der Alarm verstummt und klingelt erneut nach der eingestellten Schlummerzeit.
-
Page 6: Fehlerbehebung
Liegt die eingestellte Zeit für den Start der Nachtlichtfunktion vor der aktuellen Zeit, wird die Nachtlichtfunktion erst beim nächsten Erreichen der Zeit eingeschaltet. °C / °F Drücken Sie um zwischen °C/°F zu wechseln. HINTERGRUNDBELEUCHTUNG In der Uhrzeitanzeige, drücken Sie einmal um die Hintergrundbeleuchtung für 5 Sekunden zu aktivieren. - Page 7 oder verschmutzt sein, reinigen Sie das Batteriefach gründlich und ersetzen Sie die Batterien. Vorsichtsmaßnahmen Setzen Sie das Gerät nicht extremer Gewalteinwirkung oder Stößen aus. Setzen Sie das Gerät nicht hohen Temperaturen, direktem Sonnenlicht, Staub und Feuchtigkeit aus. Tauchen Sie das Gerät nicht in Wasser.
- Page 8 Hinweispflicht nach dem Batteriegesetz Altbatterien gehören nicht in den Hausmüll. Wenn Batterien in die Umwelt gelangen, können diese Umwelt- und Gesundheitsschäden zur Folge haben. Sie können gebrauchte Batterien unentgeltlich bei ihrem Händler und Sammelstellen zurückgeben. Sie sind als Verbraucher zur Rückgabe von Altbatterien gesetzlich verpflichtet! Hinweispflicht nach dem Elektronikgerätegesetz Laut Elektro- und Elektronikgerätegesetz (ElektroG)
- Page 9 INSTRUCTION MANUAL WQ 296...
-
Page 10: Time Settings
OVERVIEW A1 – PM display A2 – Night light on icon A3 – Time display A4 – Date / month A5 – Weekday A6 – Indoor temperature A7 – Alarm 2 A8 – Alarm 1 B1 – Down / °C/°F button B2 –... -
Page 11: To Set Alarm
once again, “24Hr” flash, press 3. Press to select 24Hr 12Hr. In 12Hr mode, PM will appear on the display to indicate afternoon time. There is no AM indicator. once again, “2014” flashes and 4. Press appears. Press to set the years. once again, the month digit “1”... - Page 12 once again, Alarm’s 1-minute digit “00” flash. Then 3. Press to set alarm 1’s minutes. press 4. Press once to confirm. Your clock will return to normal time display (or if no key is pressed for approx. 10 seconds) TO SET ALARM 2 1.
- Page 13 TO ACTIVATE THE SNOOZE FUNCTION When alarm is sounding, press once, the alarm will be silenced and come on again after the set snooze duration. Note: if your second alarm activates while the first alarm is sounding or it is in the snooze mode, the second alarm overrides the first alarm (the first alarm is reset to come on the next day).
-
Page 14: Troubleshooting
TROUBLE SHOOTING If your clock displays irrelevant time or does not function properly, which maybe caused by electro-static discharge or other interference, open the battery cover, take out the batteries a few seconds and reinstall them by observing the correct +/- polarity. Your unit will be reset to default settings and you need to set it again. - Page 15 Always replace a complete set of batteries. Never mix used and new batteries. Remove exhausted batteries immediately. Remove batteries when not in use. Do not recharge and do not dispose of batteries in fire as the batteries may explode.
- Page 16 MANUEL D’INSTRUCTIONS WQ 296...
-
Page 17: Vue D'ensemble
VUE D’ENSEMBLE A1 - Affichage PM A2 - Icône veilleuse A3 - Affichage de l’heure A4 - Date/mois A5 - Jour de la semaine A6 - Température intérieure A7 - Alarme 2 A8 - Alarme 1 B1 - Down/°C/°F B2 - Set/Alarm set B3 - Snooze/Light B4 - Alarm 1-2 on/off B5 - Up... - Page 18 régler les minutes. Maintenez appuyée permet un réglage de façon rapide. Appuyez une nouvelle fois sur la touche , « 24Hr » se met à pour sélectionner 24Hr clignoter, appuyez sur la touche 12Hr. En mode 12Hr, PM apparaîtra à l’écran, pour indiquer l’heure de l’après-midi.
-
Page 19: Pour Régler L'alarme
10. Utilisez la touche pour confirmer votre choix. Votre horloge reviendra à l’affichage normal de l’heure (ou si aucune touche n’est enfoncée pendant environ 10 secondes.) POUR RÉGLER L’ALARME 1 1. En mode affichage de l’heure normale, appuyez une fois sur la touche , 6:00 et A1 apparaîtront. - Page 20 ACTIVER/DÉSACTIVER L’ALARME 1 ET/OU 2 1. En mode affichage de l’heure normale, appuyez une fois sur la pour activer l’alarme 1, touche apparaîtra. pour activer l’alarme 2, 2. Utilisez une fois encore la touche apparaîtra. 3. Utilisez à nouveau la touche pour activer les deux alarmes 1 et 2, apparaîtront.
-
Page 21: En Cas De Panne
mette à clignoter. Utilisez ensuite les touches pour mettre la veilleuse « ON ». 2. Appuyez à nouveau sur la touche , « 0:00 » clignotera, utilisez ensuite les touches pour sélectionner les heures du déclenchement de la veilleuse. 3. Appuyez une fois de plus sur la touche , «... -
Page 22: Entretien De L'appareil
ENTRETIEN DE L’APPAREIL 1. Placez votre radioréveil sur une surface stable, loin de la lumière directe du soleil et des sources de chaleur excessive et à l’abri de l’humidité. 2. Placez un tissu ou un matériau protecteur entre vos appareils et un mobilier en bois naturel pour le protéger. - Page 23 et ne jetez aucune pile au feu, elle risque d’exploser. ● Rangez vos piles de façon à ce qu’aucun objet métallique ne puisse causer de court-circuit. ● Évitez d’exposer les piles à des températures extrêmes, à l’humidité ou à la lumière directe du soleil. ●...
- Page 24 MANUAL DE INSTRUCCIONES DEL WQ 296...
-
Page 25: Vista General
VISTA GENERAL A1 - Pantalla PM A2 - Icono de luz nocturna encendido A3 - Presentación de la hora A4 - Fecha/mes A5 - Día laborable A6 - Temperatura interior A7 - Alarma 2 A8 - Alarma 1 B1 - Down/°C/°F B2 - Set/Alarm set B3 - Snooze/Light B4 - Alarm 1-2 on/off... - Page 26 ; parpadeará “24Hr”; pulse Vuelva a pulsar para seleccionar 24Hr 12Hr. En modo 12Hr, aparecerá PM en la pantalla para indicar la hora vespertina. No le aparecerá el indicador AM. ; “2014” parpadeará y aparecerá Vuelva a pulsar Pulse para configurar los años.
-
Page 27: Configurar La Alarma
AJUSTAR LA HORA DE LA ALARMA 1 1. En el modo de pantalla normal, pulse una vez y aparecerá 6:00 y A1. hasta que el dígito de la Alarma 1 “6” 2. Mantenga pulsado parpadee. Posteriormente, pulse para configurar las horas de la alarma 1. - Page 28 2. Vuelva a pulsar una vez más para activar la Alarma 2; aparecerá 3. Vuelva a pulsar para activar tanto la Alarma 1 como la Alarma 2; tanto como aparecerán. 4. Vuelva a pulsar para desactivar ambas alarmas; (desaparecerán tanto como DETENER Y REINICIAR LA ALARMA PARA EL DÍA SIGUIENTE Cuando estén sonando las alarmas 1 o 2, el icono de alarma...
-
Page 29: Solución De Problemas
; aparecerá “6 Hr”; posteriormente, pulse 3. Vuelva a pulsar para seleccionar la duración de la luz nocturna 5 Hr/6 Hr/7 4. Vuelva a pulsar para confirmarlo. El reloj volverá a la pantalla horaria normal (o si no se pulsa ninguna tecla durante aproximadamente 10 segundos). - Page 30 3. Limpie la unidad con un paño suave humedecido con jabón neutro y agua. Los agentes más fuertes como el benceno, disolventes o materiales similares pueden dañar la superficie de la unidad. Asegúrese que la unidad está desconectada antes de limpiarla. 4.
- Page 31 peligro de asfixia. ¡Use el producto únicamente para la finalidad prevista! Consideración de obligaciones según la ley sobre pilas No debe tirar las pilas usadas a la basura de su hogar, ya que pueden causar daños a la salud y al medio ambiente.
- Page 32 GEBRUIKSAANWIJZING WQ 296...
- Page 33 OVERZICHT A1 - PM-weergave A2 - Pictogram nachtlicht aan A3 - Tijdsweergave A4 - Datum/maand A5 - Dag van de week A6 - Binnentemperatuur A7 - Alarm 2 A8 - Alarm 1 B1 - Down/°C/°F B2 - Set/Alarm set B3 - Snooze/Light B4 - Alarm 1-2 on/off B5 - Up C1 - Batterijklepje...
- Page 34 Druk nogmaals op ; de cijfers "00" voor de minuten beginnen te knipperen. Druk op om de minuten in te stellen. Houd ingedrukt om de instellingen sneller te doorlopen. Druk nogmaals op ; "24Hr" begint te knipperen; druk om 24Hr 12Hr te selecteren. In de 12Hr- nogmaals op modus verschijnt PM op het scherm om aan te geven dat het middag is.
- Page 35 ALARM 1 INSTELLEN 1. Druk bij normale tijdweergave eenmaal op ; 6:00 en A1 verschijnen. 2. Houd ingedrukt tot het cijfer "6" voor de uren van alarm 1 begint te knipperen. Druk dan op om de uren van alarm 1 in te stellen.
- Page 36 2. Druk nogmaals op om alarm 2 te activeren, verschijnt. 3. Druk nogmaals op om zowel alarm 1 als 2 te activeren; verschijnen. 4. Druk nogmaals op om beide alarmen te deactiveren ( verdwijnen). HET ALARM STOPPEN EN WEER VOOR DE VOLGENDE DAG INSTELLEN Wanneer Alarm 1 of 2 klinkt, zal het betreffende alarmicoontje knipperen.
-
Page 37: Zorg Voor Het Product
3. Druk nogmaals op ; "6 Hr" verschijnt; druk dan op om de duur dat het nachtlicht aan is te selecteren: 5 Hr/6 Hr/7 Hr. 4. Druk nogmaals op om te bevestigen. De klok keert terug naar normale tijdweergave (of als er gedurende ongeveer 10 seconden niet op een toets wordt gedrukt) Opmerking: Plaats de klok 's nachts onder uw zichtlijn, voor de beste leesbaarheid. - Page 38 apparaat beschadigen. Haal de stekker uit het stopcontact voordat u het apparaat reinigt. 4. Mix geen oude en nieuwe batterijen. Mix geen alkaline, standaard (zink-koolstof) of oplaadbare (nikkel-cadmium) batterijen. 5. Verwijder de batterij als u het apparaat voor langere tijd, zoals een maand of langer, niet gebruikt om mogelijke corrosie te voorkomen.
- Page 39 Neem wettelijke heffingen in verband met de afvoer van batterijen in aanmerking Oude batterijen behoren niet tot huishoudelijk afval, omdat deze schadelijk zijn voor de volksgezondheid en het milieu. U kunt gebruikte batterijen kosteloos inleveren bij uw dealer of inzamelpunten. U bent als eindgebruiker wettelijk verplicht verbruikte batterijen in te leveren bij distributeurs of andere inzamelpunten! Houd rekening met heffingen in het kader van wetgeving m.b.t.
- Page 40 MANUALE DI ISTRUZIONI WQ 296...
-
Page 41: Installazione
PANORAMICA A1 - Display PM A2 - Icona luce notturna accesa A3 - Indicazione orario A4 - Giorno/mese A5 - Giorni settimana A6 - Temperatura interna A7 - Sveglia 2 A8 - Sveglia 1 B1 - Down/°C/°F B2 - Set/Alarm set B3 - Snooze/Light B4 - Alarm 1-2 on/off B5 - Up... - Page 42 ancora una volta, le cifre dei minuti “00” Premere lampeggiano. Premere per impostare i minuti. Tener premuto per accelerare la velocità delle impostazioni. ancora una volta fino a quando “24Hr” non Premere per selezionare 24Hr 12Hr. In lampeggia, quindi premere modalità...
-
Page 43: Impostazione Della Sveglia
10. Premere per confermare. L'orologio ritornerà alla visualizzazione normale dell'orar (o se nessun tasto è premuto per circa 10 secondi.) IMPOSTAZIONE SVEGLIA 1 1. Nella visualizzazione dell'orario normale, premere una volta: appaiono 6:00 e A1. 2. Premere e tenere premuto fino a quando la cifra dell'ora della Sveglia 1 “6”... - Page 44 ACCENSIONE O SPEGNIMENTO DELLA SVEGLIA 1 E 2 1. Nella visualizzazione normale dell'ora, premere una volta per attivare la Sveglia 1, appare 2. Premere ancora una volta per attivare la Sveglia 2, appare 3. Premere nuovamente per attivare la Sveglia 1 e 2, appaiono 4.
-
Page 45: Risoluzione Dei Problemi
ancora una volta, “0:00” lampeggia, quindi 2. Premere premere per selezionare l'ora di avvio della luce notturna. ancora una volta, appare “6 Hr”, quindi premere 3. Premere per selezionare la durata di accensione della luce notturna 5 Hr/6 Hr/7 Hr. 4. - Page 46 2. Quando si posiziona l'unità su mobili in legno naturale e finiture laccate, proteggerne la superficie di appoggio, interponendo un panno o altro materiale protettivo. 3. Pulire l'unità con un panno morbido bagnato solo con detergente neutro e acqua. Agenti più forti come Benzine, solventi o altre sostanze simili possono danneggiare la superficie dell'unità.
- Page 47 potrebbero causare il rischio di soffocamento. Utilizzare il prodotto solo per lo scopo previsto. Obblighi in base alla normativa sulle batterie Le batterie vecchie non appartengono ai rifiuti domestici in quanto possono causare danni alla salute e all'ambiente. È possibile consegnare le batterie usate gratuitamente al proprio rivenditore e punti di raccolta.
- Page 48 NÁVOD K POUŽITÍ VÝROBKU WQ 296...
-
Page 49: Nastavení Času
PŘEHLED A2 - Ikona zapnutí nočního podsvícení A1 - Zobrazení PM A3 - Zobrazení času A4 - Datum/měsíc A6 - Vnitřní teplota A5 - Den v týdnu A7 - Budík 2 A8 - Budík 1 B1 - Down/°C/°F B2 - Set/Alarm set B3 - Snooze/Light B4 - Alarm 1-2 on/off B5 - Up... - Page 50 Znovu stiskněte tlačítko a rozbliká se text „24Hr“. Stisknutím tlačítka vyberte možnost „24Hr“ „12Hr“. V režimu nebo 12Hr se na displeji zobrazí zkratka „PM“, která označuje odpolední čas. Ukazatel AM na displeji není. Znovu stiskněte tlačítko , rozbliká se text „2014“ a zobrazí se .
-
Page 51: Nastavení Budíku
NASTAVENÍ BUDÍKU 1 1. Při normálním zobrazení času stiskněte jednou tlačítko Zobrazí se hodnota „6:00“ a „A1“. 2. Stiskněte a přidržte tlačítko , dokud se nerozbliká číslice hodin budíku 1 „6“. Poté stisknutím tlačítka nebo nastavte hodiny budíku 1. Pokud chcete nastavení urychlit, stiskněte a držte tlačítko nebo 3. - Page 52 2. Opětovným stisknutím tlačítka aktivujte budík 2. Zobrazí se ikona 3. Opětovným stisknutím tlačítka aktivujte budík 1 i budík 2. Zobrazí se obě ikony 4. Opětovným stisknutím tlačítka deaktivujte oba budíky (zmizí obě ikony ZASTAVENÍ A RESET BUDÍKU NA DALŠÍ DEN Zvoní-li budík 1 nebo 2, bliká...
-
Page 53: Řešení Problémů
3. Znovu stiskněte tlačítko a zobrazí se text „6 Hr“. Poté stisknutím tlačítka vyberte dobu zapnutí nočního nebo podsvícení „5 Hr/6 Hr/7 Hr“. 4. Opětovným stisknutím tlačítka volbu potvrďte. Hodiny se vrátí do normálního zobrazení času (nebo pokud po dobu asi 10 sekund nestisknete žádné... -
Page 54: Bezpečnostní Opatření
materiály mohou povrch jednotky poškodit. Ujistěte se, že je před čištěním zařízení vypojené ze zásuvky. 4. Nevkládejte společně staré a nové baterie. Nemíchejte alkalické, standardní (karbozinkové) nebo nabíjecí (niklokadmiové) baterie. 5. Pokud se zařízení nebude používat po delší dobu, jako například měsíc nebo déle, vytáhněte baterie, abyste zabránili možné... - Page 55 Likvidace baterií podle předpisů Staré baterie nepatří do domácího odpadu, protože mohou způsobit škody na zdraví a životním prostředí. Použité baterie můžete zdarma vrátit prodejci a do sběrných míst. Jako koncoví uživatelé jste vázáni zákonem použité baterie vrátit distributorům a do jiných sběrných míst! Povinnosti dle zákona o elektrických zařízeních Tento symbol znamená, že elektrická...
- Page 56 INSTRUKCJA OBSŁUGI WQ 296...
-
Page 57: Ustawienia Czasu
PRZEGLĄD A1 - Wyświetlacz PM A2 - Ikona oświetlenia nocnego A3 - Wyświetlanie czasu A4 - Dzień/miesiąc A5 - Dzień tygodnia A6 - Temperatura wewnętrzna A7 - Alarm 2 A8 - Alarm 1 B1 - Down/°C/°F B2 - Set/Alarm set B3 - Snooze/Light B4 - Alarm 1-2 on/off B5 - Up... - Page 58 Nacisnąć ponownie . Cyfry „00” minut zaczną migać. Nacisnąć , aby ustawić minuty. Nacisnąć i przytrzymać , aby przyspieszyć zmianę ustawień. albo Nacisnąć ponownie przycisk . Wskazanie „24Hr” zacznie migać. Nacisnąć , aby wybrać 24Hr 12Hr. W trybie 12Hr na wyświetlaczu pojawi się...
- Page 59 10. Nacisnąć , aby potwierdzić. Zegar powróci do wyświetlania czasu (stanie się to również, jeśli przez około 10 sekund nie zostanie naciśnięty żaden przycisk). ABY USTAWIĆ ALARM 1 1. Podczas wyświetlania czasu jednokrotnie nacisnąć przycisk Pojawią się wskazania 6:00 i A1. 2.
- Page 60 WŁĄCZANIE LUB WYŁĄCZANIE ALARMU 1 I 2 1. Podczas wyświetlania czasu jednokrotnie nacisnąć , aby włączyć Budzik 1. Na wyświetlaczu pojawi się 2. Nacisnąć ponownie , aby włączyć Budzik 2. Pojawi się 3. Nacisnąć ponownie , aby aktywować zarówno Budzik 1, jak i Budzik 2.
-
Page 61: Podświetlenie Tła
2. Nacisnąć jeszcze raz , zacznie migać wskazanie „0:00”, następnie nacisnąć , aby wybrać godziny rozpoczęcia oświetlenia nocnego. 3. Nacisnąć ponownie . Pojawi się „6 Hr”, następnie nacisnąć , aby wybrać czas trwania oświetlenia nocnego w godzinach: 5 Hr / 6 Hr / 7 Hr. 4. -
Page 62: Środki Ostrożności
2. Stawiając urządzenia na meblach z naturalnego drewna lub z lakierowanym wykończeniem, należy chronić je, podkładając obrusik lub materiał ochronny. 3. Urządzenie należy czyścić miękką ściereczką zwilżoną tylko w delikatnym mydle i wodzie. Środki silniejsze, takie jak benzyna, rozpuszczalnik lub podobne środki, mogą uszkodzić powierzchnię urządzenia. - Page 63 ● Nie ładować ponownie baterii ani nie wyrzucać ich do ognia, ponieważ mogą eksplodować. ● Należy upewnić się, że baterie są przechowywane z dala od metalowych obiektów, ponieważ zetknięcie z nimi może spowodować zwarcie. ● Unikać wystawiania baterii na działanie ekstremalnych temperatur, wilgoć...
Need help?
Do you have a question about the WQ 296 and is the answer not in the manual?
Questions and answers