
Subscribe to Our Youtube Channel
Related Manuals for Techno Line WT 235


Summary of Contents for Techno Line WT 235
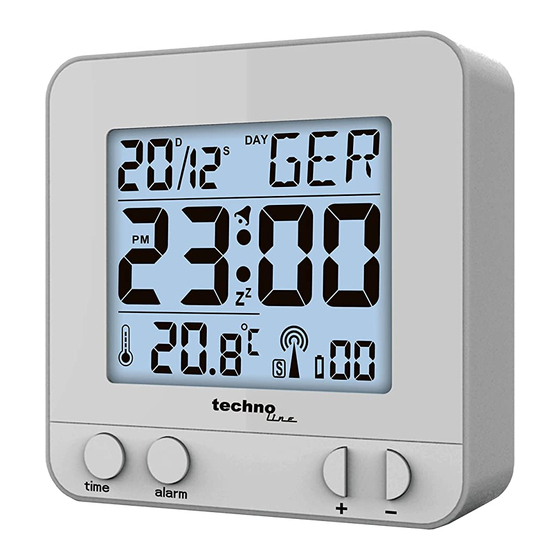
- Page 1 WT 235 Tastenfunktionen Teil A LCD Teil B Tasten 1. “time” Taste 1. Uhrzeit 2. “alarm” Taste 2. Datum 3. “+” Taste 3. Woche 4. “-“ Taste 4. Temperatur DE 1...
- Page 2 5. “ “ Taste 5. Funksymbol DCF-77 Technische Daten: DCF 77 - Funkuhr Uhrzeit in 12/24 Uhr Format Manuelle Zeiteinstellung Kalender bis zum Jahr 2099 Datums- und Wochentagsanzeige Temperaturanzeige in °C oder °F Automatische Schlummerzeit: 5 Minuten ...
- Page 3 empfangen zu können. Manuelle Zeiteinstellung: Drücken und halten Sie die “time” Taste für 2 Sekunden, die Zeitzone beginnt zu blinken. Benutzen Sie die “+” und “-“Taste um die richtige Zeitzone einzustellen. (0 für Deutschland, -1 für UK) Drücken Sie die “time” Taste um die Einstellung zu bestätigen, die Stundenanzeige beginnt zu blinken.
- Page 4 Drücken Sie die “time” Taste um die Einstellung zu bestätigen, die Sprache beginnt zu blinken. Benutzen Sie die “+” und “-“ Taste um die Sprache einzustellen. (GER, FRA, ITA, NET, ESP, DAN, ENG) Drücken Sie die “time” Taste um die Einstellung zu bestätigen und zu schließen. ...
- Page 5 Alarmzeit einzustellen. Die Stundenanzeige des Alarms beginnt zu blinken. Benutzen Sie die “+” und “-“Taste um die Stunde einzustellen. Drücken Sie die “time” Taste um die Einstellung zu bestätigen. Die Minutenanzeige des Alarms beginnt zu blinken. Benutzen Sie die “+” und “-“Taste um die Minute einzustellen.
- Page 6 erscheint das “ ” Symbol auf dem Display. Der Alarm ertönt nach 5 Minuten erneut. Die Schlummerfunktion kann durch Drücken einer beliebigen Taste beendet werden. °C/°F Temperaturanzeige: Die Temperatur wird in °C oder °F angezeigt. Drücken Sie die “- “ Taste um zwischen den Einheiten zu wechseln.
- Page 7 von 7 Minuten kein Signal empfangen, stoppt die DCF Signalsuche (das Funksymbol verschwindet vom Display) und startet automatisch zur nächsten vollen Stunde. Information: Bei dem Versuch das DCF Signal zu empfangen, funktioniert keine Taste außer “ ”, um die DCF Funksignalfunktion zu verlassen, drücken Sie die “-” Taste für 2 Sekunden. ...
- Page 8 Umwelteinflüsse auf Funkempfang Die Uhr empfängt kabellos die genaue Uhrzeit. Wie bei allen kabellosen Geräten kann der Funkempfang durch folgende Einflüsse beeinträchtigt sein: lange Übertragungswege naheliegende Berge und Täler nahe Autobahnen, Gleisen, Flughäfen, Hochspannungsleitungen, etc. nahe Baustellen ...
- Page 9 Setzen Sie das Gerät nicht hohen Temperaturen, direktem Sonnenlicht, Staub und Feuchtigkeit aus. Tauchen Sie das Gerät nicht in Wasser. Vermeiden Sie den Kontakt mit ätzenden Materialien. Werfen Sie das Gerät nicht ins Feuer. Es könnte explodieren. ...
- Page 10 kann zum Ersticken führen. Verwenden Sie das Produkt ausschließlich für den vorgesehenen Zweck! Hinweispflicht nach dem Batteriegesetz Altbatterien gehören nicht in den Hausmüll. Wenn Batterien in die Umwelt gelangen, können diese Umwelt- und Gesundheitsschäden zur Folge haben. Sie können gebrauchte Batterien unentgeltlich bei ihrem Händler und Sammelstellen zurückgeben.
- Page 11 WT 235 Production Appearance Part A- LCD Part B-Button 1: “time” button 1: Time 2: “alarm” button 2: Date 3: “+” button 3: Week 4: “-” button 4: Temperature EN 1...
- Page 12 5: DCF symbol 5: “ ” button Technical data: Radio controlled Clock via DCF frequency Time in 12/24 hour format Manual time setting Continuous calendar up to year 2099 Date and weekday display Temperature alternatively in °C or °F ...
- Page 13 Manual time setting: Press and hold down the “time” button for 2 seconds, the time zone start to flash. Now use “+” and “-“buttons to set the time zone. (0 for Germany, -1 for UK) Press “time” to confirm your setting, the hour display starts to flash. Now use “+” and “-“ buttons to set the hour.
- Page 14 Press “time” to confirm your setting and to end the setting procedures, enter the clock mode. In the clock mode, press the “+“ button to switch between 12/24 hour mode. Please note: After 30 seconds without pressing any button, the clock switches automatically from Set Mode to Normal Time Mode.
- Page 15 Press “time” button to confirm your setting and to end the setting procedure. Please note: After 30 seconds without pressing any button the clock switches automatically from setting mode to Normal clock mode. The alarm will sound for 2 minutes if you do not deactivate it by pressing any button. In this case the alarm will be repeated automatically after 24 hours.
- Page 16 °C/°F temperature display: The temperature is displayed either in °C or °F. Briefly pressing the “- “ button allows you to switch between the individual models. Reception of the Radio signal: The clock automatically starts the DCF signal search on the batteries are changed. The radio mast symbol starts to flash.
- Page 17 Please note: In the process of receiving the RCC, except the “ ” key, any buttons are not functional, until press and hold down the “-” button for 2 seconds, to exit the RCC receiver function. If the clock cannot receive the DCF signal (because the distance is too great to receive a signal from the transmitter in Colorado), you have the option of setting the time manually as mentioned above.
- Page 18 Environmental reception effects The clock obtains the accurate time with wireless technology. Same as all wireless devices, the reception is maybe affected by the following circumstances: long transmitting distance nearby mountains and valleys near freeway, railway, airports, high voltage cable etc. ...
- Page 19 Do not expose the unit to extreme temperatures, direct sunlight, dust or humidity. Do not immerse in water. Avoid contact with any corrosive materials. Do not dispose this unit in a fire as it may explode. ...
- Page 20 Consideration of duty according to the battery law Old batteries do not belong to domestic waste because they could cause damages of health and environment. You can return used batteries free of charge to your dealer and collection points. As end-user you are committed by law to bring back needed batteries to distributors and other collecting points! Consideration of duty according to the law of electrical devices This symbol means that you must dispose of electrical devices separated from the...
- Page 21 WT 235 Apparence du produit Partie A-Écran LCD Partie B-Commandes Heure Touche « time » Date Touche « alarm » FR 1...
- Page 22 Semaine Touche « + » Température Touche « - » Symbole DCF Touche « » Caractéristiques techniques : Horloge radio-pilotée via fréquence DCF Le format de l’heure est 12/24 heures Réglage manuel de l’heure Calendrier continu jusqu'à 2099 ...
- Page 23 Lorsque vous insérez les piles, toutes les icônes de l'écran s'illuminent brièvement, l'écran LCD affiche toutes les icônes pendant deux secondes et un bip est émis, le mode de réception DCF est alors activé et celui-ci sera actif pendant sept minutes. Réglage manuel de l'heure : ...
- Page 24 Appuyez sur la touche « time » pour confirmer votre réglage, la date clignote. Utilisez désormais les touches « + » et « - » pour régler la date. Appuyez sur la touche « time » pour confirmer votre réglage, la langue sélectionnée clignote. Utilisez désormais les touches «...
- Page 25 active. Pressez et maintenez enfoncée la touche « alarm » pendant 2 secondes jusqu'à ce que l'icône de l'alarme clignote à l'écran. Utilisez désormais les touches « + » et « - » pour sélectionner l'heure d'alarme de votre choix, puis appuyez brièvement sur la touche « time » pour valider cette heure d'alarme.
- Page 26 Augmentation du volume de l’alarme (crescendo, durée : 2 minutes) change le volume 4 fois durant la sonnerie de l'alarme. Rappel d’alarme automatique : Suivez la procédure ci-dessous pour activer la fonction de Rappel d'alarme automatique : Lorsque l'alarme est déclenchée, appuyez sur la touche «...
- Page 27 L'horloge commence automatiquement la recherche de signal DCF une fois le remplacement des piles effectué. L'icône d'antenne radio clignote. À 1 heure, l'horloge radio-pilotée effectue automatiquement une procédure de synchronisation avec le signal DCF pour corriger les écarts avec l'heure exacte. En cas d’échec des tentatives de synchronisation (l'icône d'antenne radio disparaît de l'écran), le système va automatiquement essayer une nouvelle synchronisation après une heure.
- Page 28 Si l'horloge ne peut pas recevoir le signal DCF (en raison d'une distance trop importante vosu séparant de l'émetteur de la région du Colorado), vous avez la possibilité de régler manuellement l'heure de la manière mentionnée ci-dessus. L'horloge se réajuste automatiquement une fois la réception du signal DCF possible.
- Page 29 réception se dégrade dans les circonstances suivantes: longue distance de transmission Montagnes et vallées proches près d'une autoroute, d'un chemin de fer, d'un aéroport, d'une ligne à haute tension, etc. près d'un chantier de construction au milieu de hauts bâtiments ...
- Page 30 Ne plongez pas l'appareil dans l'eau. Évitez tout contact avec des matériaux corrosifs. Ne jetez pas l'appareil dans le feu, elle risque d'exploser. N'ouvrez pas le coffret de l'appareil et n'altérez aucun de ses composants. Avertissements de sécurité concernant les piles ...
- Page 31 Noter l'obligation de la Loi sur la batterie Les piles ne doivent pas être déposées avec vos ordures ménagères. Dans le cas où vous le faites vous risquez de provoquer des dommages importants à votre environnement ou à la santé d'autrui. Vous pouvez rendre les piles usagées à votre commerçant qui vous les a vendues ou d'office à...
- Page 32 WT 235 Apariencia de producción Parte A-LCD Parte B-Botones Botón “time” Hora Botón “alarm” Día Botón “+” Semana Botón “-” Temperatura ES 1...
- Page 33 Símbolo DCF Botón “ ” Datos técnicos: Reloj controlado por radio mediante frecuencia DCF Hora en formato de 12/24 horas Ajuste manual de la hora Calendario continuo hasta el año 2099 Pantalla de fecha y día de la semana ...
- Page 34 recepción DCF durante siete minutos. Ajuste manual de la hora: Mantenga pulsado el botón “time” durante 2 segundos; la zona horaria empieza a parpadear. Ahora use los botones “+” y “-” para fijar la zona horaria. (0 para Alemania, -1 para el Reino Unido) ...
- Page 35 Pulse “time” para confirmar su configuración; la pantalla del idioma empieza a parpadear. Ahora use los botones “+” y “-” para fijar el idioma. Pulse “time” para confirmar su configuración y para finalizar los procedimientos de configuración; entre en el modo redo reloj. ...
- Page 36 El dígito de hora de la hora de alarma empezará a parpadear. Use los botones “+” y “-” para configurar las horas. Pulse el botón “time” para confirmar su configuración. La pantalla de los minutos de la hora de la alarma empieza a parpadear. Pulse los botones “+” y “-”...
- Page 37 toque “ ” para activar la función de repetición. Cuando la función de retardo está active aparece el icono “ ” en la pantalla. Esta operación retrasa la alarma 5 minutos y la alarma se reiniciará a esta hora. ...
- Page 38 Para iniciar la recepción manual de la señal DCF mantenga pulsando el botón “-”; si no se recibe ninguna señal en siete minutos, entonces se detiene la búsqueda de la señal DCF (el símbolo del mástil de la radio desaparece) y empieza otra vez a la siguiente hora en punto. Por favor tenga en cuenta: ...
- Page 39 Por medio de la presente Technotrade declara que el WT235 cumple con los requisitos esenciales y cualesquiera otras disposiciones aplicables o exigibles de la Directiva 2014/53/EU y ROHS 2011/65/CE. El original de la declaración de conformidad UE se puede encontrar en: www.technoline.de/doc/4029665002354 Efectos ambientales en la recepción La el reloj obtiene la hora exacta con tecnología inalámbrica.
- Page 40 Coloque el reloj en una posición donde obtenga una señal óptima, p.ej. cerca de una ventana y lejos de superficies metálicas o aparatos eléctricos. Precauciones Esta unidad está diseñada para usarla solamente en interiores. No someta unidad a fuerzas o golpes excesivos. ...
- Page 41 puede causar un cortocircuito. Evite exponer las baterías a altas temperaturas, humedad o a los rayos directos del sol. Guarde las baterías lejos del alcance de los niños. Pueden atragantarse con ellas. Utilice el producto sólo para la finalidad expuesta! Obligación en virtud de la ley de baterías Las baterías usadas no deben ser eliminadas en la basura doméstica.
- Page 42 WT 235 Uiterlijk van product Deel A-LCD Deel B-Toetsen Toets “time” Tijd Toets “alarm” Datum NL 1...
- Page 43 “+” toets Week “-” toets Temperatuur DCF-symbool “ ”-toets Technische gegevens: Radiogestuurde klok via DCF-frequentie Tijd in 12/24-uurs formaat Handmatige tijdinstelling Doorlopende kalender tot jaar 2099 Weergave van datum en weekdag Temperatuuraanduiding instelbaar op °C of °F ...
- Page 44 Belangrijke informatie: Wanneer u de batterijen plaats lichten alle symbolen op het LCD-scherm gedurende 2 seconden op en klikt er een pieptoon. Na zeven minuten gaat de klok naar de DCF-ontvangst. Handmatige tijdinstelling: Houd de toets “time” gedurende 2 seconden ingedrukt; de tijdzone begint te knipperen. Gebruik nu de toetsen “+”...
- Page 45 Druk op “time” om uw instelling te bevestigen en de datumweergave begint te knipperen. Gebruik nu de toetsen “+” en “-” om de datum in te stellen. Druk op “time” om de instelling te bevestigen; de taalweergave begint te knipperen. Gebruik nu de toetsen “+”...
- Page 46 Houd de toets “alarm” gedurende 2 seconden ingedrukt totdat het knipperende pictogram voor de alarmtijd wordt weergegeven. Gebruik nu de toetsen “+” en “-” om de gewenste alarmtijd te selecteren en druk dan kort op de toets “time” om deze alarmtijd in te stellen. ...
- Page 47 Automatische sluimerfunctie: Ga als volgt verder om de automatische sluimerfunctie te activeren: Druk terwijl het alarm klinkt op “ ” om de sluimerfunctie te activeren. Wanneer de sluimerfunctie actief is, verschijnt het pictogram “ ” op het scherm. Deze handeling vertraagt het alarm met 5 minuten en het alarm gaat op deze tijd opnieuw af.
- Page 48 automatisch een nieuwe poging starten op het volgende volle uur. Deze procedure wordt 5 keer automatisch herhaald. Houd om de ontvangst van het DCF-signaal handmatig te starten de toets “-” ingedrukt. Als er binnen zeven minuten geen signaal wordt ontvangen, dan stopt het zoeken naar een DCF signaal (het symbool met de radiomast verdwijnt) en wordt het op het volgende hele uur weer gestart.
- Page 49 interferentiebronnen te houden zoals televisies of computermonitors. De radio-ontvangst is zwakker in kamers met betonnen muren en in kantoren. Plaats het systeem in dergelijke omstandigheden dicht in de buurt van een raam. Hierbij verklaart Technotrade dat het toestel WT235 in overeenstemming is met de essentiële eisen en de andere relevante bepalingen van richtlijn 2014/53/EU en ROHS 2011/65/EG.
- Page 50 binnenin betonnen gebouwen in de buurt van elektrische apparatuur (computers, TV’s, enz.) en metalen structuren binnenin bewegende voertuigen Plaats het klok op een locatie met een optimaal signaal, bijv. dicht bij een raam en uit de buurt van metalen oppervlaktes of elektrisache apparatuur.
- Page 51 Combineer nooit gebruikte en nieuwe batterijen. Verwijder onmiddellijk uitgeputte batterijen. Verwijder batterijen wanneer niet in gebruik. Batterijen nooit opladen of in vuur werpen om ontploffing te voorkomen. Houd de batterijen niet in de nabijheid van metalen voorwerpen. Een contact kan een kortsluiting veroorzaken.
- Page 52 levensduur bereikt, niet mag worden afgevoerd met het gewone huishoudelijk afval. Breng de apparaat naar het plaatselijke inzamelpunt voor afval of recyclingcentrum. Dit is van toepassing voor alle landen van de Europese Unie en op de overige Europese landen met een systeem voor gescheiden afvalinzameling.
- Page 53 WT 235 Aspetto del prodotto LCD Parte A Pulsante Parte B Pulsante “time” Pulsante “alarm” Dati IT 1...
- Page 54 Tasto “+” Settimana Pulsante “-” Temperatura Icona DCF Pulsante “ ” Dati tecnici: Orologio radiocontrollato via frequenza DCF Formato orario 12/24 Impostazione manuale dell’ora Calendario continuo fino all'anno 2099 Visualizzazione data e giorno della settimana ...
- Page 55 Informazioni importanti: quando si inseriscono le batterie tutte le icone sul display si accendono brevemente, il display si accende per 2 secondi emettendo un bip, poi accede alla ricezione DCF per sette minuti. Impostazione manuale dell’ora: Premere e tenere premuto il pulsante “time” per 2 secondi, l'indicazione del fuso orario inizia a lampeggiare.
- Page 56 Premere “time” per confermare la propria impostazione, l'indicazione del giorno inizia a lampeggiare. Usare ora i tasti “+” e “-” per impostare il giorno. Premere “time” per confermare la scelta, il display della lingua inizia a lampeggiare. Usare adesso i tasti “+”...
- Page 57 dell'orario della sveglia è visualizzata. Ora utilizzare i pulsanti “+” e “-” per selezionare l'orario della sveglia necessario e premere brevemente il pulsante “time” per impostare l'orario di questa sveglia. L'indicazione dell'ora dell'orario della sveglia inizia a lampeggiare. Usare i tasti “+” e “-” per regolare l’ora.
- Page 58 Funzione Snooze automatica: Procedere come segue per attivare la funzione di snooze automatica: Mentre la sveglia suona, toccare “ ” per attivare la funzione snooze. Quando la funzione snooze è attivata, l'icona “ ” appare sul display. Questa operazione fa tornare indietro la sveglia di 5 minuti e la sveglia si riavvia a quest'ora. ...
- Page 59 sincronizzazione non ha successo (il simbolo dell'antenna radio scompare dal display), il sistema tenterà automaticamente un'altra sincronizzazione all'ora successiva. Questa procedura è ripetuta automaticamente fino a 5 volte. Per avviare la ricezione manuale del segnale DCF, premere e tenere premuto il pulsante “-”. Se nessun segnale è...
- Page 60 monitor di computer. La ricezione radio è più debole in ambienti con mura in cemento e in uffici. In tali circostanze estreme, porre il sistema vicino alla finestra. Con la presente Technotrade dichiara che questo WT235 è conforme ai requisiti essenziali ed alle altre disposizioni pertinenti stabilite dalla direttiva 2014/53/EU e ROHS 2011/65/CE.
- Page 61 in prossimità di apparecchiature elettriche (computer, TV, ecc.) e di strutture metalliche all'interno di veicoli in movimento Porre l’orario in una posizione con segnale ottimale, ad es. vicino a una finestra e lontano da superfici in metallo o apparecchiature elettriche. Precauzioni ...
- Page 62 Rimuovere immediatamente le batterie scariche. Rimuovere le batterie quando non sono utilizzate. Non conservare le batterie in prossimità di oggetti metallici. Un contatto potrebbe causare un corto circuito. Non ricaricare le batterie e non gettarle nel fuoco perché potrebbero esplodere. ...
- Page 63 Obbligo di avviso secondo la legge sulle dispositivi elettrici Questo simbolo indica che i dispositivi elettrici alla fine del loro ciclo di vita devono essere smaltiti separatamente dai rifiuti domestici generali. Portare il dispositivo al proprio punto di raccolta rifiuti locale o a un centro di riciclaggio. Ciò...
- Page 64 WT 235 Popis výrobku Část A – LCD Část B – Tlačítka Čas Tlačítko „time“ Tlačítko „alarm“ Datum CZ 1...
- Page 65 Tlačítko „+“ Týden Tlačítko „-“ Teplota Symbol DCF Tlačítko „ “ Technické údaje: Hodiny řízené rádiem prostřednictvím frekvence DCF Čas ve formátu 12/24 hodin Ruční nastavení času Kalendář až do roku 2099 Zobrazení data a dnů v týdnu ...
- Page 66 Důležité informace: Při vložení baterií se krátce rozsvítí všechny symboly na displeji, celý displej LCD se rozsvítí na 2 sekundy a bude pípat, a potom zadejte příjem DCF na sedm minut. Ruční nastavení času: Na 2 sekundy stiskněte a podržte tlačítko „time“; začne blikat časové pásmo. Nyní pro nastavení časového pásma použijte tlačítka „+“...
- Page 67 použijte tlačítka „+“ a „−“. Nastavení potvrďte stiskem tlačítka „time“. Začne blikat zobrazení jazyka. Nyní pro nastavení jazyka použijte tlačítka „+“ a „−“. Pro potvrzení svého nastavení a ukončení režimu nastavení stiskněte tlačítko „time“. Displej se přepne do režimu hodin. ...
- Page 68 Nyní pro volbu požadovaného času buzení použijte tlačítka „+“ „-“ a pro nastavení tohoto času buzení krátce stiskněte tlačítko „time“. V nastavení času buzení začne blikat zobrazení hodin. Pro nastavení hodin použijte tlačítka „+“ a „-“. Pro potvrzení svého nastavení stiskněte tlačítko „time“ ...
- Page 69 Automatická funkce opakovaného buzení: Pokud chcete aktivovat funkci automatického opakovaného buzení, postupujte následujícím způsobem: Během vyzvánění budíku funkci opakovaného buzení aktivujete stiskem tlačítka „ “. Je-li funkce opakovaného buzení aktivní, na displeji se zobrazí ikona „ “. Takto se čas buzení posune o 5 minut, po jejichž uplynutí se buzení znovu spustí. ...
- Page 70 vysílače z displeje zmizí), systém se o další synchronizaci automaticky pokusí v příští celou hodinu. Tento postup se automaticky opakuje až pětkrát. Pro zahájení ručního příjmu signálu DCF stiskněte a přidržte tlačítko „-“. Není-li během sedmi minut přijat žádný signál, vyhledávání signálu DCF se zastaví (symbol rádiového vysílače zmizí) a znovu se spustí...
- Page 71 Technotrade tímto prohlašuje, že tento WT235 je ve shodě se základními požadavky a dalšími příslušnými ustanoveními směrnice 2014/53/EU a ROHS 2011/65/ES. Originál EU prohlášení o shodě lze nalézt na: www.technoline.de/doc/4029665002354 Environmentální dopady přijmu Hodiny přijímá přesný čas pomocí bezdrátové technologie. Stejně jako u všech bezdrátových přístrojů mohou být tyto ovlivněny následujícími okolnostmi: ...
- Page 72 elektrických přístrojů. Upozornění Tato jednotka je k použití pouze v interiéru. Nevystavujte přístroj nadměrné síle nebo nárazu. Nevystavujte přístroj extrémním teplotám, přímému slunečnímu záření, prachu nebo vlhkosti. Nikdy neponořujte do vody. Vyhněte se kontaktu s korozívními materiály. ...
- Page 73 způsobit zkrat. Nevystavujte baterie extrémním teplotám nebo vlhkosti nebo přímému slunečnímu záření. Ukládejte baterie mimo dosah dětí. Existuje riziko udušení. Výrobek používejte pouze ke stanovenému účelu! Všimněte si požadavky podle baterie-směrnice Staré baterie nepatří do domovního odpadu, protože by mohly způsobit škody na zdraví...
- Page 74 WT 235 Wygląd produkcyjny Część A – Ekran LCD Część B – przycisk Przycisk „time” Godzina Przycisk „alarm” Data PL 1...
- Page 75 Tydzień Przycisk „+” Przycisk „-” Temperatura Symbol DCF Przycisk „ ” Dane techniczne: Zegar sterowany radiowo przez częstotliwość DCF Czas w formacie godzinowym 12/24 Ręczne ustawianie czasu Ciągły kalendarz do roku 2099 Wyświetlacz daty i dnia tygodnia ...
- Page 76 Ważna informacja: Po włożeniu baterii wszystkie symbole na wyświetlaczu na krótko zaświecą się, cały ekran LCD zaświeci się na 2 sekundy z sygnałem dźwiękowym, a następnie wprowadzony zostanie odbiór DCF na siedem minut. Ręczne ustawianie czasu: Nacisnąć i przytrzymać przycisk „time” przez 2 sekundy, zacznie migać strefa czasowa. Przyciskami „+”...
- Page 77 Nacisnąć „time”,aby potwierdzić ustawienia, wyświetlacz daty zacznie migać. Przyciskami „+” i „-” należy ustawić datę. Nacisnąć „time”, aby potwierdzić ustawienia, wyświetlacz języka zacznie migać. Przyciskami „+” i „-” należy ustawić język. Nacisnąć „time”, aby potwierdzić ustawienia i zakończyć procedurę ustawiania, przejść do trybu zegara.
- Page 78 alarmu. Przyciskami „+” i „-” należy wybrać potrzebny czas alarmu i krótko nacisnąć przycisk „time”, aby ustawić ten czas alarmu. Wyświetlacz godziny czasu alarmu zacznie migać. Użyć przycisków „+” oraz „-”, aby ustawić godzinę. Nacisnąć przycisk „time”, aby potwierdzić ustawienie ...
- Page 79 Aby aktywować funkcję automatycznej drzemki, należy postępować w następujące sposób: Kiedy rozlega się alarm, nacisnąć „ ”, aby aktywować funkcję drzemki. Gdy funkcja drzemki jest aktywna, na wyświetlaczu pojawi się ikona „ ”. Ta operacja cofa alarm o pięć minut i uruchomi się on ponownie o tej godzinie. ...
- Page 80 automatycznie ponownej synchronizacji o następnej pełnej godzinie. Procedura powtarza się automatycznie do 5 razy. Aby rozpocząć ręczny odbiór sygnału DCF, należy nacisnąć i przytrzymać przycisk „-”. Jeśli w ciągu siedmiu minut nie zostanie odebrany żaden sygnał, wyszukiwanie sygnału DCF zostanie zatrzymane (symbol masztu radiowego zniknie) i uruchomi się...
- Page 81 telewizyjne czy komputery. Odbiór sygnału radiowego jest słabszy w pomieszczeniach o betonowych ścianach i w biurach. W takich trudnych warunkach należy ustawić system koło okna. Niniejszym Technotrade oświadcza, że WT235 jest zgodny z zasadniczymi wymogami oraz pozostałymi stosownymi postanowieniami Dyrektywy 2014/53/EU i ROHS 2011/65/EC.Kopię pełnej deklaracji zgodności można pobrać...
-
Page 82: Środki Ostrożności
w pobliżu urządzeń elektrycznych (komputerów, telewizorów, itd.) i konstrukcji metalowych w poruszających się pojazdach Zegar należy ustawić w miejscu z optymalnym sygnałem, tzn. blisko okna i z dala od powierzchni metalowych lub urządzeń elektrycznych. Środki ostrożności Urządzenie jest przeznaczone do zastosowań we wnętrzach.. ... - Page 83 Zużyte baterie należy natychmiast wymieniać. Wyjmować baterie, jeśli urządzenie nie jest używane. Nie ładować ponownie baterii ani nie wyrzucać ich do ognia, ponieważ mogą eksplodować. Nie przechowuj baterie w pobliżu przedmiotów metalowych. Styczność może spowodować zwarcie. ...
- Page 84 Zawiadomienie wymagań na mocy dyrektywy urządzenia elektryczne Ten symbol oznacza, że należy oddzielać urządzenia elektryczne od ogólnych odpadów domowych po zakończeniu ich żywotności. Urządzenie należy oddać do lokalnego punktu zbiórki odpadów lub centrum recyklingu. Dotyczy to wszystkich państw Unii Europejskiej oraz innych państw europejskich, w których obowiązuje system zbierania odpadów segregowanych.
Need help?
Do you have a question about the WT 235 and is the answer not in the manual?
Questions and answers