Advertisement
Quick Links
I N S T A L L A T I O N I N S T R U C T I O N S
LF55UxP-B2B
LF49UxP
Back-to-Back Floor Kiosk
Floor Kiosk
40"/42"/43"/46"/47"/48"/49"/50"/55" Portrait Floor Kiosks,
40"/42"/43"/46"/47"/48"/49"/50"/55" Portrait Back-to-Back Floor
Kiosks
Portuguese Product Description
Italian Product Description
Dutch Product Description
LF40/42/43/46/47/48/49/50/55UxP,
LF40/42/43/46/47/48/49/50/55UxP-B2B
Advertisement

Related Manuals for LEGRAND CHIEF LF40UxP


Summary of Contents for LEGRAND CHIEF LF40UxP
- Page 1 I N S T A L L A T I O N I N S T R U C T I O N S LF55UxP-B2B LF49UxP Back-to-Back Floor Kiosk Floor Kiosk 40"/42"/43"/46"/47"/48"/49"/50"/55" Portrait Floor Kiosks, 40"/42"/43"/46"/47"/48"/49"/50"/55" Portrait Back-to-Back Floor Kiosks Portuguese Product Description Italian Product Description Dutch Product Description...
-
Page 2: Important Safety Instructions
Concrete anchors must be installed product. The information contained in this document is subject directly into concrete surface. to change without notice or obligation of any kind. Legrand makes no representation of warranty, expressed or implied, regarding the information contained herein. Legrand... - Page 3 Installation Instructions LF40/42/43/46/47/48/49/50/55UxP, LF40/42/43/46/47/48/49/50/55UxP-B2B TABLE OF CONTENTS...
- Page 4 LF40/42/43/46/47/48/49/50/55UxP, LF40/42/43/46/47/48/49/50/55UxP-B2B Installation Instructions DIMENSIONS LF40UxP, LF42UxP, LF43UxP, LF46UxP, LF47UxP, LF48UxP (page 1 of 2) Viewing Area Viewing Area Image Diagonal Side Bezels Top/Bottom Bezels Model Width Height (C ) LF40UxP 40" 19.6" (497.8mm) 34.1" (866.1 mm) 5.84" (148.3 mm) 7.2"...
- Page 5 LF40/42/43/46/47/48/49/50/55UxP, LF40/42/43/46/47/48/49/50/55UxP-B2B Installation Instructions DIMENSIONS...cont’d LF40UxP, LF42UxP, LF43UxP, LF46UxP, LF47UxP, LF48UxP (page 2 of 2) FAN KNOCKOUTS 2RU KNOCKOUT 0.203 5.16 TOP KNOCKOUTS SCALE 1:8 THICKNESS REMOVABLE ACCESS PANEL ELECTRICAL OUTLET KNOCKOUT 2RU KNOCKOUTS ELECTRICAL OUTLET KNOCKOUT 3.00 76.20 REMOVABLE 0.20 5.16 STORAGE PANEL REMOVABLE...
- Page 6 Installation Instructions LF40/42/43/46/47/48/49/50/55UxP, LF40/42/43/46/47/48/49/50/55UxP-B2B DIMENSIONS...cont’d LF40UxP-B2B, LF42UxP-B2B, LF43UxP-B2B, LF46UxP-B2B, LF47UxP-B2B, LF48UxP-B2B (page 1 of 2) Viewing Area Viewing Area Image Diagonal Side Bezels Top/Bottom Bezels Model Width Height (C ) LF40UxP-B2B 40" 19.6" (497.8mm) 34.1" (866.1 mm) 5.84" (148.3 mm) 7.2"...
- Page 7 LF40/42/43/46/47/48/49/50/55UxP, LF40/42/43/46/47/48/49/50/55UxP-B2B Installation Instructions DIMENSIONS...cont’d LF40UxP-B2B, LF42UxP-B2B, LF43UxP-B2B, LF46UxP-B2B, LF47UxP-B2B, LF48UxP-B2B (page 2 of 2) 0.203 5.16 TOP KNOCKOUTS SCALE 1:8 THICKNESS 3.00 76.20 0.20 5.16 DIMENSIONS: INCH DIMENSIONS: INCH REMOVABLE [MILLIMETERS] STORAGE PANEL [MILLIMETERS] LOWER FRONT PANEL REMOVED...
- Page 8 Installation Instructions LF40/42/43/46/47/48/49/50/55UxP, LF40/42/43/46/47/48/49/50/55UxP-B2B DIMENSIONS...cont’d LF49UxP, LF50UxP, LF55UxP (page 1 of 2) Viewing Area Viewing Area Model Image Diagonal Side Bezels Top/Bottom Bezels Width Height (C ) LF49UxP 49" 23.8" (604.5 mm) 42.3 (1074.4 mm) 5.73" (164.5 mm) 6.48" (164.5 mm) LF50UxP 50"...
- Page 9 LF40/42/43/46/47/48/49/50/55UxP, LF40/42/43/46/47/48/49/50/55UxP-B2B Installation Instructions DIMENSIONS...cont’d LF49UxP, LF50UxP, LF55UxP (page 2 of 2) TOP KNOCKOUTS 0.203 5.16 SCALE 1:8 3.00 76.20 REMOVABLE 0.20 5.16 STORAGE PANEL SECTION B-B SCALE 1 : 8 LOWER FRONT PANEL REMOVED DIMENSIONS: INCH [MILLIMETERS]...
- Page 10 Installation Instructions LF40/42/43/46/47/48/49/50/55UxP, LF40/42/43/46/47/48/49/50/55UxP-B2B DIMENSIONS...cont’d LF49UxP-B2B, LF50UxP-B2B, LF55UxP-B2B (page 1 of 2) Viewing Area Viewing Area Image Diagonal Side Bezels Top/Bottom Bezels Model Width Height LF49UxP-B2B 49" 23.8" (604.5 mm) 42.3 (1074.4 mm) 5.73" (164.5 mm) 6.48" (164.5 mm) LF50UxP-B2B 50"...
- Page 11 LF40/42/43/46/47/48/49/50/55UxP, LF40/42/43/46/47/48/49/50/55UxP-B2B Installation Instructions DIMENSIONS...cont’d LF49UxP-B2B, LF50UxP-B2B, LF55UxP-B2B (page 2 of 2) TOP KNOCKOUTS 0.203 5.16 SCALE 1:8 3.00 76.20 0.20 5.16 SECTION B-B SCALE 1 : 8 REMOVABLE STORAGE PANEL DIMENSIONS: INCH LOWER FRONT PANEL REMOVED [MILLIMETERS]...
- Page 12 Installation Instructions LF40/42/43/46/47/48/49/50/55UxP, LF40/42/43/46/47/48/49/50/55UxP-B2B LEGEND Tighten Fastener Pencil Mark Apretar elemento de fijación Marcar con lápiz Befestigungsteil festziehen Stiftmarkierung Apertar fixador Marcar com lápis Serrare il fissaggio Segno a matita Bevestiging vastdraaien Potloodmerkteken Serrez les fixations Marquage au crayon Loosen Fastener Drill Hole Aflojar elemento de fijación Perforar...
-
Page 13: Tools Required For Installation
LF40/42/43/46/47/48/49/50/55UxP, LF40/42/43/46/47/48/49/50/55UxP-B2B Installation Instructions TOOLS REQUIRED FOR INSTALLATION 1/2" 5/16" 3/8" PARTS *Quantities are listed as (LFxxUxP / LFxxUxP-B2B) Monitor Interface Hardware Bag NOTE: Letters match markings on hardware bags BA (4/8) BB (4/8) BC (4/8) M4 x 12mm M4 x 25mm M4 x 50mm BD (4/8) BE (4/8) -
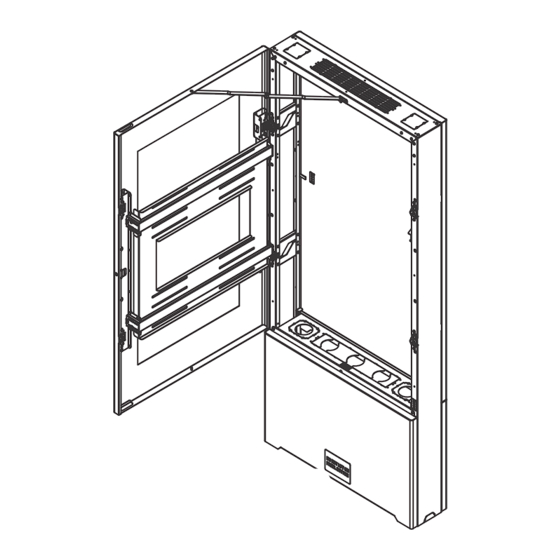
Page 14: Assembly And Installation
Installation Instructions LF40/42/43/46/47/48/49/50/55UxP, LF40/42/43/46/47/48/49/50/55UxP-B2B ASSEMBLY AND INSTALLATION (One-sided display only) Grasp and "squeeze" the sides of the rear panel from behind the kiosk. Remove Kiosk from Packaging (One-sided display only) Lift to remove the rear panel from NOTE: These instructions apply to both the LF49/50/55UxP the kiosk. - Page 15 LF40/42/43/46/47/48/49/50/55UxP, LF40/42/43/46/47/48/49/50/55UxP-B2B Installation Instructions Place kiosk (A) on top of drilled holes making sure that drilled holes are centered within the mounting holes in WARNING: TIPPING HAZARD! Close and lock door(s) kiosk. before removing the hex head bolts from the pallet. (See Figure 3) Keep door(s) closed and locked until the kiosk is fully secured to the floor.
- Page 16 Installation Instructions LF40/42/43/46/47/48/49/50/55UxP, LF40/42/43/46/47/48/49/50/55UxP-B2B Attaching Kiosk to Base Swing Install the kiosk to the PACLFx or PACLFx-B2B free-standing door (D) Gasket strip kiosk base or back-to-back base following instructions included with the base. Attaching Flat Panel NOTE: Use the key to unlock and open the swing door. Use a 5/16"...
- Page 17 LF40/42/43/46/47/48/49/50/55UxP, LF40/42/43/46/47/48/49/50/55UxP-B2B Installation Instructions IMPORTANT ! : The M8 screws do NOT require a washer. Use the universal washer (BO) ONLY with the Slots for depth adjustment M4, M5 or M6 screws. • Proper screw length requires base of screw head to protrude above flat washer a distance equal to or greater than the screw diameter.
- Page 18 Installation Instructions LF40/42/43/46/47/48/49/50/55UxP, LF40/42/43/46/47/48/49/50/55UxP-B2B Cabling Storage Panel Cables may be placed through the corners of the display frame. (See Figure 10) WARNING: Exceeding the weight capacity can result in Attach cable tie mounts (G) as necessary to keep cables serious personal injury or damage to equipment! It is the from being damaged in pinch points of the kiosk.
- Page 19 LF40/42/43/46/47/48/49/50/55UxP, LF40/42/43/46/47/48/49/50/55UxP-B2B Installation Instructions Figure 12 Return lower panel to kiosk by sliding it in from the left side of the kiosk. (See Figure 12) Pull up lower panel latch inside kiosk and push in right side of lower panel to complete installation of panel. (See Figure 12) (One-sided display only) Rest rear panel on top of lower panel and lift upward approximately 2 inches.
- Page 20 P +31 (0) 495 580 852 F +31 (0) 495 580 845 Asia Pacific A Office No. 918 on 9/F, Shatin Galleria 8800-003187 Rev00 18-24 Shan Mei Street 2020 Legrand Fotan, Shatin, Hong Kong www.legrandav.com P 852 2145 4099 05/20 F 852 2145 4477...
Need help?
Do you have a question about the CHIEF LF40UxP and is the answer not in the manual?
Questions and answers