Loewe Audiodesign SoundPort, SoundPort Compact, SoundPort Mini - Speaker System Manual
- Operating instructions manual (35 pages) ,
- Operating instructions manual (260 pages)
Advertisement
- 1 Delivery specifications
- 2 Performance
- 3 About this instruction manual
- 4 For your safety
- 5 Operating controls
- 6 Connections
- 7 Start-up
- 8 Switching on
- 9 Switching off
- 10 Charging the audio source
- 11 Source selection
- 12 Sound settings
- 13 Connecting the audio source to AUDIO IN
- 14 Lightning Connector
- 15 Bluetooth link
- 16 Connectivity Easy Pairing Link
- 17 USB Audio
- 18 PC Audio
- 19 Sync
- 20 Audio playback / Adjusting the volume
- 21 Handsfree function
- 22 Smart Standby mode
- 23 Standby mode
- 24 Accessories
- 25 Supported iDevices
- 26 Applicable remote control versions
- 27 Technical Data
- 28 Environmental protection
- 29 Declaration of conformity
- 30 Documents / Resources
Delivery specifications
- SoundPort or SoundPort Compact or SoundPort Mini
- Mains cable
- Audio cable, 3.5 mm jack
- USB cable (type A–B)
- This instruction manual
Performance
Connection options
- Bluetooth 2.1 + EDR
- Connectivity Easy Pairing (for connection with NFC-enabled devices)
- Apple Lightning Connector
- AUDIO IN (stereo audio input 3.5 mm jack)
- USB A (USB streaming / charging of connected audio sources)
- USB B (USB Speaker / Sync)
- Headphone jack (3.5 mm stereo audio output)
Replay functions
- Support of audio codecs (aptX, SBC)
- Bluetooth handsfree equipment
About this instruction manual
The information in this manual refers to the Loewe products SoundPort (item no. 52227x00), SoundPort Compact (item no. 52228x00), SoundPort Mini (item no. 52229x00).
In the instruction manual the term SoundPort is used as a collective term for all three SoundPort device versions. In the event that differences in the use / operation of the device versions occur, each SoundPort device type is described separately.
In the instruction manual the term iDevices is used as a collective term for the Apple devices iPhone, iPad, iPad mini and iPod.

For best results regarding safety and the longevity of the set, we recommend you read the chapter "For your safety".
For your safety
For your safety, and to avoid unnecessary damage to your unit, please read and follow the safety instructions below:
Intended use and ambient conditions
This unit is intended exclusively for playback of audio signals. It must not be used in rooms with a high level of humidity (e.g. bathroom, sauna) or a high dust concentration. The manufacturer's warranty is only valid for use in the specified permissible environment.
If the unit is used outdoors, make sure that it is protected from moisture (rain, dripping water and splashing water or dew). High humidity and dust concentrations lead to leakage currents in the device. This can result in a shock hazard by touching it or even fire.
If you have moved the unit out of the cold into a warm environment, leave it switched off for about an hour because of a possible formation of condensation.
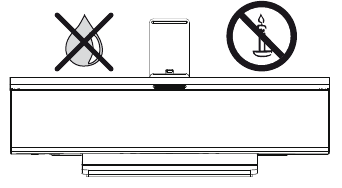
Do not place objects containing liquids on top of the unit. Protect the device against dripping and splashing water. Candles or naked flames must be kept away from the unit at all times to prevent it from catching fire.
Never place the device in a location where it is exposed to vibrations. This can lead to material overload.
Power supply
Incorrect voltages can damage the unit. This device may only be connected to a power supply with the voltage and frequency indicated on the type plate using the supplied mains cable. The mains plug of the unit must be easily accessible so that the device can be disconnected from the mains at any time. When unplugging the unit from the mains, pull at the connector body and not at the cable.
Lay the mains cable so that it cannot be damaged. The connecting cable may not be kinked or laid over sharp edges, stood on or exposed to chemicals; the latter also applies to the unit as a whole. A mains cable with damaged insulation can cause electric shocks and poses a fire risk.
Supervision
Do not allow children to use the device without supervision or to play in the immediate vicinity of the device. The device could tip over, be pushed off or pulled down from the stand surface and injure someone. Do not allow the switched-on device to run unattended.
Air circulation and high temperatures
Ensure that there is at least 3 cm free space on the sides and above the set for air circulation, if the set is placed in a cabinet or on a shelf.
Like any electronic device, your unit requires air for cooling. Obstruction of the air circulation can cause fires.
Prevent metal items, needles, paper clips, liquids, wax, or similar items, from getting into the interior of the device through the openings of the device covers. Such objects can cause short circuits in the unit, which could possibly cause a fire.
If something should get into the interior of the set then immediately unplug the mains plug of the device and contact the field service for more information.
Set-up
Place the unit on an even, firm, horizontal surface. Particularly make sure that the set does not protrude to the front and laterally when placed in or on pieces of furniture.
Set up the device where it is not exposed to direct sunlight and where it is not exposed to additional heating by radiators.
Volume

Loud music can lead to ear damage. Avoid extreme volume especially over long periods. Make sure that the volume is turned down on the TV set or the TV set is turned off before you leave the room.
Thunder storms
In the event of a thunderstorm, pull out the mains plug and all connected cables from the device. A voltage surge caused by lightning conducted through the mains could damage the unit. The mains plug and all connected cables should also be pulled out during long periods of absence.
Repairs and accessories

Under no circumstances, do not open or remove the housing cover, otherwise you will come into contact with dangerous voltages or be exposed to other hazards. There are no parts inside the unit that can be repaired by the user. Have your device repaired or serviced by authorised technicians only.
Only use original accessories, if possible.
Cleaning and care
Switch off the device with the main switch prior to cleaning.
Clean the aluminium surface with a soft, slightly damp, clean and colour-neutral cloth only, without any aggressive or scouring cleaning agents.
You can remove any dust on the speaker surface by carefully using a vacuum cleaner if needs be.
Operating controls

-
Key
![]() (Switching ON/OFF)
(Switching ON/OFF) -
Key
![]() (Source selection / Sound settings)
(Source selection / Sound settings) - Key
![]() (Handsfree talking / Bluetooth link)
(Handsfree talking / Bluetooth link) - Key
![]() (Volume +)
(Volume +) - Key
![]() (Volume –)
(Volume –) - Apple Lightning Connector (max. 2.1A)
- Connectivity Easy Pairing Antenna (for connection with NFC-enabled devices)
- LED display
- Microphone for handsfree talking (hidden behind the speaker cover)
- Infrared receiver (hidden behind the speaker cover)
 (Switching ON/OFF)
 (Source selection / Sound settings)
 (Handsfree talking / Bluetooth link)
 (Volume +)
 (Volume –)
Connections

- Power switch
- AC-IN (mains socket)
- Cable cover (removable)
- AUDIO IN (stereo audio input, 3.5 mm jack)
- USB B connection
- USB A connection
- Headphone output (3.5 mm jack)
Start-up
Connecting to the mains supply
Remove from SoundPort / SoundPort Compact the cable cover 13 on the rear side of the device.
Plug the mains cable into the mains socket 12 and connect it to a 220-240 V 50/60 Hz socket.
Switching on

When switched off, the LED display is 8 dark.

Switch the power switch 11 to position ON.
The SoundPort is in the Standby mode.

The middle two segments of the LED display 8 light dimmed.

Press the ON/OFF key 1 on the unit.

The LED display 8 lights up green on the very first start (AUDIO IN source).
When switching on later, the last selected source remains active. For the colours of the LED display for each source.
- After 10 minutes without music playback, receiving or sending a call, pressing a key on the SoundPort or on the Assist remote control, connecting or disconnecting a device and running a sync process, the SoundPort will automatically switch to Smart Standby mode.
Switching off

Press the ON/OFF key 1 on the unit.
The SoundPort switches to the Standby mode.

The middle two segments of the LED display 8 light dimmed.
- After 4 hours in Smart Standby mode, the SoundPort automatically switches to the Standby mode.
Charging the audio source
You may charge the battery of your audio source, e.g., a mobile phone, iPad, etc. via your SoundPort.
- The power switch of the SoundPort must be switched on.
- Only one device should be charged at the same time.
Charging of iDevices at the Lightning Connector:
Plug your iDevice with Lightning Connector on the Lightning Connector built-in in the SoundPort 6.
Charging of USB audio sources:
Connect the type A plug of the USB cable into the USB socket 16 of the SoundPort. To do this, use a USB cable with type A plug suitable for your audio source (commercially available).
- The connected device (Lightning / USB) is charged in both the operating and the Smart Standby mode of the SoundPort. The audio source will not be charged in Standby mode.
Source selection
The SoundPort offers several ways to connect and select audio sources. Each source is assigned a different colour on the LED display.
LED colours of the individual sources

AUDIO IN (green)
How to connect an audio source via a 3.5 mm stereo cable to the AUDIO IN port of the Soundport is described on "Connecting the audio source to AUDIO IN".

Apple Lightning Connector (violet)
How to connect iDevices to the Lightning Connector is described on "Lightning Connector".

Bluetooth (blue)
How to link audio sources via Blutooth / NFC is described on "Linking the audio source via Bluetooth".

USB Audio (yellow)
How to connect audio sources to USB is described on "Connecting the audio source with USB cable".

PC Audio (pink)
How to connect the SoundPort as a USB device is described on "Connecting the SoundPort as USB device (PC Audio)".
Selection of the source

Each time you press the SRC key 2 you go to the next source.
The sequence of the sources corresponds to the sequence of the LED colours described above.
Having selected the source, the SoundPort tries to establish a connection to the audio source via the selected port.

During the search, the LED display 8 flashes in the selected source colour (the maximum search time is 30 sec).

If successful, the LED display 8 lights up in the selected source colour.

If the search was not successful the LED display 8 lights up dimmed in the selected source colour (60% brightness).
Sound settings
With your SoundPort you have the possibility to select predefined sound settings for audio playback.
Selecting the sound settings

Press the SRC key 2 on the SoundPort for a longer period (approx. 2 sec).

The LED display 8 shows the last selected sound setting (e.g. classic).

Press the + key 4 or – key 5 repeatedly until the desired sound is selected (e.g. flat).

If no key is pressed for a few seconds, the previously selected source will be indicated again.
LED display of the sound settings

1 LED display: presetting flat

2 LED displays: presetting voice

3 LED displays: presetting classic

4 LED displays: presetting pop
Connecting the audio source to AUDIO IN
You can connect your SoundPort to your audio source, e.g., mobile phone, music player, etc., using an audio cable (3.5 mm jack plug).
Connect the stereo audio input AUDIO IN 14 of the SoundPort with the analogue stereo audio output of your audio source A .
To do so, use the supplied audio cable S with 3.5 mm jack plug.

![]()
AUDIO IN has been selected as source.
The audio signal is now replayed via the audio cable.

Lightning Connector
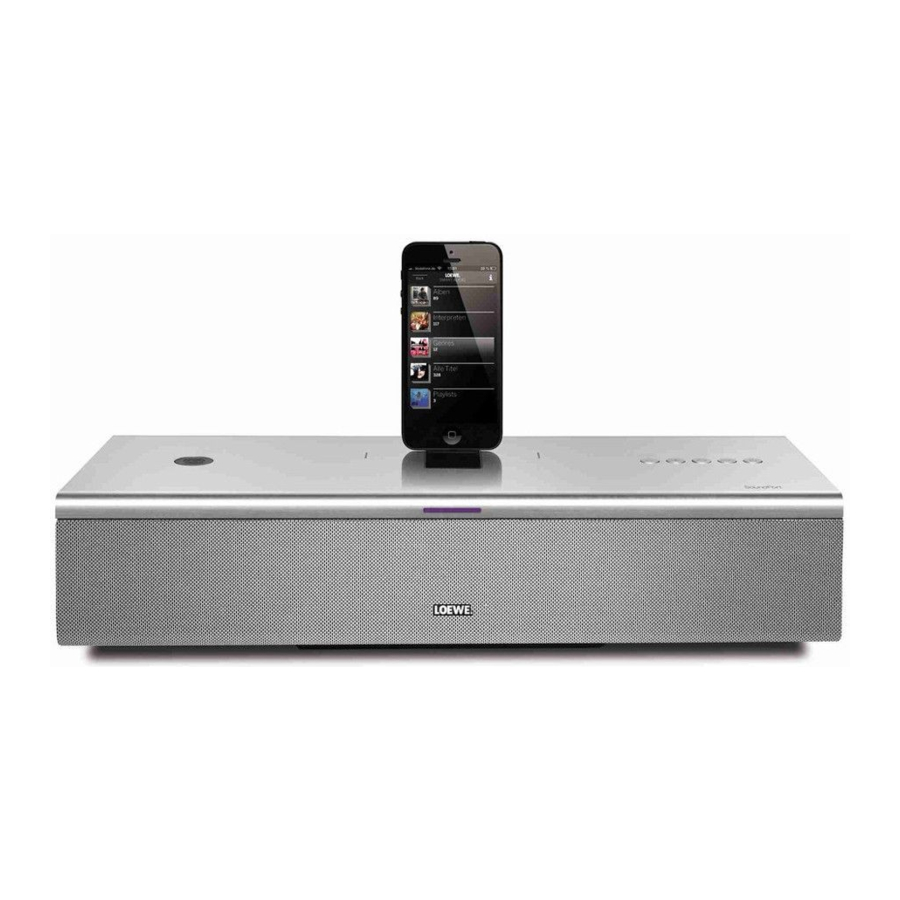
Your SoundPort is equipped with an Apple Lightning Connector for iDevices. Thus, you can replay any sound source (music, video, internet radio) from your iDevice with Lightning Connector via the speakers of the SoundPort.
The iDevice connected to the Lightning connector is charged during operation and also in the Smart Standby mode of the SoundPort.
Opening the Lightning Connector
Press slightly on the top of the closed cover flap at its front. The Lightning Connector opens automatically when the lock is released.

To fix the holder push the opened cover flap to the rear in its locking position. Now you can use the Lightning Connector for iDevices.
Closing the Lightning Connector
Press the opened cover flap from the locking position to the front. Close the cover by pushing it down beyond the closed end position. You will hear the engagement of the cover flap.

Connecting the audio source to the Lightning Connector
You can connect iDevices with Lightning Connector in vertical alignment with the built-in Lightning Connector. The iDevices can also be positioned horizontally. In this case, the connection is made via Bluetooth or via USB cable connection.
If the iDevice is plugged into the Lightning Connector of the SoundPort, it is ready for audio playback or to sync with the PC / laptop.
Below you will see which iDevice can be used on the SoundPort device variants (maximally with respect to size).

-
Please remove any protective cover from your iDevice to ensure a reliable connection to the lightning connector.


Bluetooth link
Linking the audio source via Bluetooth
You can link your SoundPort to an audio source, e.g., smartphone, tablet PC, etc. using a wireless Bluetooth connection. The audio sources must support the Bluetooth A2DP protocol.
- The distance between your SoundPort and the audio source must be no more than 10 m (line of sight).
- The SoundPort stores the last 5 audio sources linked via Bluetooth. In this way, the link will be established more quickly when linking again. However, only one active link is possible at the same time. If a new audio source is added, the "oldest" stored audio source is deleted from the list of links.
![]()
Bluetooth has been selected as source.


Press the key 3 on the SoundPort for a longer period (approx. 3 sec).
You hear a signal tone.

The LED display 8 flashes.


Enable the Bluetooth function of your audio source. If necessary, get help from the instruction manual of your audio source.
If necessary, confirm the Bluetooth Search function of the audio source.
Now, Bluetooth devices will be searched near the audio source. Select SoundPort_xx . If a code is requested, enter 0000.
After the linking is completed you hear a signal tone.

The LED display 8 lights up continuously, the SoundPort is now ready for audio playback.
- For some audio sources, the link must be explicitly enabled before music playback can be heard from the SoundPort.

When changing the source by pressing the SRC key 2 the ongoing music playback is paused / stopped, but the link to the audio source remains.

When pressing the ON/OFF key 1 the SoundPort will be switched to the Standby mode. An ongoing music playback is paused / stopped, the link with the audio source is interrupted.
After switching the SoundPort on again using the ON/OFF key 1, the SoundPort tries to relink to the audio source. In this state, the LED indicator 8 flashes. After successful linking the LED will light up permanently.
Connectivity Easy Pairing Link
Linking the audio source via Connectivity Easy Pairing
It is especially simple to link your SoundPort to your audio source, e.g., smartphone, tablet PC, etc., when using the Connectivity Easy Pairing function (linking with NFC-enabled devices). For this purpose, the audio source must support the NFC function.

Enable the NFC function and the Bluetooth function of your audio source. If necessary, get help from the instruction manual of your audio source.
- Find out the exact NFC detection area in the manual of your audio source.
- The link via theConnectivity Easy Pairing function is permanently active for the SoundPort (exception: Standby mode). Therefore, you do not have to change manually to the Bluetooth source.
Hold the NFC detection area of your audio source A in the direction of the Connectivity Easy Pairing antenna 7 of the SoundPort.

If necessary, confirm the inquiry of your audio source that it can be coupled to the SoundPort. After the linking is completed you hear a signal tone.

The LED indicator 8 lights up permanently.
Now, the SoundPort is linked to your audio source via Bluetooth and is ready for audio playback.
- For some audio sources, the link must be explicitly enabled before music playback can be heard from the SoundPort.
- If another NFC-enabled audio source appears in the coupling area of the SoundPort, this is linked with the SoundPort. The existing link to the previous audio source is disconnected.
USB Audio
Connecting the audio source with USB cable
You can connect your SoundPort to your audio source, e.g., mobile phone, music player, etc., using a USB cable.
Connect the USB connector (type A) 16 of the SoundPort with the audio source A. Depending on your audio source use the appropriate USB cable U.

- Certain audio sources, e.g., Android smartphones have a micro-USB port; iDevices without Lightning Connector (1 are connected via a 30-pin connector to the USB port of the SoundPort.
- The audio source must support audio playback via USB (USB streaming).
![]()
USB Audio is selected as a source.

The audio signal is now replayed via USB.
PC Audio
Connecting the SoundPort as USB device (PC Audio)
You can connect a PC/laptop to your SoundPort via a USB cable. The SoundPort logs on to the PC/laptop as a USB speaker and can then be used as a playback device to the PC/laptop.
Audio devices connected to the SoundPort via Lightning Connector can be synchronised with the PC/ laptop via the SoundPort.
Connect the USB connector (B type) 15 with a free USB port on your PC/laptop P. To do so, use a USB cable type A-B U.
")
![]()
PC Audio is selected as a source.

The audio signal is now replayed via USB.
- The function depends on the hardware and software package of the connected source, e.g. connection configuration, used driver, codecs and formats. Please refer also to the documentation for your source device and if necessary, update the driver or firmware.
Sync
SoundPort – iTunes Sync
An iDevice device connected to the Lightning Connector of the SoundPort can be synchronised via the SoundPort with iTunes on your PC/laptop. The SoundPort serves as a connecting link between iDevice and PC/Laptop.

- The functionality of this application depends on the PC, notebook, operating system, iTunes, Apple iOS and iDevice as well as on the respective software versions used.
- The SoundPort is connected to the PC as a USB device.
- An iDevice is contacted on the Lightning Connector of the SoundPort.
![]()
Apple Lightning Connector is selected as source.- iTunes is installed on the PC/notebook and the automatic synchronisation is enabled (for iTunes settings see the software documentation).


The LED display 8 indicates the Apple Lightning Connector as selected source.

Press the key 3 on the SoundPort for a longer period (approx. 3 sec). to activate the Sync mode.

The LED display 8 flashes during the sync process from left to right.
- Also note any possible notifications and messages of the operating system or from iTunes on your PC/notebook.
- During the sync process, no other functions (switching off, source selection, handsfree talking, volume change etc.) are possible with the SoundPort.
![]()
Press the key 3 on the SoundPort for a longer period (approx. 3 sec) to end the Sync mode.
Audio playback / Adjusting the volume
Audio playback
- An audio source must be connected or linked with the SoundPort.
- In the source selection this audio source must be selected.

The LED display 8 shows the selected source, e.g., USB Audio.

Start the audio playback on your audio source. The playback control (title selection, winding, etc.) is done via the player/app of the audio source.
Adjusting the volume
- When using an audio cable connection adjust the volume of your audio source to a high level to avoid interfering noise. Adjust the desired volume on the SoundPort.
- When connecting iDevices via Bluetooth the volume adjustment between iDevice and SoundPort is coupled, i.e. change in the volume of one of the devices alters the volume of the other one.
- Loud music can lead to ear damage. Avoid extreme volume especially over long periods.
- After 10 minutes without audio playback or key operation, SoundPort automatically switches to Smart Standby mode.

The LED display 8 indicates the selected source, e.g., Apple Lightning Connector.

Set the volume on the SoundPort using the keys + 4 and – 5.

The volume can be adjusted in several steps which are represented visually by four LEDs of the LED indicator 8.
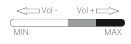
Pressing briefly the key + 4 or – 5 increases or decreases the volume by one step.
When keeping the + or - key depressed you traverse the whole volume range.
The maximum volume is indicated by two flashes of all LEDs with full brightness.
If there is no volume change within three seconds, the LED display 8 shows the colour of the selected source again.

Mute the SoundPort by pressing the + and - keys simultaneously. All four LEDs of the LED display 8 flash with full luminous intensity.
By pressing the + or - key the muting is cancelled. The LED display shows the previously selected source again.
Handsfree function
Handsfree function
- The SoundPort must be coupled and linked via Bluetooth or Connectivity Easy Pairing with your mobile phone.
- Loud ambient noise impairs the quality of the handsfree function. Make sure that there is a quiet environment or abstain from using the handsfree function if there is no proper environment.
- To achieve a high level of intelligibility between callers, speak only alternately. The distance between the caller and the SoundPort should be between 0.3 m and 1.2 m.
- To accept an incoming call, the SoundPort must be switched on and Bluetooth must be selected as the source.
The LED display 8 indicates Bluetooth as source.
In case of an incoming call, a ring tone sounds.
The LED display 8 flashes quickly in white.
An audio playback will be paused in this case.

Answer the incoming call by pressing the key 3 on the SoundPort or the corresponding key on your mobile phone.

The LED display 8 lights up in white.
When speaking turn your face to the front 9 of the SoundPort. The microphone is located in the centre of the speaker cover.

Set the volume on the SoundPort to a medium level using the keys + 4 and – 5.

Finish the telephone conversation by pressing again the key 3 on the SoundPort or the corresponding key on your mobile phone.

The LED display 8 resumes to the colour of the last selected source again.
Smart Standby mode
The Smart Standby mode is automatically activated if the following happens at the SoundPort for the duration of 10 minutes:
- no music is played back,
- there is no incoming or outgoing call,
- no key is pressed at the SoundPort or on the Assist remote control,
- no device is connected or disconnected and
- no sync is in progress.
In the Smart Standby mode, some circuit parts (DSP / amplifier, etc.) are switched off in order to save power in the SoundPort.
The sound port can be aroused from the Smart Standby mode in different ways:
- An iDevice is being connected to the Lightning Connector.
- A mobile device is being linked via Connectivity Easy pairing (NFC).
- Playback with a paired Bluetooth device continues (only if Bluetooth was active as a last source before the Smart Standby mode).
- Playback with a device at AUDIO IN is continued (only if AUDIO IN was active as a last source before the Smart Standby mode).
- One of the four SRC device keys 2, Handsfree 3 , + 4 oder – 5 is pressed.
- linked Bluetooth device is logged off.
- A key of the Assist remote control unit is pressed.
- Devices connected to Lightning / USB are also charged in Smart Standby mode of the SoundPort.
- Pressing the ON/OFF key 1 switches the SoundPort to the Standby mode (see below).
- After 4 hours in Smart Standby mode, the SoundPort automatically switches to the Standby mode.
- The power consumption in Smart Standby mode is higher than in the Standby mode
Standby mode
Press the ON/Off key 1 to switch the SoundPort to the Standby mode.
In Standby mode, the device can only be switched on again by the ON/OFF key 1 on the SoundPort or by the ON/OFF key on the Assist remote control.
- In the Standby mode, no devices connected to Lightning / USB are charged.
- The power consumption in Standby mode is lower than in Smart Standby mode.
Accessories
Inlays
With inlays available as accessories, you can customise your SoundPort to your needs. Ask your dealer for appropriate inlays for your SoundPort, SoundPort Compact and SoundPort Mini.
Remote control - Assist
With the optional accessory Assist system remote control you can control the functions of your SoundPort. If your Loewe device is supplied with the latest Assist, you can use your existing remote control.
The remote control must first be set for the operation of your SoundPort. The device keys (depending on remote control version) STB – VIDEO – AUDIO – DVD– REC– RADIO– SP can be set to control your SoundPort.

Press the required device key and the Stop key simultaneously for 5 sec until the corresponding LED display of the selected device key flashes twice.

Then enter the two-digit device code 31 for Soundport. The LED above the selected button flashes twice.
Key assignment

- Sound on/off
- Volume +
- Sound setting – (previous preset)
- Volume –
- Playback (1
- Previous title (1
- Pause (1
- On / Off
- Setting of the device key for SoundPort (see above) / Switching to SoundPort operation
- Source selection + (next audio device)
- Sound setting + (next preset)
- Source selection – (previous audio device)
- Next title (1
- Stop (1
(1 The function is only available for audio sources via Lightning connector, Bluetooth and USB audio.
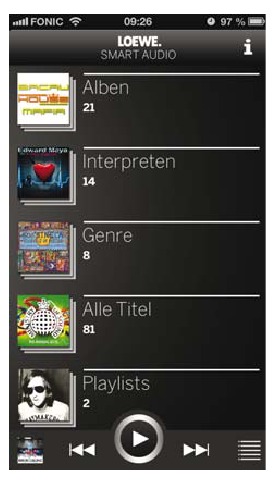
Smart Audio App

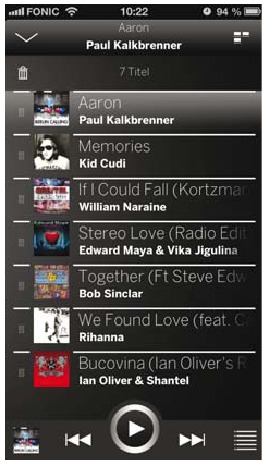
Completely smart: The Loewe Smart Audio app. Experience music you have stored on your smartphone, now with the intuitive and high-end Loewe audio player. Available free of charge from the Apple App Store or Google Play Store.
- The home screen provides a structured overview of the locally stored music. At a glance, you can capture the content and with only a few operating steps it takes you to your favorite title.
![]()
-
Automatically, all recently heard titles will be added to the playlist. This list can always and everywhere be reached by the list icon at the bottom right. In this list, titles can be deleted or moved. For this purpose, the trash icon or the left part of each list item is used. The active areas do not only enable a jump into the playlist - with just one click you go to the home screen or the player.
![]()
-
The player always shows the currently playing song with all its control possibilities. With the AirPlay icon you can easily select all available speakers.
![]()

Supported iDevices
- As of 18 February, 2014.
Sound Port – Lightning Connector:
iPhone 5, iPhone 5c, iPhone 5s
iPad (4th generation), iPad mini, iPad mini with Retina display, iPad Air
iPod touch (5th generation), iPod nano (7th generation)
Sound Port – USB:
iPhone, iPod touch, iPod nano
Sound Port Compact – Lightning Connector:
iPhone 5, iPhone 5c, iPhone 5s
iPad (4th generation), iPad mini, iPad mini with Retina display, iPad Air
iPod touch (5th generation), iPod nano (7th generation)
Sound Port Compact – USB:
iPhone, iPod touch, iPod nano
Sound Port Mini – Lightning Connector:
iPhone 5, iPhone 5c, iPhone 5s
iPod touch (5th generation), iPod nano (7th generation)
Sound Port Mini – USB:
iPhone, iPod touch, iPod nano
Applicable remote control versions
The list includes the remote control versions that can be used to control the functions of the SoundPort. How to set the remote control to operate the SoundPort.
- The availability of the device code 31 depends on the version of the remote control unit. The item number / version you can read in the battery compartment of the remote control.
| Assist 1 (TV) | 89900A13 / 89900A14 |
| Assist 1 (MediaVision) | 89900A11 |
| Assist 1 (HomeCinema) | 89900A12 |
| Assist 1 (SoundVision) | 89900A10 |
| Assist 1 (MultiContr. II) | 89900A09 |
| Assist 2 (TV) | 89950A23 |
| Assist 2 (SoundBox) | 89950A20 |
| Assist 2 (AirSpeaker) | 89950A22 |
Technical Data
| SoundPort | SoundPort Compact | SoundPort Mini | |
| Item number | 52227x00 | 52228x00 | 52229x00 |
| Operating temperature | 5°C... 35°C | ||
| Humidity | 30%... 85% (no condensation) | ||
| Dimensions (approx.) (W x H x D) | 550 x 126 x 201 mm | 415 x 109 x 178 mm | 280 x 91 x 153 mm |
| Weight | 5.5 kg | 3.6 kg | 1.9 kg |
| Mains voltage | 220 - 240 V, 50/60 Hz | ||
| Power consumption: On mode (max. Audio output) On mode (1/8 Audio output) Smart Standby mode Standby mode | 103 W 51 W 2,1 W < = 0,5 W | 62 W 40 W 2,1 W < = 0,5 W | 48 W 35 W 0,8 W < = 0,5 W |
| USB A | 2.0, type A, charging function, maximum 2.1 A | ||
| USB B | PC Audio, iTunes Lightning Sync | ||
| Audio IN | 3.5mm jack, 1.0 Vrms, 10k Ohm | ||
 | Headphone, 32–200 Ohm | ||
| Speakers | 2 tweeters, 15 W each 2 broadband speakers, 20 W each 2 woofers, 60 W each | 2 broadband speakers, 20 W each 1 woofer, 60 W | 2 broadband speakers, 8 W each 1 woofer, 20 W |
| Transmission range | 65 Hz to 20 kHz | ||
| Output power (sine / music): | 2 x 17 W + 1 x 50 W / 2 x 34 W + 1 x 100 W | 2 x 10 W + 1 x 20 W / 2 x 20 W + 1x 40 W | 2 x 6 W + 1 x 10 W / 2 x 12 W + 1 x 20 W |
| Volume levels | 48 | 24 | |
| Wireless transmission | Bluetooth 2.4 GHz, 10 m transmission range NFC | ||
| Bluetooth protocols | A2DP, 2.1+EDR, AVRCP 1.4, HS, HFP 1.6 (wideband speech), aptX-Decoder, AEC | ||
Environmental protection
Cardboard box and packaging
In line with national regulations regarding the disposal of packaging materials, we pay a fee to authorised recyclers who collect packaging from dealers. Nevertheless, we recommend that you keep the original cardboard box and the rest of the packaging materials so that the device can, if necessary, be transported under the safest possible conditions.
The device


The EU Directive 2002/96/EC governs the proper return, handling and recycling of used electronic appliances. Old electronic devices must therefore be disposed of separately. Never dispose of this device in normal domestic waste! You can hand in your old unit free of charge at identified collection points or to your dealer if you buy a similar new unit.
Additional details about return (also for non EU countries) are available from your local municipal authorities.
Batteries

In accordance with the Battery Directive, used batteries should no longer be disposed of in the domestic waste. You can dispose of used batteries free of charge at the collection points in retail outlets. Your dealer will also have a collection point for used batteries.
Declaration of conformity

The set is CE marked and complies with EU directives. The complete Declaration of conformity can be our website.
Legal information
"© 2012 CSR plc and its group companies.
The aptX® mark and the aptX logo are trade marks of CSR plc or one of its group companies and may be registered in one or more jurisdictions."

"Made for iPod", "Made for iPhone" and "Made for iPad" mean that an electronic accessory has been designed to connect specifically to iPod, iPhone or iPad, respectively, and has been certified by the developer to meet Apple performance standards. Apple is not responsible for the operation of this device or its compliance with safety and regulatory standards. Please note that the use of this accessory with iPod or iPhone may affect wireless performance.
iPod, iPhone, iPad, iPad mini and iTunes are registered trademarks of Apple Inc. in the USA and other countries.
SoundPort / SoundPort Compact:

SoundPort Mini:

Legal details
Loewe Technologies GmbH
Industriestraße 11
D-96317 Kronach
Editorial date 05/14-4.0 TB
© Loewe Technologies GmbH, Kronach
All rights including translation, technical modifications and errors reserved.

Documents / ResourcesDownload manual
Here you can download full pdf version of manual, it may contain additional safety instructions, warranty information, FCC rules, etc.
Download Loewe Audiodesign SoundPort, SoundPort Compact, SoundPort Mini - Speaker System Manual
Advertisement


Need help?
Do you have a question about the SoundPort and is the answer not in the manual?
Questions and answers