Table of Contents
Advertisement
Quick Links
Advertisement
Table of Contents

Subscribe to Our Youtube Channel
Related Manuals for Cylinda DM 3005


Summary of Contents for Cylinda DM 3005
- Page 1 DM 3005...
- Page 2 DM 3005...
- Page 3 Please read this user manual first! Dear Customer, We hope that you get the best results from your product which has been manufactured with high quality and state-of-the-art technology. Therefore, please read this entire user manual and all other accompanying documents carefully before using the product and keep it as a reference for future use.
-
Page 4: Table Of Contents
CONTENTS 1 INSTRUCTIONS FOR SAFETY 5 OPERATING THE AND ENVIRONMENT PRODUCT Keys ...............27 General safety ..........4 Intended use ........... 4 Preparing the machine ........27 Children’s safety ..........5 Programme selection ........27 Disposing of packaging material ....5 Auxiliary functions ........29 Transportation of the product ....... -
Page 5: Instructions For Safety And Environment
INSTRUCTIONS FOR SAFETY AND ENVIRONMENT This section contains safety electric shock! • instructions that will help to get Never touch the plug with protected from risk of personal wet hands! Never unplug by injury or property damage. Failure pulling on the cable, always to follow these instructions shall pull out by grabbing the plug. -
Page 6: Children's Safety
instructions for safety and environment • • This appliance is intended Do not forget to close the door to be used in household and of the product when leaving similar applications such as: the room where it is located. • - Staff kitchen areas in shops, Store all detergents and offices and other working... -
Page 7: Compliance With Weee Directive And Disposing Of The Waste Product
instructions for safety and environment Compliance with WEEE Directive and Disposing of the Waste Product This product complies with EU WEEE Directive (2012/19/EU). This product bears a classification symbol for waste electrical and electronic equipment (WEEE).This product has been manufactured with high quality parts and materials which can be reused and are suitable for recycling. -
Page 8: Dishwasher
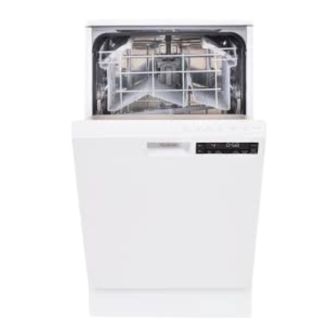
DISHWASHER Overview 1. Top Cover (depends on model) 2. Upper impeller 3. Lower basket 4. Lower impeller 5. Filters 6. Rating Label 7. Control panel 8. Door 9. Detergent dispenser 10. Cutlery basket 11. Salt reservoir lid 12. Upper basket rail 13. -
Page 9: Fan Drying System
Dishwasher Technical specifications Compliance to standards and test data / EC declaration of conformity This product complies with the following EU directives; Development, production and sales stages of this product comply with the safety rules included in all pertaining European Community regulations. 2006/95/EC, 2004/108/EC, 93/68/EC, IEC 60436/DIN 44990, EN 50242 Power input 220-240 V, 50 Hz (see rating label) -
Page 10: Installation
INSTALLATION Refer to the nearest Authorised Service capacity! The product must be installed Agent for installation of your product. To on a flat surface in order for the door to make the product ready for use, make sure be closed comfortably and securely. •... -
Page 11: Waterprotect
Installation on the new product. Use the new water inlet hose supplied with the product. max 100 cm • Connect the water inlet hose directly to the water tap. Pressure coming from the tap should be minimum 0.3 and maximum 10 bars. If the water pressure min 50 cm exceeds 10 bars, a pressure relief valve min 4cm... -
Page 12: Electrical Connection
Installation • The specified voltage must be equal to your mains voltage. • Do not make connections via extension cables or multi-plugs. Damaged power cables must be replaced by the Authorised Service Agent. If your dishwasher is equipped with internal illumination, lamp should only be replaced by the Authorised Service Agent in case of failures that may occur on the... -
Page 13: Preparation
PREPARATION Tips for energy saving Following information will help you use the product in an ecological and energy-efficient manner. Wipe away any coarse food remnants on the dishes before putting them in the product. Operate the product after filling it completely. When selecting a programme, consider the table of “Programme data and average consumption values”. - Page 14 Preparation Adjusting the water softening system Washing performance will increase when water softening system is adjusted properly. Use the test stripe supplied with the product to determine the supply water hardness in order to adjust the system. 1 Second Lime free Level A little limy Level...
-
Page 15: Adding Salt
Preparation Adding salt Water softening system needs to be regenerated in order that the product operates with the same performance continuously. Dishwasher salt is used for this purpose. Use only special softening salts produced particularly for the dishwashers in your machine. We recommend using granular or powder softening salts. -
Page 16: Adding Detergent
Preparation Since different salt brands in the market have different particle sizes and since the water hardness may vary, dissolution of the salt in water may take a couple of hours. Therefore, Salt Indicator remains on for a while after adding salt into the machine. -
Page 17: Tablet Detergents
Preparation Put the detergent into the detergent dispenser If dishes have been waiting just before operating the machine as for a long time and have illustrated below. dried residues, fill the 5 cm³ 1. Push the latch to right to open the compartment too (5). - Page 18 Preparation 4. Make the appropriate rinse aid settings. Tablet detergents give satisfying results only under certain usage Depending on the model, salt conditions. The best washing indicator and/or rinse aid performance in dishwashers is indicator must be enabled again obtained by using detergent, if they were disabled before.
- Page 19 Preparation Decorative prints of chinaware as well as aluminum and silver items may get discoloured or tarnished after washing in the dishwasher just as it happens in handwashing as well. Some delicate glass types and crystals may become dull in time. We strongly recommend you to check if the tableware you are going to purchase is suitable...
- Page 20 Preparation Suggestions for loading the dishwasher Improper Loading Of Dishware Lower basket Upper basket DISHWASHER / USER INSTRUCTIONS 19 / 42 EN...
-
Page 21: Cutlery Basket
Preparation Cutlery basket (depends on model) Cutlery basket is designed to wash your dishes such as knife, fork, spoon, etc. in a cleaner manner. Bringing the tines to the horizontal position by holding them from the tips may cause them to bend. Therefore, it will be appropriate to bring the tines in the middle to horizontal or vertical position by holding them... -
Page 22: Collapsible Lower Basket Tines
Preparation Collapsible lower basket tines Bringing the tines to the horizontal position by holding (depends on model) them from the tips may cause Foldable tines (A) located at the lower them to bend. Therefore, it will basket of the machine are designed for be appropriate to bring the tines an easier placement of large pieces such in the middle to horizontal or... -
Page 23: Collapsible Upper Basket Tines
Preparation Collapsible upper basket tines (depends on model) Upper basket of the machine is equipped with tines with gradual folding system (A) that you can lay down when you need a larger space for large dishes. To bring the collapsible tines into horizontal position, grab the tines from mid position and push them in the directions of arrows. -
Page 24: Adjusting The Height Of Loaded Upper
Preparation Adjusting the height of loaded 3. Make sure that both sides of the basket height adjustment mechanism are at the upper basket same level (down or up). (depends on model) Basket adjustment mechanism on the upper basket of the machine is designed to allow you create wider areas in the upper or lover section of the machine based on your requirements by adjusting the height of the... -
Page 25: Adjusting The Height Of The Upper Basket
Preparation Adjusting the height of the upper basket (depends on model) Basket adjustment mechanism on the loaded upper basket of the machine is designed to allow you create taller areas in the upper or lower section of the machine based on your requirements by adjusting the height of the loaded basket in up or down directions. -
Page 26: Height Setting With Empty Basket
Preparation Height setting with empty basket (depends on model) In this model, the height setting of the upper basket may be changed using the wheels which are mounted at two different heights. Release the latches on both the right and left tracks of the upper basket by pushing them outwards Pull out the basket out completely. -
Page 27: Operating The Product
OPERATING THE PRODUCT 1. Display 5. Function keys 2. On/Off key Half Load Function 3. Start/Pause/Cancel key Super Rinse function 4. Time Delay key (Not in use) SteamGloss function 6. Programme Selection keys 11. Time Delay indicator 7. Programme indicator 12. -
Page 28: Keys
Operating the product Keys 3. Press Programme Selection keys until the number of the programme you selected On / Off key appears on the Programme indicator. It is used to turn on or off the machine. Use P+ to switch to the next programme, Press On / Off Key to switch ON. - Page 29 Operating the product /42 EN DISHWASHER / USER INSTRUCTIONS...
-
Page 30: Auxiliary Functions
Operating the product Auxiliary functions indicator will light on the display in the Function Selected indicator. Washing programmes of your dishwasher 4. Start the programme by pressing Start / are designed to obtain the best cleaning Pause / Cancel key. effect, considering the type of the soil, soiling degree and properties of the dishes to be Super Rinse function... -
Page 31: Innerclean
Operating the product InnerClean Interior Lighting (Depends on the model) This programme is recommended to be Some models have interior lighting to operated on each 1-2 months for machine illuminate the interior when the door is cleaning and necessary hygiene. The opened. - Page 32 Operating the product the end of the period. Time Delay is Your machine performs water displayed on the Display Information softening depending on the Line. Selected programme will start as hardness level of the supply soon as the countdown is over. water.
-
Page 33: Cancelling The Programme
Operating the product To activate the Child Lock: There might be residues of 1. Pres Child (Key) Lock keys detergent or rinse aid left in the simultaneously and hold for 3 seconds. machine and / or on the pieces 2. "3", "2", "1" is displayed on Display being washed depending on the step the programme you have Information Line and key lock is... -
Page 34: Overflowing Warning
Operating the product Leave your dishes in the machine for about 15 minutes to cool down after they are washed. Your dishes will dry in a shorter time if you leave the door of your machine ajar during this period. This process will increase the drying effectiveness of your machine. -
Page 35: Cleaning The Filters
MAINTENANCE AND CLEANING Service life of the product extends and 1. Turn the micro filter (1) and coarse filter frequently faced problems decrease if it is (2) assembly counterclockwise and pull cleaned at regular intervals. it out from its seating (A). Unplug the product and turn off the tap before attempting any cleaning procedures. -
Page 36: Cleaning The Hose Filter
Maintenance and cleaning 6. Place the coarse filter into the microfilter. Cleaning the impellers Make sure that it is properly seated. Turn Clean the impellers at least once a week in the coarse filter clockwise until a “click” order for the machine operates efficiently. sound is heard. -
Page 37: Upper Impeller
Maintenance and cleaning Upper impeller Check if the holes on the upper impeller (1) are clogged. If they are clogged, remove and clean the impeller. Turn its nut to left to remove the upper impeller (A, B). Make sure that the nut is tightened well when installing the upper impeller. -
Page 38: Troubleshooting
TROUBLESHOOTING Machine does not start. • Power cable is unplugged. >>> Check if the power cable is plugged in. • Fuse is blown. >>> Check the fuses in your house. • Water is cut. >>> Make sure that the water inlet tap is open. •... - Page 39 Troubleshooting • Selected programme is unsuitable. >>> Since rinsing temperature is low at programmes with short duration, drying performance will also be low. Select programmes with longer duration for a higher drying performance. • Surface quality of the kitchen utensils is deteriorated. >>> Desired washing performance can not be obtained at kitchen utensils with deteriorated surfaces and it is not suitable to use such utensils in terms of hygiene as well.
- Page 40 Troubleshooting of the machine completely in order to avoid odour build up in machine. You can also use commercially available odour removers or machine cleaners. Rust, discoloration or surface deterioration occurs on dishes • Salt leakage exists. >>> Salt may cause deterioration and oxidation on metal surfaces. Pay attention not to spill salt around the salt filling hole while adding salt.
- Page 41 Troubleshooting Decorations and ornaments on kitchen utensils are being erased. Decorated glasses and decorated luster porcelains are not suitable for washing in the dishwasher. Manufacturers of glassware and porcelain tableware items do not recommend washing such kitchen utensils in the dishwashers either. Dishes are scratched.
- Page 42 Troubleshooting Kitchen utensils are broken. • Dishes are not placed orderly in the machine. >>> Load the dishes as described in the user manual. • Baskets are overloaded. >>> Do not overload the baskets in excess of their capacity. Water remains in the dishwasher at the end of the programme. •...
- Page 43 • Nationwide service • Model code • Problem description • Visit www.cylinda.se • Serial number • Name and address • Call 0771-25 25 00 • Purchase date • Phonenumber Elektroskandia Sverige AB, Cylinda, 191 83 Sollentuna...
Need help?
Do you have a question about the DM 3005 and is the answer not in the manual?
Questions and answers